
Posted on June 16, 2003

Test fitting of all major components. I tried several layouts, but this one was the best option.
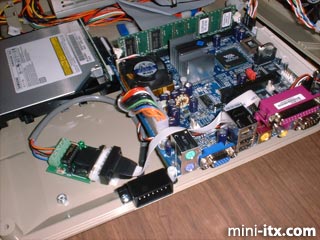
The addition of the internal Atari interface. I added a genuine Atari SIO socket, so that connections to actual Atari computers could use standard Atari cables.
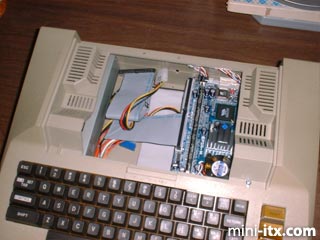
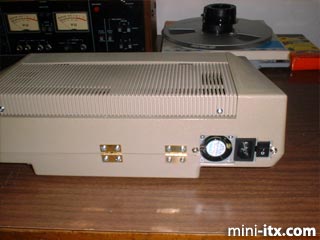
Test fitting the case halves back together. Most of the case's original support pillars had to be cut out to make room for the parts, so I was going to have to figure out how to re-seal the case with some level of structural integrity.
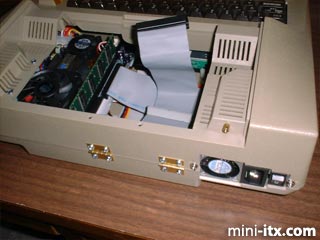
I decided to mount a set of hinges on the rear of the case, so that the case could open like a clamshell from the front. The front support pillars were intact. To my satisfaction, this combination made for a good solid closure. To improve airflow, I attached a slim CPU fan to the case, blowing straight down on the mobo, just to keep air moving inside the case. The case itself is riddled with ventilation grilles, so I reckoned that ventilation would be adequate. Done.
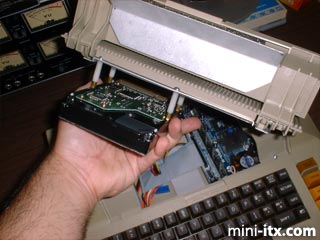
I still had to figure out how to get a hard drive into this thing. Notebook style or full-size? Well, I had a spare 15 GB full-size drive laying around, and it looked like there was JUST enough space between the power supply and mobo to fit. ...but how to mount it! I thought I might put it on stilts and fold the ribbon cables beneath, but eventually decided that it would be easier and more practical to hang it upside-down from the top case panel (the part that includes the hinged cartridge cover door. I used nylon standoffs to suspend the drive so that it is about an inch below the top cover, but also an inch above the case floor, where the ribbon cables are folded up.
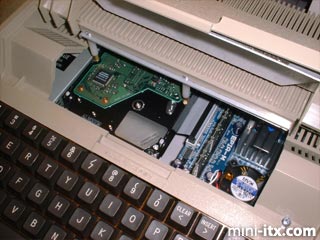
The test fitting was brilliant--everything nestled together like it was deisgned for it--like a jigsaw puzzle. All the while, maintaining good airflow around everything.
I found that those little brass standoffs that come with PC cases (the kind that motherboards screw on to) are perfect for fastening the top cover to the main case. I ran two screws through the back of the top cover and into the brass standoffs. Done.
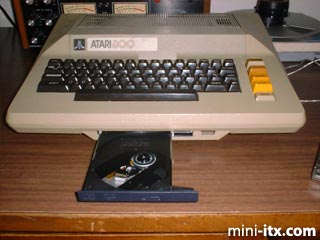
The Atari 800 Server is (mechanically) done. Here it is, all assembled, and showing the CDR tray ejected.
 |
 |
 |
Quick Links
Mailing Lists:
Mini-ITX Store
Projects:
Show Random
Accordion-ITX
Aircraft Carrier
Ambulator 1
AMD Case
Ammo Box
Ammo Tux
AmmoLAN
amPC
Animal SNES
Atari 800 ITX
Attache Server
Aunt Hagar's Mini-ITX
Bantam PC
BBC ITX B
Bender PC
Biscuit Tin PC
Blue Plate
BlueBox
BMW PC
Borg Appliance
Briefcase PC
Bubbacomp
C1541 Disk Drive
C64 @ 933MHz
CardboardCube
CAUV 2008
CBM ITX-64
Coelacanth-PC
Cool Cube
Deco Box
Devilcat
DOS Head Unit
Dreamcast PC
E.T.PC
Eden VAX
EdenStation IPX
Encyclomedia
Falcon-ITX
Florian
Frame
FS-RouterSwitch
G4 Cube PC
GasCan PC
Gingerbread
Gramaphone-ITX-HD
GTA-PC
Guitar PC
Guitar Workstation
Gumball PC
Hirschmann
HTPC
HTPC2
Humidor 64
Humidor CL
Humidor II
Humidor M
Humidor PC
Humidor V
I.C.E. Unit
i64XBOX
i-EPIA
iGrill
ITX Helmet
ITX TV
ITX-Laptop
Jeannie
Jukebox ITX
KiSA 444
K'nex ITX
Leela PC
Lego 0933 PC
Legobox
Log Cabin PC
Lunchbox PC
Mac-ITX
Manga Doll
Mantle Radio
Mediabox
Mega-ITX
Micro TV
Mini Falcon
Mini Mesh Box
Mini-Cluster
Mobile-BlackBox
Moo Cow Moo
Mr OMNI
NAS4Free
NESPC
OpenELEC
Osh Kosh
Pet ITX
Pictureframe PC
Playstation 2 PC
Playstation PC
Project NFF
PSU PC
Quiet Cubid
R2D2PC
Racing The Light
RadioSphere
Restomod TV
Robotica 2003
Rundfunker
SaturnPC
S-CUBE
SEGA-ITX
SpaceCase
SpacePanel
Spartan Bluebird
Spider Case
Supra-Server
Teddybear
Telefunken 2003
TERA-ITX
The Clock
ToAsTOr
Tortoise Beetle
Tux Server
Underwood No.5
Waffle Iron PC
Windows XP Box
Wraith SE/30
XBMC-ION