
Posted on May 11, 2005
Power Supply
To maintain the original outward appearance, the new power supply had to sit inside the case and connect up to the old switch on the back of the machine. The original switch and power lead were both part of a self contained supply module that sat on the left hand side of the B. I removed the old supply from the metal casing but unfortunately the new power supply didn't fit nicely into the space. To make it fit I removed the outer black plastic case and replaced the plastic power connector with flying leads. I then soldered a new, shorter output connector to the power supply so that I didn't have a really long piece of cable trailing around inside. To finish off, I soldered a modern day hard drive power connector onto the leads of the auxiliary output supply on the B. This would give me a power connection for an external DVD or floppy.
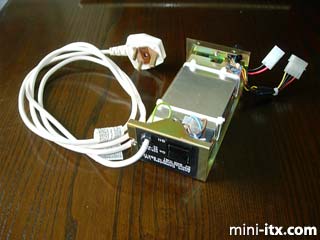
The power supply with auxiliary output.
Hard Disk
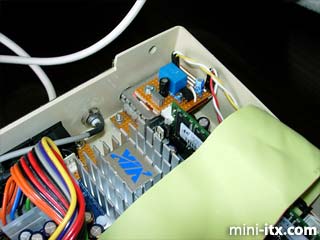
To mount the hard drive in place I made a little bracket to using a couple of expansion slot blanking plates from an old PC. Two mounting bolts for the hard drive were screwed through the plastic that separates the power supply from the main area. Another was then attached to the little bracket to support the weight. The supporting bracket was mounted so that it would sit between the Ethernet and LPT1 socket outputs on the motherboard. The cables that connect the external sockets to the motherboard were then made and put in place before the hard drive was fastened in.

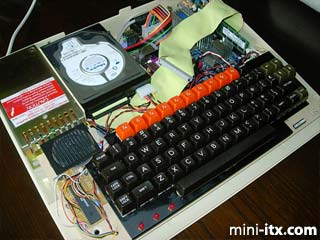
Case showing every thing in place
but the keyboard (looking very cramped)
Power-up Circuit
To get the machine to power up was more difficult than I'd imagined. The original B powered up as soon as you turned on the mains switch at the back. However, the ITX power supply only comes on when the power on pins are connected and disconnected on the motherboard. To overcome this I constructed a little 555 timer circuit that closes and opens a relay just after power is applied. When the relay is connected to the power on pins on the motherboard, it boots up nicely. This small piece of circuitry was mounted on top of the UHF connector box at the back of the case and was powered using the 5v supply from the on board PS2 connector.
Power on circuitry was secreted away at the back of the case.
Software
The keyboard was then fixed in place and a floppy and CD-ROM used to install Slackware 10 onto the empty hard drive. Of course the project wouldn't be finished without a BBC emulator to run the old games (I used BeebEm).
Completed project without lid.
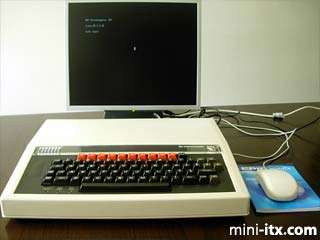
Completed project with Linux login customised
to look like the old Beeb login.
Future Improvements
I have still got quite a list of things I'd like to do to the machine. Initially I have to connect the 2 USB outputs to either the analogue input socket or the cassette port. The cassette port only has 7 pins so I'd have to connect the two grounds together. I'd also like to re-connect the IDE connectors underneath so that I can hook up a parallel printer, floppy disc and perhaps connect a DVD drive to the Tube port. I don't know whether it's possible but it would be good to get the old 5.25" drive connected and modify the emulator software to read in original BBC floppies. Lastly I need to have some sort of connector for using a normal PC keyboard (maybe the user port). The problem with the current one comes when operating in BIOS or when installing Linux for the first time when the BBC key map is not available. When the connector is pushed home it could perhaps disconnect the internal keyboard (via a relay) and connect the external one instead.
Until then I'll just enjoy playing all those old games, Exile, Repton…
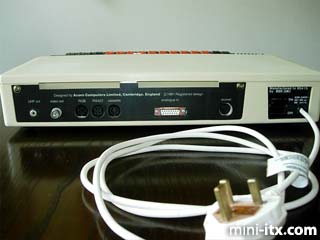
Rear view of the completed project showing external connectors.
(Exactly the same as the original).
 |
 |
 |
Quick Links
Mailing Lists:
Mini-ITX Store
Projects:
Show Random
Accordion-ITX
Aircraft Carrier
Ambulator 1
AMD Case
Ammo Box
Ammo Tux
AmmoLAN
amPC
Animal SNES
Atari 800 ITX
Attache Server
Aunt Hagar's Mini-ITX
Bantam PC
BBC ITX B
Bender PC
Biscuit Tin PC
Blue Plate
BlueBox
BMW PC
Borg Appliance
Briefcase PC
Bubbacomp
C1541 Disk Drive
C64 @ 933MHz
CardboardCube
CAUV 2008
CBM ITX-64
Coelacanth-PC
Cool Cube
Deco Box
Devilcat
DOS Head Unit
Dreamcast PC
E.T.PC
Eden VAX
EdenStation IPX
Encyclomedia
Falcon-ITX
Florian
Frame
FS-RouterSwitch
G4 Cube PC
GasCan PC
Gingerbread
Gramaphone-ITX-HD
GTA-PC
Guitar PC
Guitar Workstation
Gumball PC
Hirschmann
HTPC
HTPC2
Humidor 64
Humidor CL
Humidor II
Humidor M
Humidor PC
Humidor V
I.C.E. Unit
i64XBOX
i-EPIA
iGrill
ITX Helmet
ITX TV
ITX-Laptop
Jeannie
Jukebox ITX
KiSA 444
K'nex ITX
Leela PC
Lego 0933 PC
Legobox
Log Cabin PC
Lunchbox PC
Mac-ITX
Manga Doll
Mantle Radio
Mediabox
Mega-ITX
Micro TV
Mini Falcon
Mini Mesh Box
Mini-Cluster
Mobile-BlackBox
Moo Cow Moo
Mr OMNI
NAS4Free
NESPC
OpenELEC
Osh Kosh
Pet ITX
Pictureframe PC
Playstation 2 PC
Playstation PC
Project NFF
PSU PC
Quiet Cubid
R2D2PC
Racing The Light
RadioSphere
Restomod TV
Robotica 2003
Rundfunker
SaturnPC
S-CUBE
SEGA-ITX
SpaceCase
SpacePanel
Spartan Bluebird
Spider Case
Supra-Server
Teddybear
Telefunken 2003
TERA-ITX
The Clock
ToAsTOr
Tortoise Beetle
Tux Server
Underwood No.5
Waffle Iron PC
Windows XP Box
Wraith SE/30
XBMC-ION