
Guide: Choosing the right DC-DC PSU
September 05, 2017
By Aleksandar Kostovic
With the increasing popularity of DC-DC power supplies, we have made a guide to help choose the right one for your needs.
In the context of computer motherboards, a DC-DC converter accepts a single DC input and converts it into the very stable voltages that a motherboard needs to operate (generally 3.3V, 5V and 12V, though some boards only require a single regulated voltage). A DC-DC converter will always be paired with either an AC Adapter (aka 'Power Brick') or a DC voltage from another system such as a battery.
The advantages over a standard ATX power supply are twofold: reduced size, and reduced noise as DC-DC converters are almost always fanless. ATX power supplies have the upper hand when larger amounts of power are required. We probably won't be mining any bitcoins using DC-DC converters any time soon.
How many Watts do you actually need?
We will often total the maximum power consumption of each component to calculate the power draw of a system under load. Thermal Design Power or TDP - though strictly speaking a measure of heat dissipation - is a useful measure for processors and GPUs. Other components such as your SSD and even your RAM will consume more power. And don't forgot those powered USB devices.
Several online calculators exist, though they tend to calculate from the perspective of a traditional ATX power supply. Figures given will often be much higher than real world figures. For example we've measured an H270 Mini-ITX system fitted with i3-7100T processor, SSD and Slim Optical Drive at 23W idle and 32W under medium load.
Some online calculators:
The other thing to note it that no power supply can ever be 100% efficient (DC-DC units are typically within the 90-95% range), so there will always be some Watts wasted in the form of heat.
Our rules of thumb: Any motherboard with an embedded Celeron, Atom etc. will be fine with a 80W or 90W DC converter. If you have a 35W TDP processor a 90W DC converter will be sufficient. A 45W Xeon or 54W Pentium or above will need at least 120W.
Types of DC-DC Converter
We can roughly break down typical DC-DC converters used with Mini-ITX motherboards into Fixed Input, Wide Input and Vehicle.
Fixed Input DC-DC converters will only accept a regulated input. If the PSU is rated to accept 12V it will only accept 12V as the input.
Wide Input DC-DC converters are more adaptive and will take a range of voltages. For example 12-24V, 6-34V, 12-72V etc.
Vehicle DC-DC converters will work with a wide range of voltages and include protection against the rapid changes in voltage cranking an engine can cause. They will often include battery-specific functionality - powering off a computer if a battery has discharged below a certain voltage for instance.
Our rules of thumb: If you are using a battery, get a vehicle capable DC converter. If you have a regulated power source that isn't 12V, get a wide input DC-DC converter. If you are powering from a standard 12V AC Adapter, use a standard DC-DC converter.
PCB-type DC-DC converters
Traditional DC-DC converters are built on a printed circuit board with an input and an output side. This allows them to be easily mounted within a case or sometimes an external enclosure. Many Mini-ITX specific cases use this type of DC-DC converter in conjunction with an external AC Adapter. Power output can be as high as 400W for a custom-designed model, though typically much lower to suit the task in hand.
picoPSUs
picoPSUs are a category of DC-DC converter that connect directly to a motherboard's ATX power connector, removing the need for the ATX cable between the DC-DC converter and motherboard.

Fixed Input picoPSUs have yellow pins, the wide input have red and the vehicle capable picoPSUs have blue pins. Power output for official picoPSUs varies from 80W to 200W peak. For edge cases, higher wattage home-grown 'unofficial' picoPSUs also exist.
Our rules of thumb: A 20pin picoPSU will work just fine if your board has a 24pin ATX connector. The additional 4 pins aren't required except in very specific circumstances.
Choice of AC Adapter
If you are powering your Mini-ITX system from a wall socket you will require an AC Adapter. The AC Adapter converts the Alternating Current from your wall socket into a single Direct Current suitable for the DC-DC converter. You will need to pair your DC-DC converter with a suitable AC Adapter. No matter how much wattage your DC-DC converter can output, it will be limited by the power output of your AC adapter, e.g. a 200W DC-DC with an 80W AC Adapter will still only provide maximum 80W of power.
Our rules of thumb: A 80W AC Adapter pairs well with the picoPSU-90; A 150W pairs well with the picoPSU-150-XT. Your AC Adapter and DC-DC converter will need to have the same voltage, plug and socket type to connect. A re-purposed Laptop power brick will probably need a new plug and a wide input DC-DC converter to function.
Store links:
PSUs
PSU Selector
AMD's Project Quantum showcases their R9 Fury in an incredible custom Mini-ITX chassis
August 27, 2015

AMD demonstrated their Project Quantum at E3 this year as a showcase for their shiny new R9 Fury GPU.
Project Quantum is a proof of concept created for AMD by the Mixer Design Group in Texas. PCWorld snagged and dissected unit #5 of around 12 units, revealing its cooling and powering secrets in all their glory.
 |  |
The nerve centre of the Quantum is an ASRock Z97E-ITX/ac Mini-ITX motherboard powered by a (shocker!) Intel i7-4790K processor.
This is no off the shelf board though. All the heatsinks and several of the front panel ports have been removed.The ATX power connector has been flipped through 90 degrees and fitted with a powerful DC converter. A meaty AC Adapter sits outside the case entirely, providing the DC converter with plenty of power.
 |  |
The cleverest part is the cooling - a custom milled Aluminium waterblock sandwiches the board and the GPU, which all sit in the bottom half of the case together with the SSD. A pump and 180mm radiator and 3D printed reservoir sit in the top half the case, connected to the bottom by 3D printed hoses.
 |  |
The Redstone PC is the Ultimate Mini-ITX Minecraft Machine
August 13, 2015

Spencer Kern put his skills as a 3D video game artist at Microsoft to good use when he created the Redstone PC.
 |  |
Inspired by a Minecraft redstone block, the Redstone PC is an 8.5in cube constructed from extruded acrylic bars and laser-cut acrylic sheets solvent welded with acrylic cement. The outer shell is decorated by custom vinyl decals covered with a clear poly finish to dissuade them from lifting off the surface.
 |  |
At the heart of his build is a Gigabyte GA-H97N WIFI Mini-ITX motherboard with an EVGA GTX 750Ti graphics card. The board is mounted upside down with strategically placed fans pulling air down and out of the bottom and rear of the case.
 |  |
Spencer took several rolls of paracord and a crimp tool and braided all of his custom-made internal cables, and even designed an entirely new power button to match the rest of the case.
 |  |
This clearly wasn’t enough work for Spencer. He also:
- Fitted internal LED lighting using light strands
- Designed a two colour decal for the SSD
- Customised a mouse, headphones and an Xbox One controller
- Designed and had custom key caps printed for a mechanical keyboard
*For the benefit of our few readers from undiscovered Patagonian tribes still unfamiliar with Minecraft - Redstone is a building block used to make rudimentary and often highly complex circuits.
The "Restomod TV" reinvents an 80s CRT Television as a Mini-ITX powered OpenELEC Media Center
October 09, 2014
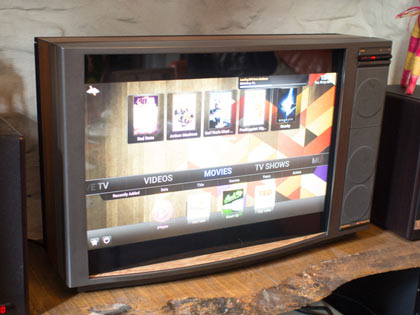
James Nethercoat picked up a Bang & Olufsen 7702 and replaced its guts with a Mini-ITX board running OpenELEC. The "Restomod TV" repurposes the original power button and remote receiver with modern equivalents.
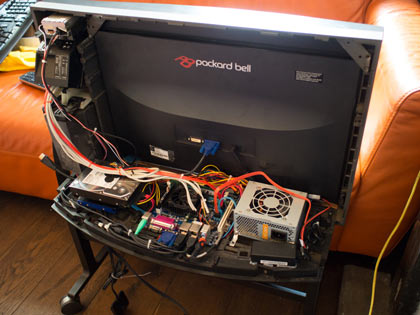
Read how James performed this feat here:
James Nethercoat's "Restomod TV"
Installing NAS4Free
April 09, 2013
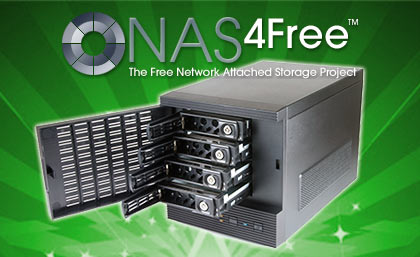
With so many of our memories and purchases existing only in the digital realm, having a reliable method of storing them is essential. We've written a guide to help you to install NAS4Free - free software which provides several methods of protecting your data by mirroring it across multiple disks.
NAS4Free is very scalable product supporting both UFS and ZFS, meaning it is a great choice for Mini-ITX systems - which can vary from low power consumption Atoms up to powerful Core i7 and Xeon based systems.
Building an XBMC 12 Home Theatre PC with a Mini-ITX motherboard
February 28, 2013
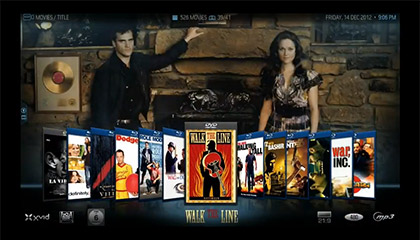
We are long time fans of XBMC here at Mini-ITX.com. OpenELEC is a distribution of XBMC (currently at version 12) with a streamlined installation and update process, making it even easier to utilise the graphics acceleration of ION and Fusion based Mini-ITX systems to make a very slick Home Theatre PC.
Here's how to do it.
Building an XBMC 12 Home Theatre PC with a Mini-ITX motherboard
XBMC Guide updated to version 10.0
January 25, 2011

We have updated our guide to building an ION-powered HTPC using XBMC to version 10.0. As an added bonus we have included a new module with instructions to enable 24fps playback for you lucky people with 1080p/24fps tellies.
Building an ION powered HTPC with XBMC
Building a Green PC
August 06, 2010

Christopher Barnatt sent us this excellent video demonstrating how to build a silent and fanless PC that consumes under 20W. Click to see just how easy it is. Then check out his website ExplainingComputers.com for more great guides.
Building an ION powered HTPC with XBMC
February 15, 2010
We are long time fans of XBMC here at Mini-ITX.com. Version 9.11 makes it extremely easy to utilise the graphics acceleration of ION based Mini-ITX systems to make a very slick Home Theatre PC.
Here's how to do it.
Building an ION powered HTPC with XBMC
The "Cambridge Autonomous Underwater Vehicle 2008"
October 10, 2008
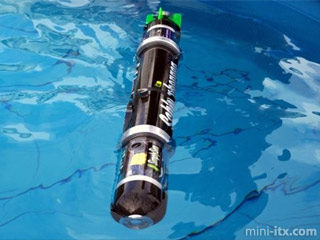
The clever chaps at Cambridge University built an Autonomous Underwater Vehicle to compete in the Student Autonomous Underwater Challenge - Europe (SAUC-E). It was one of the smallest robots at the competition weighing in at just under 7kg, in part due to the tiny Pico-ITX motherboard used to power the autonomy software which guides it...
The SAUC-E competition is a Europe wide competition aimed at University level students. The teams design and build their own AUVs that must attempt an underwater assault course that may vary from year to year but can consist of gates, drop targets and surface zones that may have to be detected by visual or acoustic means.
"Florian", the DVD burning robot
September 12, 2008
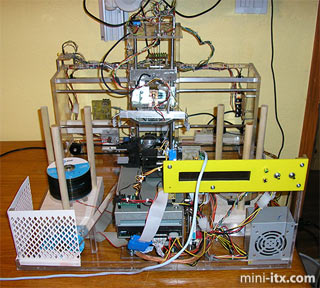
Aaron Shephards built himself a DVD burning robot to automate his backups. "Florian" picks up a DVD from a stack and places them in the DVD burner to be written. It then flips them over to be labelled, and even discards any bad disks into a naughty pile. All using self-built circuit boards, a few servos and servo controllers, plenty of LEDs, his own software written in Perl and components from local surplus shops. There's an EPIA M10000 motherboard in there too. Somewhere.
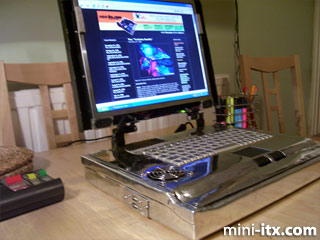
The "i-EPIA"
September 05, 2008
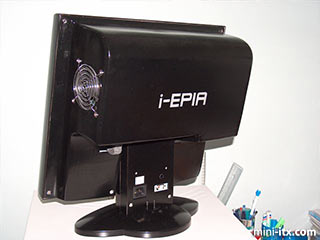
Tim Schellekens has built an inexpensive Monitor PC from Mini-ITX components and a 15in LCD Monitor found on eBay, loosely inspired by his brother in law's iMac.
This one's currently running Ubuntu.
The "GTA-PC"
May 22, 2008
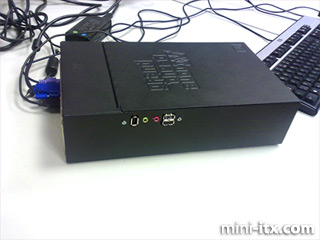
Mark Harris bought the GTA IV special edition, then decided to play with the packaging instead.
The safety deposit box was the perfect size to repurpose an old EPIA Mini-ITX motherboard and case and even came with a convenient carrying handle. This one's currently running Slax booting from a 1GB Compact Flash card and runs near silently with just a couple of fans to keep things running cool.
The "Digg" Case
April 14, 2007

Alex 'Qtip42' Wiley's latest creation isn't a Mini-ITX based project, but it does deserve an honourable mention and a link here. Why? Because Alex is a member of an elite group of people - he contributed not one but two projects to the site all the way back in 2003 - the ironically Mini-ITX (and not AMD) powered "AMD Case" and the rather marvellous "Spider Case". Alex now runs a case modding company based in Oregon, USA called Computer Choppers. Nice one Alex.
"Digg" Case Project Log and Gallery at Computer Choppers
The "ITX-Laptop"
January 19, 2007
Torquil Harkness disappeared into his shed armed with a bundle of components, an angle grinder and mig welder and emerged several days later with his very own fully upgradable 2.0GHz Mini-ITX powered aluminium laptop. When he told the store what he was going to do we didn't quite believe him. We do now Torquil.
The next version will have SATA RAID.
Torquil Harkness' "ITX-Laptop"
Where's the rest?
The rest of the many Mini-ITX projects archived on this site can be found linked from our news archive, or using the alphabetical list on the right of the page. Or just have a random one.
 |
 |
 |
Quick Links
Mailing Lists:
Mini-ITX Store
Projects:
Show Random
Accordion-ITX
Aircraft Carrier
Ambulator 1
AMD Case
Ammo Box
Ammo Tux
AmmoLAN
amPC
Animal SNES
Atari 800 ITX
Attache Server
Aunt Hagar's Mini-ITX
Bantam PC
BBC ITX B
Bender PC
Biscuit Tin PC
Blue Plate
BlueBox
BMW PC
Borg Appliance
Briefcase PC
Bubbacomp
C1541 Disk Drive
C64 @ 933MHz
CardboardCube
CAUV 2008
CBM ITX-64
Coelacanth-PC
Cool Cube
Deco Box
Devilcat
DOS Head Unit
Dreamcast PC
E.T.PC
Eden VAX
EdenStation IPX
Encyclomedia
Falcon-ITX
Florian
Frame
FS-RouterSwitch
G4 Cube PC
GasCan PC
Gingerbread
Gramaphone-ITX-HD
GTA-PC
Guitar PC
Guitar Workstation
Gumball PC
Hirschmann
HTPC
HTPC2
Humidor 64
Humidor CL
Humidor II
Humidor M
Humidor PC
Humidor V
I.C.E. Unit
i64XBOX
i-EPIA
iGrill
ITX Helmet
ITX TV
ITX-Laptop
Jeannie
Jukebox ITX
KiSA 444
K'nex ITX
Leela PC
Lego 0933 PC
Legobox
Log Cabin PC
Lunchbox PC
Mac-ITX
Manga Doll
Mantle Radio
Mediabox
Mega-ITX
Micro TV
Mini Falcon
Mini Mesh Box
Mini-Cluster
Mobile-BlackBox
Moo Cow Moo
Mr OMNI
NAS4Free
NESPC
OpenELEC
Osh Kosh
Pet ITX
Pictureframe PC
Playstation 2 PC
Playstation PC
Project NFF
PSU PC
Quiet Cubid
R2D2PC
Racing The Light
RadioSphere
Restomod TV
Robotica 2003
Rundfunker
SaturnPC
S-CUBE
SEGA-ITX
SpaceCase
SpacePanel
Spartan Bluebird
Spider Case
Supra-Server
Teddybear
Telefunken 2003
TERA-ITX
The Clock
ToAsTOr
Tortoise Beetle
Tux Server
Underwood No.5
Waffle Iron PC
Windows XP Box
Wraith SE/30
XBMC-ION