
Posted on July 14, 2004
|
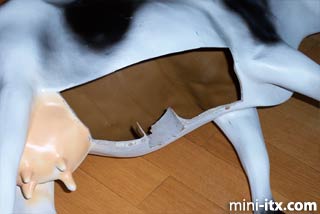
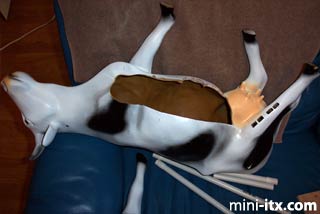
After a few minutes with the Dremel I realized I had to cut straight lines. I could not cut curves with the cut off wheel of the Dremel. One thing I had not planned was the fine dust that was produced by the cut off wheel as I cut the plastic. I had to wash it in the bathtub after each major set of cuts that I made, sorry no pictures of me giving a cow a bath allowed. 4 washes and 3 hours later I had the hole cut and smoothed the edges with a file.
|
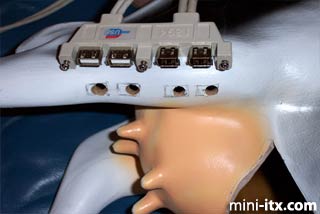
After I opened up the belly of the cow I cut out the holes for the USB ports and 1394 FireWire ports. I cut the basic shape of the holes out with the Dremel and a cutting bit.
|
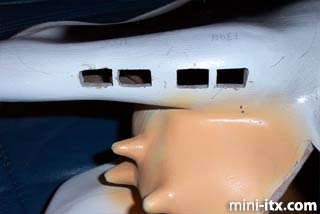
Then I used a file to square them up. I keep testing the plugs till I got them to the right size. This also required 2 trips to the bathtub and apparently took several hours as I lost track of time. Then next step was to make a hole for the on off switch and the power connection. With that done it had to have another bath and then the next step was to decide how to mount the board in the cow. It was 2100 by the time I looked up. I had not realized how late it was. The next big thing is to mount the board in the cow and cut the slot in the top of the cow for the CD R/RW DVD combo drive. This will have to wait till the morning.
|
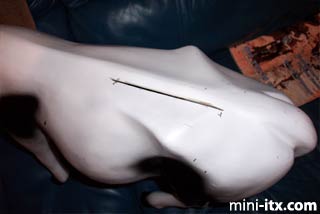
The first thing I did was to line up the drive where I wanted it then I made the best guess possible as to where it was on the outside. I used the Dremel to cut the slot on the top of the cow creating more of the fine dust. The house now has a layer of this dust all over the place. This is a major down side since when I am done it will require a massive dusting with a vacuum cleaner. The slot was too narrow when I was done so I had to use a fiber reinforced cut off wheel because they are thicker than a regular cut off wheel. This made the slot wide enough to let a CD slide in and out with binding. After I cut the slot I used 240 grit sand paper to smooth out the slot.
I put some hooks on the piece I cut out of the belly so that I could put it back in and have it stay in place without falling off the bottom.
|
The next problem I had is that one of the legs broke OFF. I will glue it back on when I have the rest of the components inside. It opened up the bell more making it easier to get inside to work so it was good in a way.
|
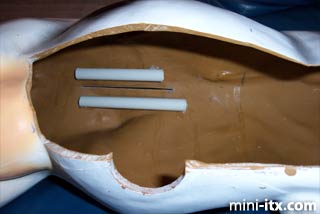
I glued 2 pieces of PVC pipe on the inside to hold the CD drive in alignment front to back. Monday after it dries I will glue 2 end pieces to hold it in place left and right. Then I will need to put something in to hold it up at the top to the cow when I turn it over to stand it up. I think 2 pieces of PVC pipe cut to length and wedged between the board with the drive mounted on it and the belly of the cow will work. By doing this I would be able to remove the drive when I need or want to. I am thinking I would want to take it apart when I ship it. Will let you know more Monday after I try it.
|
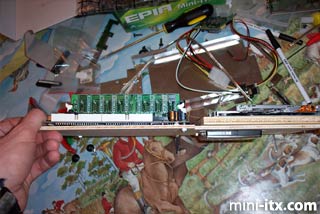
Well the idea I had about mounting the drive was good so I tried to put a pieces of ply wood on the back of the drives and mount the mother board to that. That part worked but the PVC pipe came off when I tried to mount the whole thing the same way. It was too heavy for the glue. I glued another piece of PVC pipe to hold the drive in place. This worked OK.
 |
 |
 |
Quick Links
Mailing Lists:
Mini-ITX Store
Projects:
Show Random
Accordion-ITX
Aircraft Carrier
Ambulator 1
AMD Case
Ammo Box
Ammo Tux
AmmoLAN
amPC
Animal SNES
Atari 800 ITX
Attache Server
Aunt Hagar's Mini-ITX
Bantam PC
BBC ITX B
Bender PC
Biscuit Tin PC
Blue Plate
BlueBox
BMW PC
Borg Appliance
Briefcase PC
Bubbacomp
C1541 Disk Drive
C64 @ 933MHz
CardboardCube
CAUV 2008
CBM ITX-64
Coelacanth-PC
Cool Cube
Deco Box
Devilcat
DOS Head Unit
Dreamcast PC
E.T.PC
Eden VAX
EdenStation IPX
Encyclomedia
Falcon-ITX
Florian
Frame
FS-RouterSwitch
G4 Cube PC
GasCan PC
Gingerbread
Gramaphone-ITX-HD
GTA-PC
Guitar PC
Guitar Workstation
Gumball PC
Hirschmann
HTPC
HTPC2
Humidor 64
Humidor CL
Humidor II
Humidor M
Humidor PC
Humidor V
I.C.E. Unit
i64XBOX
i-EPIA
iGrill
ITX Helmet
ITX TV
ITX-Laptop
Jeannie
Jukebox ITX
KiSA 444
K'nex ITX
Leela PC
Lego 0933 PC
Legobox
Log Cabin PC
Lunchbox PC
Mac-ITX
Manga Doll
Mantle Radio
Mediabox
Mega-ITX
Micro TV
Mini Falcon
Mini Mesh Box
Mini-Cluster
Mobile-BlackBox
Moo Cow Moo
Mr OMNI
NAS4Free
NESPC
OpenELEC
Osh Kosh
Pet ITX
Pictureframe PC
Playstation 2 PC
Playstation PC
Project NFF
PSU PC
Quiet Cubid
R2D2PC
Racing The Light
RadioSphere
Restomod TV
Robotica 2003
Rundfunker
SaturnPC
S-CUBE
SEGA-ITX
SpaceCase
SpacePanel
Spartan Bluebird
Spider Case
Supra-Server
Teddybear
Telefunken 2003
TERA-ITX
The Clock
ToAsTOr
Tortoise Beetle
Tux Server
Underwood No.5
Waffle Iron PC
Windows XP Box
Wraith SE/30
XBMC-ION