
Posted on April 9, 2013
Configuration
1a. Creating a UFS RAID1 mirror
1b. Creating a ZFS RAIDz1 or RAIDz2 array
2. Sharing your data with Windows users
3. Enable S.M.A.R.T.
4. Enable Email Notifications
Let's see if we have any disks attached to our system. Choose the Disks menu at the top of the screen, then select Management.
Your screen should now show your attached disks. If you don't see anything you may need to use the "Import disks" option.
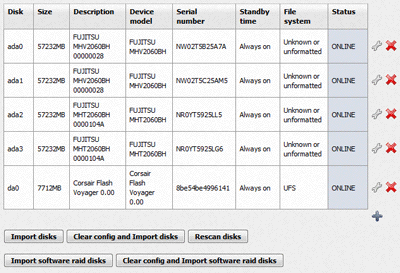
Once you see your disks, you need to decide how you want to configure them. We will outline 2 scenarios.
1a) I have a small system with 2 drives. I want to set up a UFS RAID1 mirror.
1b) I have a system with enough memory and CPU and 2 or more disks. I want to set up a ZFS RAIDz1 or RAIDz2 array.
1a. Creating a UFS RAID1 mirror
Further reading can be found in the NAS4Free documentation here.
1. Format the disks
From the Disks menu, choose Format.
Select the first disk in your mirror. Choose the File System type "Software RAID".
Now click Format disk. You should see some text that shows technical detail.
Repeat the above tasks with the second disk.
2. Add the disks to the virtual RAID device
From the Disks menu, choose Software RAID.
Now choose RAID 1 from the tabs at the top of the page.
Click on the small "+" icon on the right of the screen to add a Software RAID device.
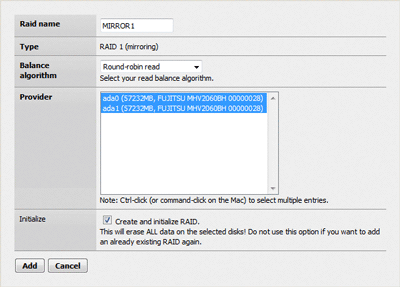
Choose a name for your RAID1 mirror. Leave the Balance algorithm as "Round-robin read" unless you have reason to choose an alternative.
Hold down the CTRL button on your keyboard and select both disks with the mouse.
Click "Create and initialize RAID.". Click Add.
On the next page, choose "Apply changes".
3. Format the virtual RAID device
Now it's time to put a filesystem on your new "virtual" disk device. Return to the format menu by choosing "Disks", then "Format".

In the drop-down you will see a new device. This will be the name you chose in the previous section.
Select this device and choose "UFS (GPT and Soft Updates)" as the File system type.
Choose a name (we normally use the same name as the virtual disk device to save any confusion).
Now choose Format disk.
4. Mount the virtual RAID device
From the Disks menu, choose Mount Point.
Click on the small "+" icon on the right of the screen to add a mount point for your new filesystem.
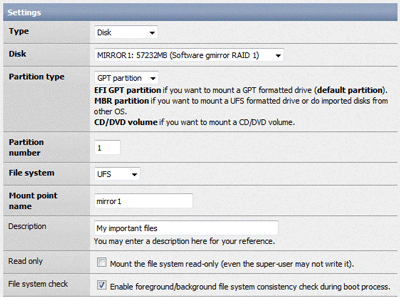
The Type should be Disk.
The Disk should be your new virtual RAID device (MIRROR1).
The File system is UFS.
Choose a Mount point name, it is custom to use lower-case for this and we suggest re-using the name of the mirror.
Leave the Owner as "root". Click Add.
You are now ready to "Share" this filesystem with your client devices (Windows PC etc).
1b. Creating a ZFS RAIDz1 or RAIDz2 array
Further reading can be found in the NAS4Free documentation here.
1. Format the disks
From the Disks menu, choose Format.
Select the first disk in your mirror, Choose the File System type "ZFS storage pool device".
Now click Format disk. You should see some text that shows technical detail.
Now repeat the above tasks with the remaining disks (but do not format your USB device!).
2. Add the disks to the virtual RAID device
From the Disks menu, choose ZFS.
Now choose Virtual device from the tabs at the top of the page.
Now click on the small "+" icon on the right of the screen to add a Software RAID device.
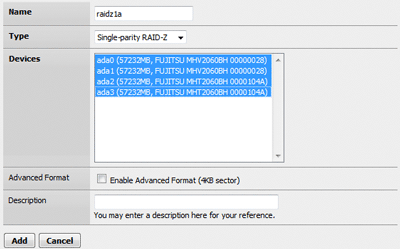
Give the device a name that describes the type of storage (we have chosen raidz1a).
Now choose a Type. We suggest Single-parity RAID-Z. This will enable you to lose any one disk without losing data, although this will reduce your overall capacity by 1 drive. If you want to be able to lose 2 drives without losing data, choose Double-Parity RAID-Z. This will reduce your overall capacity by 2 drives.
Hold down the CTRL button on your keyboard and select both disks with the mouse.
Now click Add. Then Apply Changes.
Now we need to create a ZFS "Pool".
Choose the Pool tab from the ZFS configuration.
Click on the small "+" icon on the right of the screen to add a ZFS Pool.
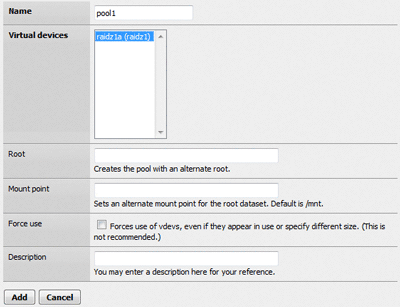
Select the Virtual device we created in the previous section.
Give the pool a name. We have rather cleverly chosen "pool1".
Leave the mount point blank.
Now click Add. Then Apply changes.
All going well, you should see "The changes have been applied successfully".
For greater flexibility we will now create a ZFS dataset. Choose Datasets from the ZFS configuration.
Click on the small "+" icon on the right of the screen to add a ZFS Dataset.
For the name, choose what you will be using this dataset for, for instance "media".
As "media" files are not generally compressible, we can leave compression off.
Now click Add. Then Apply Changes.
You are now ready to "Share" this filesystem with your client devices (Windows PC etc).
2. Sharing your data with Windows users
Once you have created either a ZFS dataset or UFS filesystem you are ready to share your files on the network.
Do you want username and password access to your data? If so you will need to perform this additional step. If you want anonymous access skip to "Adding a network share".
Adding user accounts
From the Access menu, choose Users and Groups.
Now click on the small "+" icon on the right of the screen to add a user.
Choose your username and password. You will also need to add a Full Name for each user - this can be whatever you like.
You should not need to change the other options.
Now click Add. Then Apply Changes.
Add any further users you require.
Adding a network share
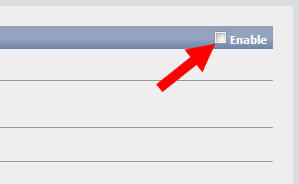
From the Services menu, choose CIFS/SMB.
The first thing you need to do is enable the service, this is done by clicking Enable on the far right of the screen and then choosing Save and Restart
If you are accessing files anonymously, choose Authentication method of Anonymous and change Max Protocol to NT1.
If you created user accounts, leave the Authentication method as Local User and the Max Protocol as SMB2.
Click Save and Restart.
Click on the Shares tab.
Click on the small "+" icon on the right of the screen to add a share.
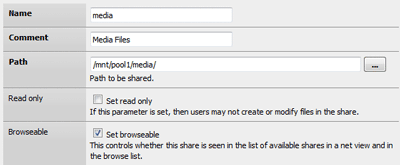
Choose a Name for the share that makes sense. This will be the name you use to access the data over the network.
For a Comment, describe the types of files that you will be storing.
For Path, browse to the location where you dataset is mounted.
Now click Add. Then Apply Changes.
You should now be able to access the filesystem over the network.
Testing your NAS
From your Windows PC, press the Windows key and E. Now type \\nas4free into the address bar.
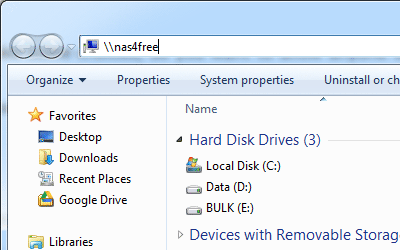
If you enabled usernames and password access, you may be asked for a username and password.
You should now be able to see the files you shared on your NAS.
You can optionally map this share to a drive letter by right-clicking on the share and choosing "Map network drive..."
3. Enable S.M.A.R.T
To enable S.M.A.R.T. monitoring on each disk, choose the spanner / wrench icon in the Disk Management area and then choose "Activate S.M.A.R.T.monitoring for this device".
Once you have enabled S.M.A.R.T. on each disk, choose Apply changes.
4. E-Mail Notifications
Hopefully your NAS will sit happily in the corner of your office or living room for years to come and your disks won't fail. If one of your disks does fail you would want to know about it. Why not configure NAS4Free to automatically e-mail you in the event of a failure or other problem?
Go to the System menu and choose Advanced. Now choose the Email tab.
Insert details appropriate to your ISP, for example
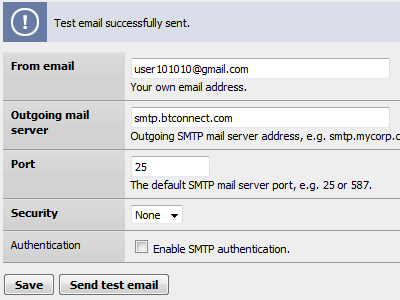
Note: The "From email" address is both the sender and the recipient of the alerts.
You can also set NAS4Free to e-mail you reports of your usage and any problems. To do this go to the Status menu and choose Email Report.
You will need to enable the service. This is done by clicking Enable on the far right of the screen and then choosing Save and Restart
In To email, choose the destination e-mail address to receive the report.
Now choose which reports you wish to receive.
Now choose the frequency and schedule of the reports, this is in a CRON-like format.
You might just want to enable the S.M.A.R.T. report here.
YOU DID IT, YOU NOW HAVE A NAS4FREE STORAGE APPLIANCE!
 |
 |
 |
Quick Links
Mailing Lists:
Mini-ITX Store
Projects:
Show Random
Accordion-ITX
Aircraft Carrier
Ambulator 1
AMD Case
Ammo Box
Ammo Tux
AmmoLAN
amPC
Animal SNES
Atari 800 ITX
Attache Server
Aunt Hagar's Mini-ITX
Bantam PC
BBC ITX B
Bender PC
Biscuit Tin PC
Blue Plate
BlueBox
BMW PC
Borg Appliance
Briefcase PC
Bubbacomp
C1541 Disk Drive
C64 @ 933MHz
CardboardCube
CAUV 2008
CBM ITX-64
Coelacanth-PC
Cool Cube
Deco Box
Devilcat
DOS Head Unit
Dreamcast PC
E.T.PC
Eden VAX
EdenStation IPX
Encyclomedia
Falcon-ITX
Florian
Frame
FS-RouterSwitch
G4 Cube PC
GasCan PC
Gingerbread
Gramaphone-ITX-HD
GTA-PC
Guitar PC
Guitar Workstation
Gumball PC
Hirschmann
HTPC
HTPC2
Humidor 64
Humidor CL
Humidor II
Humidor M
Humidor PC
Humidor V
I.C.E. Unit
i64XBOX
i-EPIA
iGrill
ITX Helmet
ITX TV
ITX-Laptop
Jeannie
Jukebox ITX
KiSA 444
K'nex ITX
Leela PC
Lego 0933 PC
Legobox
Log Cabin PC
Lunchbox PC
Mac-ITX
Manga Doll
Mantle Radio
Mediabox
Mega-ITX
Micro TV
Mini Falcon
Mini Mesh Box
Mini-Cluster
Mobile-BlackBox
Moo Cow Moo
Mr OMNI
NAS4Free
NESPC
OpenELEC
Osh Kosh
Pet ITX
Pictureframe PC
Playstation 2 PC
Playstation PC
Project NFF
PSU PC
Quiet Cubid
R2D2PC
Racing The Light
RadioSphere
Restomod TV
Robotica 2003
Rundfunker
SaturnPC
S-CUBE
SEGA-ITX
SpaceCase
SpacePanel
Spartan Bluebird
Spider Case
Supra-Server
Teddybear
Telefunken 2003
TERA-ITX
The Clock
ToAsTOr
Tortoise Beetle
Tux Server
Underwood No.5
Waffle Iron PC
Windows XP Box
Wraith SE/30
XBMC-ION