
Posted on July 22, 2014
Which download should I use?
UPDATE! OpenELEC now include all their drivers in their Generic build. If you have a modern motherboard, try this build first. We'll meet you lower down the page.
If your board is slightly older, then a legacy build may be more suitable.
The OpenELEC Legacy Build download page has 3 different builds relevant to current Mini-ITX motherboards. Find your motherboard in this list to determine which build to choose. We'll meet you lower down the page.
Choose ION Builds if you have an NVidia-based board such as:
- Asus AT3IONT-I & Deluxe (32-bit only)
- Asus AT3N7A-I (32-bit only)
- Asus AT5IONT-I & Deluxe
- Jetway JNC98-525
- Zotac D2700-ITX/D2550-ITX
- Zotac H67-ITX-D-E
- Zotac ION-ITX-A/B/C/D/F/G/K/S/T/U (32-bit only)
- Zotac ION-ITX-P CULV
- Zotac Z68-ITX-B-E Supreme
Choose Fusion Builds if you have an AMD-based board such as:
- ASRock E350M1
- Asus C60M1-I
- Asus E35M1-I Deluxe
- Asus E45M1-I Deluxe
- Gigabyte GA-E350N-USB3 & GA-E350N
- Jetway JNF81-T56N
- Sapphire Pure Fusion Mini E350
- Zotac Fusion E350-A-E
- Zotac ZBOX AD10, AD11, AD12, AD13
Choose Intel Builds
(1) If you have an Intel HDXXXX video based board such as:
- Gigabyte GA-C847N
- Motherboards using onboard video out with Clarkdale and Arrandale Core i3/i5/i7 processors and H55/H57 chipset such as:
- Gigabyte GA-H55N-USB3
- Zotac H55-ITX
- Intel DH57JG
- Motherboards using onboard video out with Sandy Bridge Processors such as:
- Asus P8H61-I
- Gigabyte GA-H61N-D2V
- Gigabyte GA-H61N-USB3
- Intel DH61AG
- Intel DH67CFB3
- Intel DQ67EPB3
- Gigabyte GA-H61N-D2V
- Jetway JNF9F-H61
- Zotac H61-ITX
- Zotac Z68-ITX-A-E
- Motherboards using onboard video out with Ivy Bridge Processors such as:
- Asus P8H77-I
- Asus P8Z77-I
- Intel DQ77KB
- Intel DH77DF
- Gigabyte GA-H77N-WiFi
- Gigabyte GA-Z77N-WiFi
- Jetway JNF9E-Q77
- Zotac Z77-ITX
- Future Motherboards using onboard video with Intel Haswell Processors
(2) If you have an Intel GMA-xxx video based board with Socket 775 processor such as:
- Intel DG45FC
(3) If you have an Intel GMA-xxx video based board with an Atom processor then playback may be limited to standard definition. Boards in this list include:
- Intel D510MO/D410PT
- Intel D525MW/D425KT
- Intel D945GCLF/2
- Jetway JNC96-525
- Jetway JNC9MGL-525
Unsupported boards
(1) Older boards based on VIA architecture
(2) Boards with PowerVR-based GMA 500/600/3600/3650 chipsets:
- Intel D2500CC
- Intel D2700MUD
- Intel D2500HN
- Intel D2700DC
- Intel D2550MUD2
- Jetway JNF9C-2600
- Jetway JNC9NDL-2550
- Jetway JNF9D-2550
- Jetway JNC9KDL-2550
- Jetway JNC9KDL-2700
- Jetway JNF9I-2550
- Jetway JBC362 Systems
- Jetway JBC372 Systems
So which version do I download?
Try this first! Choose the Stable Generic version, currently Generic x86_64 Version:4.0.7.
If the lastest Stable Generic build didn't work, then your board may require a Legacy version. Consult the table above then meet us down here. We'll be waiting.
For Legacy ION, choose the Stable version, currently OpenELEC Stable - ION i386 Version:3.2.4. If your processor supports 64bit, choose ION x64_64.
For Legacy Fusion, choose the Stable version, currently OpenELEC Stable - Fusion x86_64 Version:3.2.4
For Legacy Intel, choose the Stable version, currently OpenELEC Stable - Intel i386 Version:3.2.4. If your processor supports 64bit, choose Intel x64_64.
Next, download the appropriate file to the disk on your Windows machine. The file will end in ".tar". Use a utility like WinRar to extract.
Once the files have extracted, a new Folder should have been created with the name beginning with "OpenELEC-".
Create your Bootable Memory Stick
Now insert your USB Memory Stick into an available USB port. Note the drive letter of the Stick for later.
WARNING: THE CONTENTS OF THIS MEMORY STICK WILL BE ERASED
Return to the OpenELEC files you just extracted: and double-click the file called "create_livestick.exe", if you are presented with a User Account Control dialog, click Yes
Once the installer is loaded, accept the License Agreement (after reading it and agreeing with it, naturally).
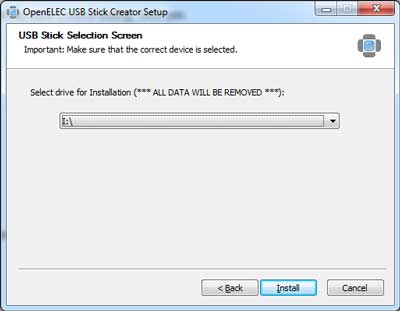
Ensure that the drive letter is the same as we noted earlier - do not wipe the wrong disk! Bad things will happen!
Your USB Stick will now be created. Once the installer is complete, right-click your USB stick and choose "Eject". Now remove the USB Stick from your PC. You are now ready to install OpenELEC.
CONGRATULATIONS - YOU BUILT YOUR INSTALLATION STICK
Installation -->
 |
 |
 |
Quick Links
Mailing Lists:
Mini-ITX Store
Projects:
Show Random
Accordion-ITX
Aircraft Carrier
Ambulator 1
AMD Case
Ammo Box
Ammo Tux
AmmoLAN
amPC
Animal SNES
Atari 800 ITX
Attache Server
Aunt Hagar's Mini-ITX
Bantam PC
BBC ITX B
Bender PC
Biscuit Tin PC
Blue Plate
BlueBox
BMW PC
Borg Appliance
Briefcase PC
Bubbacomp
C1541 Disk Drive
C64 @ 933MHz
CardboardCube
CAUV 2008
CBM ITX-64
Coelacanth-PC
Cool Cube
Deco Box
Devilcat
DOS Head Unit
Dreamcast PC
E.T.PC
Eden VAX
EdenStation IPX
Encyclomedia
Falcon-ITX
Florian
Frame
FS-RouterSwitch
G4 Cube PC
GasCan PC
Gingerbread
Gramaphone-ITX-HD
GTA-PC
Guitar PC
Guitar Workstation
Gumball PC
Hirschmann
HTPC
HTPC2
Humidor 64
Humidor CL
Humidor II
Humidor M
Humidor PC
Humidor V
I.C.E. Unit
i64XBOX
i-EPIA
iGrill
ITX Helmet
ITX TV
ITX-Laptop
Jeannie
Jukebox ITX
KiSA 444
K'nex ITX
Leela PC
Lego 0933 PC
Legobox
Log Cabin PC
Lunchbox PC
Mac-ITX
Manga Doll
Mantle Radio
Mediabox
Mega-ITX
Micro TV
Mini Falcon
Mini Mesh Box
Mini-Cluster
Mobile-BlackBox
Moo Cow Moo
Mr OMNI
NAS4Free
NESPC
OpenELEC
Osh Kosh
Pet ITX
Pictureframe PC
Playstation 2 PC
Playstation PC
Project NFF
PSU PC
Quiet Cubid
R2D2PC
Racing The Light
RadioSphere
Restomod TV
Robotica 2003
Rundfunker
SaturnPC
S-CUBE
SEGA-ITX
SpaceCase
SpacePanel
Spartan Bluebird
Spider Case
Supra-Server
Teddybear
Telefunken 2003
TERA-ITX
The Clock
ToAsTOr
Tortoise Beetle
Tux Server
Underwood No.5
Waffle Iron PC
Windows XP Box
Wraith SE/30
XBMC-ION