Enter the Mini-ITX.com online store

Projects

September 05, 2017
Choosing the right DC-DC PSU

August 27, 2015
AMD's Project Quantum

August 13, 2015
The Redstone PC is the ultimate Mini-ITX Minecraft Machine

October 09, 2014
The "Restomod TV"

April 09, 2013
Installing NAS4Free

February 28, 2013
Building an XBMC 12 Home Theatre PC

January 25, 2011
XBMC Guide updated to version 10.0

August 06, 2010
Building a Green PC

February 15, 2010
Building an ION powered HTPC with XBMC

October 10, 2008
The "Cambridge Autonomous Underwater Vehicle 2008"

Mini-ITX Online Store

September 12, 2008
"Florian", the DVD burning robot

September 05, 2008
The "i-EPIA"

May 22, 2008
The "GTA-PC"

April 14, 2007
The "Digg" Case

January 19, 2007
The "ITX-Laptop"

December 07, 2006
The "Tortoise Beetle"

October 02, 2006
The "DOS Head Unit"

August 31, 2006
The "Janus Project"

August 05, 2006
The "Leela PC"

June 26, 2006
Nano-ITX in a Football

May 17, 2006
The "EPIA Alloy Mod"

April 11, 2006
Neatorama's Collection of Case Mods

February 18, 2006
The "Rundfunker"

October 24, 2005
The "ITX TV"

October 06, 2005
The K'nex-ITX

August 05, 2005
The "Waffle Iron PC"

July 21, 2005
The "Supra-Server"

July 18, 2005
The "Mega-ITX"

July 07, 2005
The "Encyclomedia"

May 25, 2005
The "Accordion ITX"

Mini-ITX Online Store

May 16, 2005
The "FileServerRouterSwitch"

May 15, 2005
The "Mini Falcon"

May 13, 2005
The "Bender PC"

May 11, 2005
The "BBC ITX B"

May 10, 2005
The "Frame"

April 20, 2005
The "Jeannie"

March 09, 2005
The "Cool Cube"

January 30, 2005
First Nano-ITX Project?

January 17, 2005
The "iGrill"

January 15, 2005
The "Gumball PC"

December 15, 2004
The "Deco Box"

December 03, 2004
The "TERA-ITX"

October 06, 2004
The "Coealacanth-PC"

September 17, 2004
The "Gramaphone-ITX-HD"

August 26, 2004
The "C1541 Disk Drive ITX"

August 25, 2004
The "SEGA-ITX"

August 13, 2004
The "Quiet Cubid"

August 06, 2004
The "BMWPC"

July 14, 2004
The "Moo Cow Moo"

July 02, 2004
The "Mini Mesh Box"

Full alphabetical archive on right hand side of page...


Travla C137 Mini-ITX Case Review
Posted on October 8, 2003

Click to launch image viewer

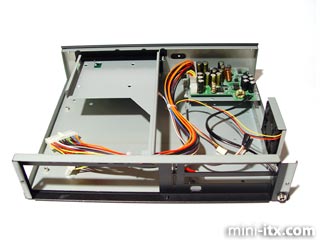
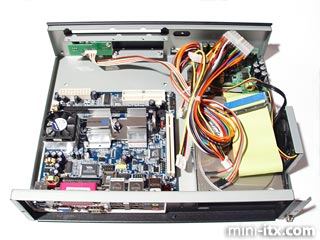
Internally, the C137 is a simple design. The base tray holds the motherboard in the corner of the case (bottom left of this picture). Above the base tray sits the top drive tray, running from the front to the back of the case. This can hold a slimline optical drive at the front (towards the top of this picture). There is another hard drive tray next to the DC-DC converter, which can support both 2.5" and 3.5" hard drives. If the optical tray had a bit more metal to it, another 2.5" hard drive could have been squeezed in there, above the motherboard.
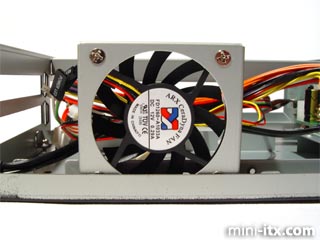
Click to launch image viewer

Cooling is provided by a single 60x60x10mm fan blowing out the side of the case, next to the motherboard heatsink(s). Vents positioned on each side of the case allow air to be sucked across the motherboard. The fan is made by ARX, part number FD1260-A1033A. It's a 12V CeraDyna unit, so should have a very long MTBF. In use, we found it to be noisier than the similarly dimensioned fan in the Cubid 3677/3688 - it spins faster.

Click to launch image viewer

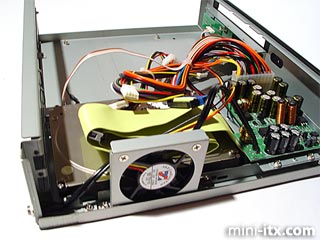
We decided to fit a 3.5" hard drive into the drive tray in front of the DC-DC converter. There are several combinations of hard drive, hard drive tray and DC-DC converter positioning possible, but this looked liked the easiest. Here are a couple of tips that will save you five minutes:

Tip #1 - Attach the IDE cable to the drive before putting it into position - the DC-DC converter nestles very close to the cable (the way we did it).

Tip #2 - Don't screw the drive into the tray at the point where it will touch the the 60mm fan - it won't fit back onto its rails properly...

Click to launch image viewer

Next we fitted the I/O panel and an EPIA motherboard. There's plenty of room for a Micro-ATX board in there too. The thin ribbon cable coming from the top left attaches to the LED and power switch headers on the board.

Click to launch image viewer

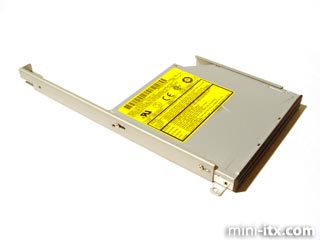
We fitted an optical drive to its drive tray - it's time to find that impossibly small screwdriver we reserve for such purposes. Don't forget to screw in the slimline IDE to desktop IDE adaptor to the back of your optical drive.

Click to launch image viewer

With a little bit of IDE origami we attached the hard drive to the motherboard, and screwed the optical drive tray back into place. The fan cable was just long enough to fit onto the SYS FAN header on the motherboard.

PCI Risers, and Conclusion -->


Board Finder
Case Finder
Mini PC Finder