|  | September 05, 2017
Choosing the right DC-DC PSU August 27, 2015
AMD's Project Quantum August 13, 2015
The Redstone PC is the ultimate Mini-ITX Minecraft Machine October 09, 2014
The "Restomod TV" April 09, 2013
Installing NAS4Free February 28, 2013
Building an XBMC 12 Home Theatre PC January 25, 2011
XBMC Guide updated to version 10.0 August 06, 2010
Building a Green PC February 15, 2010
Building an ION powered HTPC with XBMC October 10, 2008
The "Cambridge Autonomous Underwater Vehicle 2008" |
| | | | September 12, 2008
"Florian", the DVD burning robot September 05, 2008
The "i-EPIA" May 22, 2008
The "GTA-PC" April 14, 2007
The "Digg" Case January 19, 2007
The "ITX-Laptop" December 07, 2006
The "Tortoise Beetle" October 02, 2006
The "DOS Head Unit" August 31, 2006
The "Janus Project" August 05, 2006
The "Leela PC" June 26, 2006
Nano-ITX in a Football May 17, 2006
The "EPIA Alloy Mod" April 11, 2006
Neatorama's Collection of Case Mods February 18, 2006
The "Rundfunker" October 24, 2005
The "ITX TV" October 06, 2005
The K'nex-ITX August 05, 2005
The "Waffle Iron PC" July 21, 2005
The "Supra-Server" July 18, 2005
The "Mega-ITX" July 07, 2005
The "Encyclomedia" May 25, 2005
The "Accordion ITX" |
| | | | May 16, 2005
The "FileServerRouterSwitch" May 15, 2005
The "Mini Falcon" May 13, 2005
The "Bender PC" May 11, 2005
The "BBC ITX B" May 10, 2005
The "Frame" April 20, 2005
The "Jeannie" March 09, 2005
The "Cool Cube" January 30, 2005
First Nano-ITX Project? January 17, 2005
The "iGrill" January 15, 2005
The "Gumball PC" December 15, 2004
The "Deco Box" December 03, 2004
The "TERA-ITX" October 06, 2004
The "Coealacanth-PC" September 17, 2004
The "Gramaphone-ITX-HD" August 26, 2004
The "C1541 Disk Drive ITX" August 25, 2004
The "SEGA-ITX" August 13, 2004
The "Quiet Cubid" August 06, 2004
The "BMWPC" July 14, 2004
The "Moo Cow Moo" July 02, 2004
The "Mini Mesh Box" Full alphabetical archive on right hand side of page... |
|
|
VIA EPIA N10000 Nano-ITX Review
Opening the Box and
Attaching the Heatsink
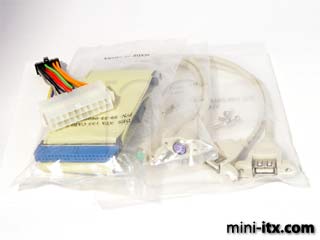
All EPIA Ns arrive with at least 5 additional items in the box: The driver CD, IDE cable, integrated PS2 keyboard and mouse cable, dual USB 2.0 cable, and an adapter to convert between the small 12 pin Nano-ITX power connector connector and a standard 20 pin ATX power connector. There was no printed manual with ours, and we don't expect there to be any at release. VIA stopped including printed manuals with their Mini-ITX motherboards around the start of 2005, much to the confusion of first-time purchasers, but presumably shaving a few cents off the cost of manufacture. The 1.04 manual we downloaded mentions a 4-port USB cable, but ours definitely only had 2 connectors. Slightly more understandably, no I/O panel is included.
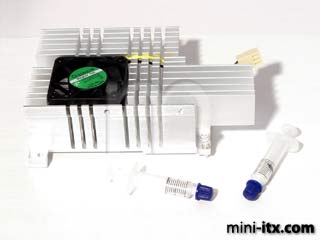
Also in the box is something unheard of for EPIA boards to date, a removable heatsink and two tubes of thermal heat paste. The 1GHz version of the board comes with a fan mounted into the top, whereas the 800MHz and 533Mhz versions are cooled just by the heatsink. Brief but helpful instructions let us know that 1 tube of paste is enough for the Luke package, and 1/2 a tube is enough for the South Bridge.
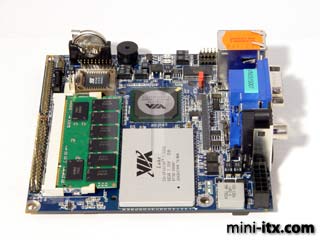
There are two reasons for having a removable heatsink. Case manufacturers are free to create their own independent cooling solutions for the board, and the heatsink can be mounted over the stick of SODIMM memory to save space. Here's our 512MB stick, freshly inserted. The only drawback is upgrading memory at a later date could prove interesting.
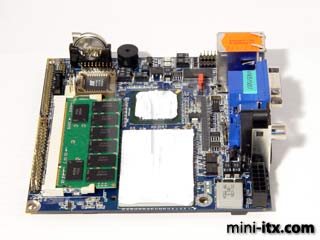
One and a half tubes worth of thermal paste, carefully applied.
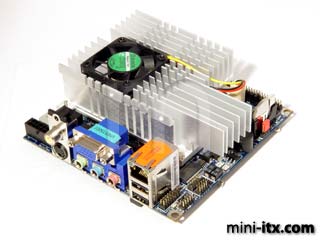
The heatsink is fitted by 3 sprung plastic push pins, and a threaded screw mounted from underneath. Anyone who has fitted a heatsink to a VGA card will be familiar with the mounting process, but to first time users care will have to be taken - instructions are not given anywhere. There are no spare push pins, and the wedged ends could be easily snapped off.
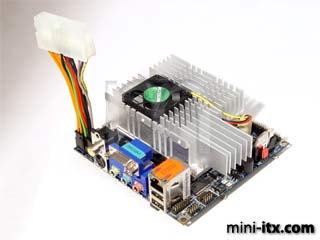
Next we plugged in the ATX to Nano-ITX power adapter cable. This is well made from thick strands of wire, as exhibited above. Connect this to any standard ATX power source and you're ready to go. In keeping with the small size of the board, we used a picoPSU and 60W AC adapter (not shown in this picture).
Back Panel Connectors -->
*Advert* Find your perfect board the Mini-ITX store! *Advert*
Our board finder will help you decide at the Mini-ITX.com Online Store. We serve the UK, Europe, USA and beyond. Order in-stock components before 7.00PM GMT and we'll ship same day! |
|
|
|