
Posted on March 8, 2003
Here's a shot of the internals... after the redesign of the internal setup... and I numbered them so I could explain what stuff is... This is before I mounted the switches or the front mount IDE cables in the box. Notice there aren't any attached to the front panel there.
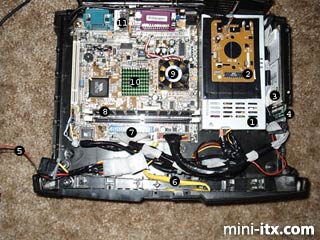
1. This is the tiny power supply I got. It's about 3/4th the width of a normal power supply, 3/4 the length, and about 1/4th the height. The rough size is about 15cm x 4.5cm x 7cm. Pretty small. There was really no way for me to mount this with screws without drilling thru the case, so I went to Walmart and got some two-sided 3M automotive trim adhesive to mount this to the bottom of the case. That tape is STRONG, and if you use it, get it right the first time cuz it's a bitch getting it back off.
2. This is a actually a gutted serial mouse... Windows doesn't display the mouse cursor if no mouse is connected to the PC... a little problem I ran into. I didn't want to take up a PS2 port, so I used an old black serial mouse I had, took the motherboard for the mouse out of its case, shortened the cord to the eact length I needed, removed EVEYTHING from the mouse's motherboard that I could (the little holder for the mouse ball, the casing, buttons, etc.) and was left with what you see there. I made a little rectangle on the top of the power supply with electrical tape and used the same 3M trim adhesive to mount the "mouse" there. Now Windows thinks there's a serial mouse connected all the time, and shows the cursor. I connected the other side of the cord to the serial port, and ran it inside the case RIGHT next to the serial port (Dremel baby) for a completely clean look.
3. This is the laptop hard drive. 3.2GB... big enough for a lot of roms. It's pretty quiet, doesn't generate a lot of heat, and is very small. Becuse of its size it was easy to mount.
4. This is the converter plug I got to convert a laptop drive interface to an IDE interface. You can see the rounded IDE cable plugged into it. Electrical tape for now, but maybe later I'll clean stuff up and get some loom.
5. These wires go to the fan on the top of the case, incase you were wondering.
6. These yellow wires come from the "stock" buttons and LEDs on the front of the case. Chris and I made work with the new motherboard by tracing the leads on the PCB that the LEDs and buttons are mounted to and splicing on some motherboard connectors. I was able to score some old motherboard connectors off of some trashed 386 cases at work.
7. Two IDE ports... I could add up to three more hard drives if needed, or a CD-ROM drive. Eventually I want to get a black slimline CD rom drive and add it to the unit for audio playback or video playback. I think it'd be cool if the box played Video CDs, SVCDs, and DIVX movies too.
8. 128MB of RAM. Woohoo.
9. VIA 800Mhz C3 processor. Not a screaming machine but fast enough to run ROMs at 60fps with 44Khz and stereo sound. Good enough for me. This board is actually faster than I thought it would be. The onboard video has minimal 2D/3D accelleration, but it works pretty well. Not bad for an all-in-one solution for $100.
10. The VIA northbridge. I might put a slightly bigger heat sync on this when I get a chance.
11. The ports: Mic in, Line out, Line in, Serial, Parallel, PS/2 for keyboard, PS/2 for mouse, 2 USB ports, VGA output, S/PDIF output/Composite video output, 10/100 LAN, and S-Video output. Not bad. For hooking it up to the TV I just use the S-Video output, and audio line out.
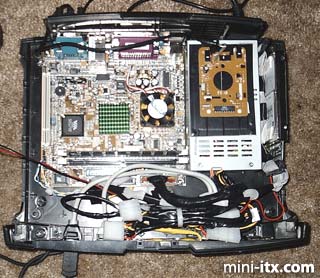
This is an updated picture, notice I mounted those two USB ports in the front in ports 1 and 2 of the XBOX. They're attached to the pins on the motherboard for an extra pair of ports so I didn't lose functionality of the two in the back. I had to make a female pin grid because the VIA pins are a little smaller and closer together than a standard motherboard USB header. The connector might not look the best, but it works. Notice it's not hooked up yet in this picture either - this is because I hadn't built the header quite yet. It's done now though, and it works great.
I also mounted switches in the banks for controllers 3 and 4. One of these switches sits idle, and one of them controls the fan on the top of the case. Eventually I'm going to replace the fan with a green/blue LED fan, and put a 10" green neon tube down one side of the inside of the case, and a blue one down the other side. There are a lot of vents in the side of the case for light to radiate from and I think it'll look pretty sweet once it's done. The second switch will most likely control that pair of lights.
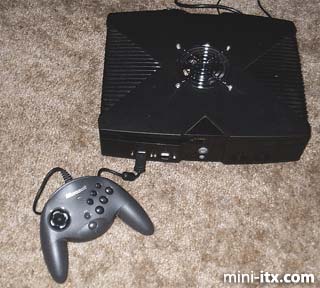
Here you can see the front USB ports and the LED switches a little better. The blue one is quite a bit brighter than the green one. Both are lit in this picture but the blue one is the most visible, thanks to my cheap digital camera.
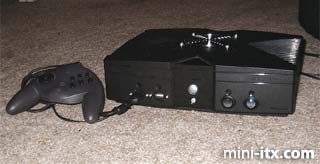
Here's a shot of the box as it sits today, connected to the TV. I'm using a Sidewinder gamepad for right now, but I'd like to get some wireless controllers when some are released that are actually comfortable. I took a look at the current options and am not impressed with any of them, but maybe someone will release some comfortable, black wireless controllers... or maybe I could get some XBOX wireless controllers and interface those to the box. Hmmmm.... ;-)
This was a pretty fun project and I learned some things from it. I'd gladly try it again if I ever look at something else someday and thought "Hey, I wonder if I could stick a PC in that." :-)
 |
 |
 |
Quick Links
Mailing Lists:
Mini-ITX Store
Projects:
Show Random
Accordion-ITX
Aircraft Carrier
Ambulator 1
AMD Case
Ammo Box
Ammo Tux
AmmoLAN
amPC
Animal SNES
Atari 800 ITX
Attache Server
Aunt Hagar's Mini-ITX
Bantam PC
BBC ITX B
Bender PC
Biscuit Tin PC
Blue Plate
BlueBox
BMW PC
Borg Appliance
Briefcase PC
Bubbacomp
C1541 Disk Drive
C64 @ 933MHz
CardboardCube
CAUV 2008
CBM ITX-64
Coelacanth-PC
Cool Cube
Deco Box
Devilcat
DOS Head Unit
Dreamcast PC
E.T.PC
Eden VAX
EdenStation IPX
Encyclomedia
Falcon-ITX
Florian
Frame
FS-RouterSwitch
G4 Cube PC
GasCan PC
Gingerbread
Gramaphone-ITX-HD
GTA-PC
Guitar PC
Guitar Workstation
Gumball PC
Hirschmann
HTPC
HTPC2
Humidor 64
Humidor CL
Humidor II
Humidor M
Humidor PC
Humidor V
I.C.E. Unit
i64XBOX
i-EPIA
iGrill
ITX Helmet
ITX TV
ITX-Laptop
Jeannie
Jukebox ITX
KiSA 444
K'nex ITX
Leela PC
Lego 0933 PC
Legobox
Log Cabin PC
Lunchbox PC
Mac-ITX
Manga Doll
Mantle Radio
Mediabox
Mega-ITX
Micro TV
Mini Falcon
Mini Mesh Box
Mini-Cluster
Mobile-BlackBox
Moo Cow Moo
Mr OMNI
NAS4Free
NESPC
OpenELEC
Osh Kosh
Pet ITX
Pictureframe PC
Playstation 2 PC
Playstation PC
Project NFF
PSU PC
Quiet Cubid
R2D2PC
Racing The Light
RadioSphere
Restomod TV
Robotica 2003
Rundfunker
SaturnPC
S-CUBE
SEGA-ITX
SpaceCase
SpacePanel
Spartan Bluebird
Spider Case
Supra-Server
Teddybear
Telefunken 2003
TERA-ITX
The Clock
ToAsTOr
Tortoise Beetle
Tux Server
Underwood No.5
Waffle Iron PC
Windows XP Box
Wraith SE/30
XBMC-ION