
Posted on July 2, 2004
DVD/CD-RW & Hard Disk
|
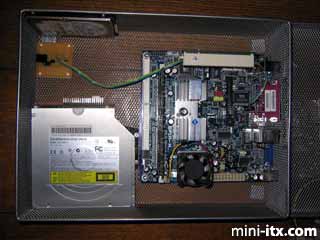
As the above photo shows, after placing the motherboard there was plenty of space left in the front for a slimline DVD unit and a 2.5 inch hard drive. You could fit a full size hard disk in there, but a full size DVD/CD won't squeeze in.
Because of the space used by the IDE adapter and cable, there was not enough clearance to mount the DVD so that the tray opens at the front, so I rotated it 90 degrees and mounted it so that the tray opens on the front right side of the box. To secure the DVD, I was able to screw its left side directly to the front of the box using the two screwholes on the side of the unit. To secure the other side of the unit, I used a plastic L-shaped bracket that had originally been used to mount the DVD inside the now-defunct laptop. This bracket screws to the right side of the DVD and then to the bottom of the case. I then cut a slot in the mesh of the appropriate size to accomodate the sliding DVD tray.
I worried a bit about vibrations from the DVD transmitting themselves to the case and experimented with placing a piece of packing foam between the DVD and the box. However, the foam put pressure on the DVD case and didn't seem to have any effect one way or another on the DVD noise (which was minimal in any case) and so I removed it.
I then mounted the hard disk vertically on the right wall of the box, screwing the drive directly to the mesh surface. For the HD, I placed a thin sheet of packing foam (in fact, the piece of red packing foam that comes in the EPIA box) between the bottom of the HD and the side of the box in order to prevent the box from picking up and amplifying HD vibrations. As you can see from the photograph, there's room along the two sides of the box to mount two or three more 2.5" disks, in the unlikely event I want to set up software RAID on this machine.
The orange circuit-board thing that you can see in the picture is the infrared receiver for the remote. More on that later.
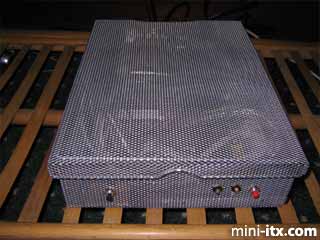
Placing the Buttons, LEDs and Power Jack
|
Radio Shack provides red and black pushbuttons that are momentary closed, which is exactly what you need for the power on and reset buttons. I cut the appropriate sized holes for them in the front of the box, and mounted them using the accompanying thin hex nut and lock washer that comes with the buttons. The buttons are a bit cheap looking (well, they are only about 25 cents each) and some day I'll find classier buttons to replace them with.
The electronics shop where I bought the LEDs also sells plastic LED retainer rings. These consist of a black ring that mounts on the case, and a plastic sleeve the slips around the LED and pushes into the ring, where it secures the LED by friction. I snipped smallish holes in the mesh and then squeezed the black plastic retainer rings through them. To prevent the rings from coming loose, I secured them with a dab of glue. If you try this, be careful not to apply too much glue, as it easily drips and will spoil the look of the mesh (don't look too carefully at the photos under high magnification!). I used bright red and blue LEDs for power and disk activity respectively.
I used the same technique to mount the external power supply jack to the back of the case, first cutting a rectangular hole slightly smaller than I needed, then squeezing the jack through the opening and securing it with glue.
To wire the LEDs and pushbuttons to the case, I used a ribbon cable, a 16 position connector housing and a dozen tiny crimp-on cable connectors. I managed to spoil about a half-dozen connectors before I learned the delicate art of crimping. One end of the ribbon cable was wired to the 16 position connector and then plugged into the motherboard's front panel header. The other end of the cable was crimped onto a pair of two-position connectors for attachment to the LEDs, and soldered directly to the power and reset pushbuttons.
The Infrared Detector
|
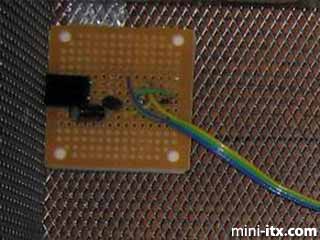
Since this unit was destined to drive my TV, it needed an infrared receiver for the remote control. The Linux Remote Control project pages list a large number of resources for building various types of remote control receivers. I chose the most basic of them, a serial port detector described at the web site given in the parts list. All that's needed to build the receiver is a dirt-cheap infrared detector, a voltage regulator, and a couple of other standard components, all of which could be found at my neighborhood electronics store. Instead of building the detector inside a DB15 hood, as described in the instructions, I wired it to a small square piece of circuit board that I found at the electronics store.
The infrared detector plugs into the motherboard's serial port header. I attached it to the bottom of the mesh box using double-sided tape. Because the box is transparent, signals from the remote control travel right through it, so one less hole to worry about.
The USB and Firewire Ports
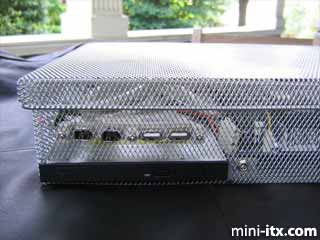
This left me with the VIA-provided USB and firewire port panel. I debated about mounting this thing at all, but ultimately decided that the firewire ports might be useful some day. I started to place the ports in the front of the box and then changed my mind before I started cutting. Fortunately the laundry marker that I was using to outline the port positions was alcohol soluble. I ended up placing the ports on the right side of the box above the CD tray. I think they look good there. It might have made more sense to place the CD above the ports, but I'll be using the ports so infrequently that it doesn't matter.
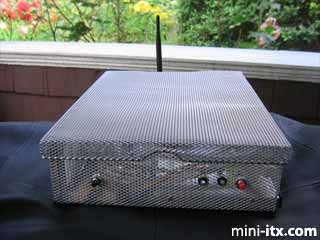
The Finished Product
Here are some more pictures of the finished product.
A la Carte
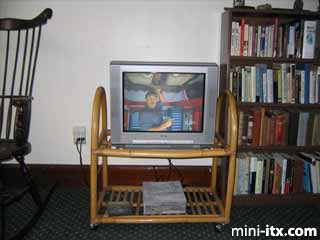
Driving My TV Set
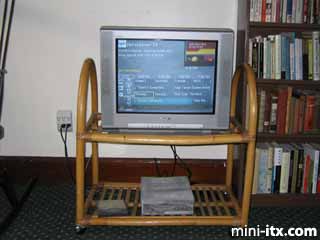
Electronic Program Guide via MythTV
Software
For software, I'm using a Linux 2.4.25 kernel with the EPIA patches from epia.kalf.org/epia_kernel/, the MythTV PVR system, and the standard X.org "via" X11 drivers.
Without the hardware MPEG-2 decoding provided by the CLE266 graphics chip, MythTV was able to play transcoded (compressed) recordings, but couldn't keep up with live TV.
Thinking that the right way to solve this problem was to use the XvMC extensions provided by the Unichrome driver coupled to MythTV XvMC support, I spent the better part of a day trying to get this to work. Finally I discovered I didn't need the Unichrome drivers at all, but could simply use the stock "VIA" driver that comes with the X.org distribution of X11R6. A compile-time option allows MythTV to take advantage of the CLE266 MPEG-2 decoder without any support from X11.
You may have noticed that I don't have a TV encoder card in the mesh box itself. Instead, I have a Hauppauge PVR-250 card installed in a large-capacity file server in my cellar. MythTV accesses recorded TV shows, videos and music via NFS across my home wireless network. Physically, the PVR-250 would fit into the mini-mesh box just fine, although disk space would be a trifle limiting.
DVDs play back smoothly with MPlayer - The Movie Player, and put about 40% load on the CPU.
 |
 |
 |
Quick Links
Mailing Lists:
Mini-ITX Store
Projects:
Show Random
Accordion-ITX
Aircraft Carrier
Ambulator 1
AMD Case
Ammo Box
Ammo Tux
AmmoLAN
amPC
Animal SNES
Atari 800 ITX
Attache Server
Aunt Hagar's Mini-ITX
Bantam PC
BBC ITX B
Bender PC
Biscuit Tin PC
Blue Plate
BlueBox
BMW PC
Borg Appliance
Briefcase PC
Bubbacomp
C1541 Disk Drive
C64 @ 933MHz
CardboardCube
CAUV 2008
CBM ITX-64
Coelacanth-PC
Cool Cube
Deco Box
Devilcat
DOS Head Unit
Dreamcast PC
E.T.PC
Eden VAX
EdenStation IPX
Encyclomedia
Falcon-ITX
Florian
Frame
FS-RouterSwitch
G4 Cube PC
GasCan PC
Gingerbread
Gramaphone-ITX-HD
GTA-PC
Guitar PC
Guitar Workstation
Gumball PC
Hirschmann
HTPC
HTPC2
Humidor 64
Humidor CL
Humidor II
Humidor M
Humidor PC
Humidor V
I.C.E. Unit
i64XBOX
i-EPIA
iGrill
ITX Helmet
ITX TV
ITX-Laptop
Jeannie
Jukebox ITX
KiSA 444
K'nex ITX
Leela PC
Lego 0933 PC
Legobox
Log Cabin PC
Lunchbox PC
Mac-ITX
Manga Doll
Mantle Radio
Mediabox
Mega-ITX
Micro TV
Mini Falcon
Mini Mesh Box
Mini-Cluster
Mobile-BlackBox
Moo Cow Moo
Mr OMNI
NAS4Free
NESPC
OpenELEC
Osh Kosh
Pet ITX
Pictureframe PC
Playstation 2 PC
Playstation PC
Project NFF
PSU PC
Quiet Cubid
R2D2PC
Racing The Light
RadioSphere
Restomod TV
Robotica 2003
Rundfunker
SaturnPC
S-CUBE
SEGA-ITX
SpaceCase
SpacePanel
Spartan Bluebird
Spider Case
Supra-Server
Teddybear
Telefunken 2003
TERA-ITX
The Clock
ToAsTOr
Tortoise Beetle
Tux Server
Underwood No.5
Waffle Iron PC
Windows XP Box
Wraith SE/30
XBMC-ION