|  | July 15, 2024
KUBIC is a Nintendo-themed, 3D Printable Mini-ITX case September 05, 2017
Choosing the right DC-DC PSU August 27, 2015
AMD's Project Quantum August 13, 2015
The Redstone PC is the ultimate Mini-ITX Minecraft Machine October 09, 2014
The "Restomod TV" April 09, 2013
Installing NAS4Free February 28, 2013
Building an XBMC 12 Home Theatre PC January 25, 2011
XBMC Guide updated to version 10.0 August 06, 2010
Building a Green PC February 15, 2010
Building an ION powered HTPC with XBMC |
| | | | October 10, 2008
The "Cambridge Autonomous Underwater Vehicle 2008" September 12, 2008
"Florian", the DVD burning robot September 05, 2008
The "i-EPIA" May 22, 2008
The "GTA-PC" April 14, 2007
The "Digg" Case January 19, 2007
The "ITX-Laptop" December 07, 2006
The "Tortoise Beetle" October 02, 2006
The "DOS Head Unit" August 31, 2006
The "Janus Project" August 05, 2006
The "Leela PC" June 26, 2006
Nano-ITX in a Football May 17, 2006
The "EPIA Alloy Mod" April 11, 2006
Neatorama's Collection of Case Mods February 18, 2006
The "Rundfunker" October 24, 2005
The "ITX TV" October 06, 2005
The K'nex-ITX August 05, 2005
The "Waffle Iron PC" July 21, 2005
The "Supra-Server" July 18, 2005
The "Mega-ITX" July 07, 2005
The "Encyclomedia" |
| | | | May 25, 2005
The "Accordion ITX" May 16, 2005
The "FileServerRouterSwitch" May 15, 2005
The "Mini Falcon" May 13, 2005
The "Bender PC" May 11, 2005
The "BBC ITX B" May 10, 2005
The "Frame" April 20, 2005
The "Jeannie" March 09, 2005
The "Cool Cube" January 30, 2005
First Nano-ITX Project? January 17, 2005
The "iGrill" January 15, 2005
The "Gumball PC" December 15, 2004
The "Deco Box" December 03, 2004
The "TERA-ITX" October 06, 2004
The "Coealacanth-PC" September 17, 2004
The "Gramaphone-ITX-HD" August 26, 2004
The "C1541 Disk Drive ITX" August 25, 2004
The "SEGA-ITX" August 13, 2004
The "Quiet Cubid" August 06, 2004
The "BMWPC" July 14, 2004
The "Moo Cow Moo" Full alphabetical archive on right hand side of page... |
|
|
The "ToAsTOr"
By Joe
Klingler - Posted on December 2, 2002
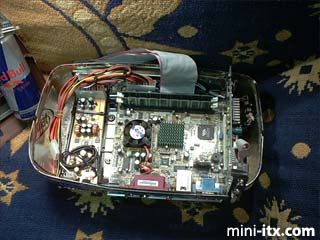
A close up of the top half before final assembly.
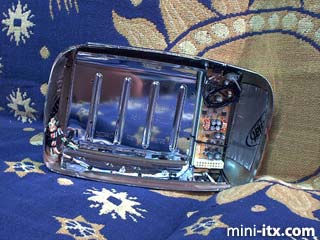
The bottom half with the video card in place.
The crumb tray reads: "NOT TO BE USED
AS A BROILER & DISCONNECT TOASTER BEFORE CLEANING"
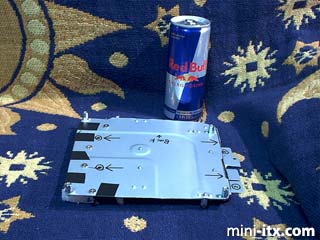
The motherboard mounting tray, the screws
going down are screwed into mobo standoffs. I then dremeled
off the screw part of the standoffs on the other side. The
four marked holes are where the bolts that go through the
mobo tray, crumb tray, and the bottom of the toaster.
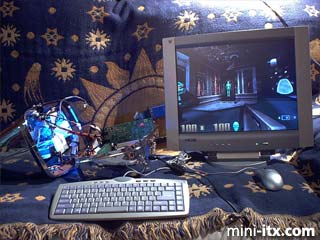
Here is where I tested the machine by playing
Quake before it was assembled for the first time. I loaded
the machine with only the mobo in the bottom half and without
the pci video card.
Building the "ToAsTOr"
The first thing I did was disassemble the
toaster. This took at least an hour. I then lightly sanded
the inside. Then, I masked off the outer chrome and gave it
two light coats of Rust-Oleum Rusty Metal Primer. I once painted
some exhaust manifolds with that primer and it was perfect
after years of use. I took a mobo tray out of a full-size
computer and cut out the part that lined up with the holes
on the epia mobo. Then I had to mount standoffs on the bottom
of the tray to raise it. I did this by drilling holes in the
metal and putting case screws through the holes and screwing
them into mobo standoffs. Then, I dremeled off the screws
that are built onto the standoffs. I needed to shore up one
side by a fraction of an inch to perfect the line up with
the I/O shield. I just stuck some foam under that side of
the mobo tray. There are four bolts that go through the mobo
tray, Crumb tray, and the bottom of the toaster. Then, I figured
where I wanted the LCD, the cold cathode, Hard Drive and DVD/CDRW.
Unfortunately, there was not room. I had to think outside
the toaster! ;-) I was able to raise the hard drive so that
it went behind the LCD screen. I accomplished this by using
a HD bracket that raised it an inch off the surface and raising
it further with many rubber washers between the bracket and
the inner wall. This left the HD bracket 1/4 of an inch from
contacting the dvd/cdrw on the opposite wall!
I had to figure out where to put a power button,
power LED, and HD activity LED. I decided on the side of the
crumb tray opposite the power supply. I cut out the plastic
around the reset button on an old computer. I then ripped
out the LEDs and replaced them with blue ones I cut off the
circuit board of a blue LED fan. Then I just cut a hole big
enough to put a finger on the power button and two holes to
see the LEDs. After cutting holes for a small power supply
I had, I had a terrible realization. The fan from the tiny
power supply was twice as loud as the hard drive and CPU fan
put together.
I could not find tiny screws for the DVD/CDRW,
I wanted a quieter power supply and was having trouble fashioning
a proper bracket for the dvd/cdrw. I killed 3 birds with one
stone by buying a mini-itx case and using some of the parts.
I cut out part of the motherboard tray that is attached to
the cd bracket and used that to mount my DVD/CDRW. I made
it very strong by using 2 steel mailbox-mounting straps as
brackets. I drilled out the holes for normal case screws and
used the same stainless steel bolts, rubber gaskets and nylon
locking nuts I used everywhere else. I cut out the air vent
from an old blue case to cover the holes from the original
power supply. I mounted the dual quiet fans from the mini-itx
case right above the blue grills to suck air in the grilles
and blow it toward the side of the toast hole that is unobstructed.
If I play Quake 3 for 30 mins the top of the case does not
quite get warm as toast. ;-) The rest of the time the case
is only slightly higher than room temp. It is very quiet.
The two biggest challenges were making the
mobo-mounting tray perfectly line up with the I/O panel and
making the cutouts for the video card! The video card slightly
protrudes out the front and back of the case. On the back
I put a screw through the bottom of the card and through the
case below the motherboard. On the back of the video card
there are wire tires holding it down to insure in transit
it does not become slightly dislodged. There is a small slot
to accommodate the edge of the video card on the front left
of the case. I trimmed the metal with clear vinyl auto door
trim. This was to make certain no part of the video card ever
touches metal. I used black vinyl "Blackout" auto
tape on the exposed parts of the metal brackets so that when
you look down in the toast hole the visible brackets are black.
95% of the way through this project my dremel
gave up the ghost. I needed to trim the black Bakelite trim
on the front because of the small slot for the back corner
of the video card. Without a dremel I tried trimming it with
a hacksaw. I broke it in half. I used outdoor goop to fix
the break. I went ahead and lined the entire back of the Bakelite
trim with the goop to strengthen it and hopefully help prevent
any future break of the trim. The Bakelite trim is covered
by an aluminum piece. I then borrowed a dremel from a coworker
and made short work of the trim job.
The computer is a dual boot with Windows XP
Pro SP1 and Slackware 8.1. I used 512 MBs of Corsair RAM and
an ATI Radeon 7500 video card. It is very playable on Quake
3. It is not fast enough to play Serious Sam 2 with an acceptable
frame rate. I must add that the latest ATI driver was MUCH
faster than the MS driver. Also, I could not run 3dMark 2001
SE with the MS video driver. It would crash. With the proper
ATI driver I looped it 100 times and it ran fine. The DVD
playback is flawless.
I want to see if I can get a slightly higher
output AC to DC brick since this rig really pushes the power
supply to the limit of its output. On the front of the case
is a simulated diamond made of glass or plastic. I presume
it would glow red from the light off the heating elements
when bread was toasting. This simulated jewel appears slightly
blue from the cold cathode, but would look killer with a blue
LED gooped to its back.
Before anyone sends me email saying
the fridge magnet is going to hurt anything... The robot is
a sticker and the Felix the Cat is on the side of the case
where there is nothing :-)
Joe Klingler
|
|