Enter the Mini-ITX.com online store

Project Browser

January 25, 2011
XBMC Guide updated to version 10.0

August 06, 2010
Building a Green PC

February 15, 2010
Building an ION powered HTPC with XBMC

October 10, 2008
The "Cambridge Autonomous Underwater Vehicle 2008"

September 12, 2008
"Florian", the DVD burning robot

September 05, 2008
The "i-EPIA"

May 22, 2008
The "GTA-PC"

April 14, 2007
The "Digg" Case

January 19, 2007
The "ITX-Laptop"

December 07, 2006
The "Tortoise Beetle"

Mini-ITX Online Store

October 02, 2006
The "DOS Head Unit"

August 31, 2006
The "Janus Project"

August 05, 2006
The "Leela PC"

June 26, 2006
Nano-ITX in a Football

May 17, 2006
The "EPIA Alloy Mod"

April 11, 2006
Neatorama's Collection of Case Mods

February 18, 2006
The "Rundfunker"

October 24, 2005
The "ITX TV"

October 06, 2005
The K'nex-ITX

August 05, 2005
The "Waffle Iron PC"

July 21, 2005
The "Supra-Server"

July 18, 2005
The "Mega-ITX"

July 07, 2005
The "Encyclomedia"

May 25, 2005
The "Accordion ITX"

May 16, 2005
The "FileServerRouterSwitch"

May 15, 2005
The "Mini Falcon"

May 13, 2005
The "Bender PC"

May 11, 2005
The "BBC ITX B"

May 10, 2005
The "Frame"

April 20, 2005
The "Jeannie"

Mini-ITX Online Store

March 09, 2005
The "Cool Cube"

January 30, 2005
First Nano-ITX Project?

January 17, 2005
The "iGrill"

January 15, 2005
The "Gumball PC"

December 15, 2004
The "Deco Box"

December 03, 2004
The "TERA-ITX"

October 06, 2004
The "Coealacanth-PC"

September 17, 2004
The "Gramaphone-ITX-HD"

August 26, 2004
The "C1541 Disk Drive ITX"

August 25, 2004
The "SEGA-ITX"

August 13, 2004
The "Quiet Cubid"

August 06, 2004
The "BMWPC"

July 14, 2004
The "Moo Cow Moo"

July 02, 2004
The "Mini Mesh Box"

June 17, 2004
Jukebox ITX

May 24, 2004
The "ERN005PC" (KANA)

March 13, 2004
The "Underwood No. 5"

February 04, 2004
The "Humidor CL"

January 23, 2004
The "Attache Server"

January 22, 2004
"Racing The Light"

Full alphabetical archive on right hand side of page...


The "Commodore 64 @ 933.000 Mhz"
By JJ aka DocLorren - Posted on April 28, 2003

Introduction


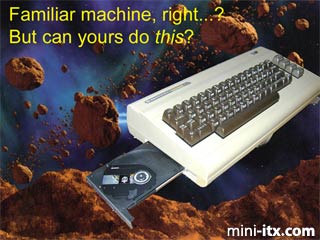
The Geek inside took over command the minute I spotted the M9000.

The nice compact layout, the onboard features, the impulse-buyer-friendly price and the power (enough for the usual stuff while I have to feed my P4 with SETI or Folding@home just to keep it from becoming bored), had not passed unnoticed. I didn"t care too much about the power consumption, you need an power outlet anyway if you want to do some serious work or want to see the end of the DVD for that matter. Didn"t care about reviews talking nonsense about gaming performance and other trivia. Didn"t care at all. The Geek inside talked in its authoritive voice: "Buy one, buy one! You must! Must!" The Geek inside usually wins, especially around payday. This time it won without a struggle. Payday was yesterday…

There it was, being admired, caressed, turned over and admired once more by yours truly.

The shiny heatsink, the little fan waiting in anticipation, the hidden processor not knowing when its first set of instruction would arrive, aaah the joy!

OK, now that I had it and had satisfied the basic need of just needing one (you fellow Mini-ITX-ers know what I am talking about), the inevitable question arose:

"What to do with it?"

It was about to become my fifth computer, and I could really not think of yet another "serious" purpose for this machine. This time I would not convince the girlfriend that it was a necessary piece of kit that was absolutely needed for some scientific groundbreaking work. This time I might even have to hide it from her eyes. Familiar feeling, friends? Ok, so it was about to become my first totally superfluous computer.

So what.

This was to be a project to fulfil some basic needs. You just know that some people have those. Now that I have introduced you to the rational reasons why I had to get hold of one of these puppies (none, as you would have guessed by now), I am about to tell you how this project turned into: "The Commodore 64 @ 933.000 Mhz"

Seeing all the nice, funny and wonderfully ridiculous housings on mini-itx.com, I decided to revive "The Significant One from the "80s". Then, I used to have a Commodore 16 on which I experimented with BASIC programming until it decided to retire after a physical "Peek" and subsequent "Poke" in its internals. "That, you should not have done, my friend…", was the feeling I was left with when the screen turned black, never to return. The C16 was thrown away. That was unwise since they are quite a little bit rarer than the 64 and nice to look at. Remember they were dark grey with light grey keys? Anyway, Nostalgia took over (two very influential powers "Nostalgia & the Geek inside" you see…) and I bought a defect C64 on Ebay for almost two Euros. Sometimes you just have to throw in some serious money to get what you really, really want :-)

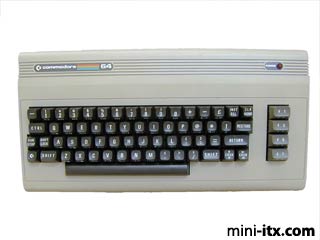
Here it is, looking very sharp, its original design appealing as always and complimentary with a nice touch of fading and aging of the plastic housing, adding to the feel of authenticity:


First its defective intestines were to be surgically removed, which was easy enough by just unscrewing the case (three screws from the bottom) removing the upper lid holding the keyboard (taking care not to break or severe the plastic hinges on the upper lid; they are a little weak), disconnecting the keyboard and power LED cable from the mainboard.

A couple of screws (eight if I am not mistaken) had to be removed before the complete mainboard could be taken out of its natural habitat.

What is left will look like this depending on your skills not to break stuff:


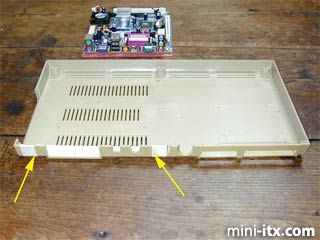
Here you see the empty undertray of the C64, with some tape to mark and protect the area that is to be milled out for a close fit of the EPIA. Oh, you can see it in the background of the picture giving a good representation of the relative dimensions of the donor / recipient. The piece of plastic that has to be removed is exactly between two little ridges (arrows) on the inside of the undertray; the EPIA I/O backplate fits like a glove between them. Of course this is purely coincidental but for people that want to do this casemod, it is very convenient to know. Also notice that because the C64 originally ran @ a mere 1.023 Mhz the heat produced by the 6510 processor did not require a fan to cool things down. Some slots provided the necessary airflow and I am very happy to say that they are located at the area where the EPIA is to be fitted. This is the second coincidence, hmm…


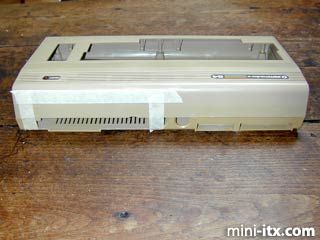
In the picture above you can see the plastic removed from the undertray, while the upper part is taped to get the same treatment in just a minute.

Below is evidence of the ruins you create by milling (and thereby melting) the plastic, but please keep your faith: everything will be alright (again depending a bit on your skill and nerves).


The end result after one hour of filing the plastic with delicate instruments can be seen below. Yes, this is going to be good. You will notice that the two lids articulate at an angle (approx. 10 degrees) while the backplate is straight. I do not recommend you trying to bend this plate as it is rather fragile and will probably break. It fits OK though, as you can see:


The next step was to find a suitable place to locate the PCI-bracket for the two additional USB 2.0 ports and the Firewire connections. Let"s see where can we put those:


Here you can see that I did not screw the bracket to the case although I did later on to secure it and again the fit is remarkable. The coincidence rate is reaching significance shortly, I presume. Note that you will have to shorten the bracket a little bit by sawing, to make it go in smoothly. Now, for the first time I was about to test-fit the M9000. The C64 isn"t that big but still the board is dwarfed. There is plenty of room for peripheral gear as you can see. After final positioning, the four holes that were already on the mainboard were also drilled in the casing, and the M9000 was tightened with screws and four nylon rings providing about 2 mm of clearance from the bottom to improve heat dissipation / airflow. The EPIA M-series is known for its low power consumption and heat production but still it is going to be a lot warmer in here than in the days it did BASIC PacMan. Remember, a modern 7200 RPM harddisk is producing quite some heat as is a spinning DVD drive. And they are about to be fitted…

First, the DC-DC converter was installed next to the M9000, because I was planning to use the former data recorder opening in the lower tray to become the power connector. Below you see the converter, the place were the power connector is going to be (yellow arrow) and the two aluminum brackets I installed to fit a slimline DVD player (red arrows).


I decided to play around a little bit with the cables just to make sure they had sufficient length, the final arrangement would become a little tidier as you will see later on. A 256 MB RAM module was fitted since I think that it is the minimum (but also sufficient) amount needed to be able to work with XP Professional smoothly.

The next step was to make room for the slimline DVD-player (Samsung SN-608B). I decided against a plain CD-ROM player because the M9000 is sooo suitable for multimedia applications it would be a shame not to use a DVD player. I also decided against a DVD/CDRW combo since the whole project was about doing something fun instead of wasting buckets of money. (This happened anyhow but see, I was beyond the point of no return; I could abandon the project halfway and end up with some pretty useless components or finish and spend even more, what would you do?)

In the following two pictures you have a detailed view of the location and construction where the drive was to be attached. Creating the large slot where the DVD-drive bezel would fit was the most distressing part of the project to get nice "n" tidy without destroying things. In the end, with use of the dremel and file the result looked OK and the fit was pretty good. I toyed with the idea to create a front loader but in my opinion that would give a rather awkward look of the rounded front of the C64. Whether a full-size drive would fit in there? Not in your dreams! By the way, normal IDE cables do not fit slimline drives. You will have to get an adapter to make things work.


WARNING! The next phase should preferably be performed at a quiet afternoon with just you, your C64-project, a cold beer in nearby reach and the absence of anyone that thinks you should grow-up. The height/tilt/rotation adjustment needed to get the player in the right spot will get you to curse, despair and display all kinds of half-grown behaviour. But when, at last, you have put it in the correct place and the lid pops out smoothly, it is time to invite your significant other(s) back in and proudly present your work.

2nd WARNING! They will not understand what you are talking about and they might have a different appreciation of your achievement than you were anticipating. YMMV.


Noticed the two Velcro strips on the DVD-player? They are the attachment points for the harddisk that is mounted on top of it (Maxtor D740X, 40 GB, 7200 RPM). Any concern about the robustness of this construction evaporated after playing with the optimal position of the harddisk. This is a very secure way to fix stuff. Below you see an overview of the, nearly completed system. I put in a round IDE cable because it looks a lot better and provides a cleaner space for (probably) better airflow. Also notice the abundant use of tie wraps on the ATX power cable and USB/Firewire cable for the same purpose.


On the right side the original C64 metal lid can be seen. Normally this would house the power connector, power button and the two joystick ports. I converted it by glueing a piece of aluminum on the backside and drilled holes in it to contain two leds and two push button switches. The green led is lit when in "sleep mode", the red led is the "on/off" indicator. The red button is for resetting, the black one for powering up/down the system.


Cables were soldered on the leds and switches and plugged in the board. The original power led on top of the C64 casing was connected to the harddisk led output. That way the disk activity can be easily monitored.

Ok, now with the bulk of the work done, this is what the (almost) completed machine looked like.


The two round openings on the back were subsequently closed by glueing another aluminum plate on the inside of the case. In one, a hole was drilled to allow for the fitting of the 12v power connector. The power for this C64 comes from a crude PSU originally manufactured to power camping refrigerators. For this humble but noble purpose, it delivers 13 volt and 5 amps, therefore it must also be able to provide the juice needed for the EPIA to play DVDs and do some background tasks. And besides it only cost 19.95 euros. You will be hard pressed to find a OEM PSU for that money. Excellent value I would suggest. Converting the cigarette lighter cable was a piece of cake.

After some preliminary test-runs the plans for incorporating the PSU in the C64 casing were rejected. Although the power consumption is low, things can get warm in there.

Once, I measured over 70 degrees from the CPU on an, admittedly, warm day while playing a DVD without any tasks running in the background. Probably the relatively poor airflow is to blame here. I am considering using the opening next to the power connector at the backside to get some airflow with a 40 mm fan located behind it. Maybe, it will not be necessary; I will have to do some more CPU-demanding tests here.


Ok, that is more or less how this Commodore got to run at a frequency 911 times its original speed. Last week I got hold of a box full with original Commodore goodies including a working C64, a PSU, datarecorder, joysticks and disk-drive (all this set me back a full 8 euros on Ebay, damn they get pricier every day), so a few things have been added on the to-do list:

- Getting the keyboard to function. I tried squeezing the standard PS2 foil in the keyboard but with limited success and destroying the original wiring. Neil who built the Commodore ITX-64 might provide a solution here.
- Fitting an optical mouse in the original joystick. This should be cheap, easy and fun to do. I"ll just have to provide some room and make the "fire" switch to function again :-)
- Hiding the camping PSU in the datarecorder. Fun and easy as well.
Incorporating an infrared led somewhere on the casing for communication with phone, PDA etc. The M9000 has fast-IR on board you know…
- Improving airflow to cool things down, as mentioned in the text.

Now that this little project is finished, I will have to find myself something new to pass time with. Maybe I should have closer look at that new M10000 board. Nice.

Hmm, tempting, maybe try a smaller HD drive, fit it in a different case. Maybe create a whole bunch of retro looking EPIAs. Let"s see, if we could just find something nice to put it in…

(Oh-oh, the Geek inside and Nostalgia took over again)


I"ll let you know when the new toy is up and running.

Ciao,
DocLorren


Quick Links
Mini-ITX Online Store

Mailing Lists:
Mini-ITX Store

Mini-ITX 101
Mini-ITX History
Advertising

Projects:

Show Random
How to submit
your project

Most Viewed Today

Mini-Cluster

XBMC-ION

ITX-Laptop

Windows XP Box

C64 @ 933MHz

Accordion-ITX
Aircraft Carrier
Ambulator 1
AMD Case
Ammo Box
Ammo Tux
AmmoLAN
amPC
Animal SNES
Atari 800 ITX
Attache Server
Aunt Hagar's MI
Bantam PC
BBC ITX B
Bender PC
Biscuit Tin PC
Blue Plate
BlueBox
BMW PC
Borg Appliance
Briefcase PC
Bubbacomp
C1541 Disk Drive
C64 @ 933MHz
CardboardCube
CAUV 2008
CBM ITX-64
Coelacanth-PC
Cool Cube
Deco Box
Devilcat
DOS Head Unit
Dreamcast PC
E.T.PC
Eden VAX
EdenStation IPX
Encyclomedia
Falcon-ITX
Florian
Frame
FS-RouterSwitch
G4 Cube PC
GasCan PC
Gingerbread
Gramaphone-ITX-HD
GTA-PC
Guitar PC
Guitar W/S
Gumball PC
Hirschmann
HTPC
HTPC2
Humidor 64
Humidor CL
Humidor II
Humidor M
Humidor PC
Humidor V
I.C.E. Unit
i64XBOX
i-EPIA
iGrill
ITX Helmet
ITX TV
ITX-Laptop
Jeannie
Jukebox ITX
KiSA 444
K'nex ITX
Leela PC
Lego 0933 PC
Legobox
Log Cabin PC
Lunchbox PC
Mac-ITX
Manga Doll
Mantle Radio
Mediabox
Mega-ITX
Micro TV
Mini Falcon
Mini Mesh Box
Mini-Cluster
Mobile-BlackBox
Moo Cow Moo
Mr OMNI
NESPC
Osh Kosh
Pet ITX
Pictureframe PC
Playstation 2 PC
Playstation PC
Plexiglass
Project NFF
PSU PC
Quiet Cubid
R2D2PC
Racing The Light
RadioSphere
Robotica 2003
Rundfunker
SaturnPC
S-CUBE
SEGA-ITX
SpaceCase
SpacePanel
Spartan Bluebird
Spide Case
Supra-Server
Teddybear
Telefunken 2003
TERA-ITX
The Clock
ToAsTOr
Tortoise Beetle
Tux Server
Underwood No.5
Waffle Iron PC
Windows XP Box
Wraith SE/30

How to submit
your project

Reviews:
CF-S688 E-Note
Cubid 2677R
Cubid 2688R
Cubid 3688
GAlantic GA610i
Hush Mini-ITX
Lian Li PC-402A
Jetway B860T
VIA M 10000
VIA MII 12000
VIA Nano-ITX
VIA Pico-ITX
Sigma XCard
Travla C137

Guides & Tips:
5.1 EPIA Audio
Cubid Tips
EPIA CL Firewall
EPIA COM IR
EPIA SCART
Extra USB Ports
IPCop Gateway
Overclocking
PowerLCD

Drivers:
EPIA  EPIA V
EPIA M  EPIA MII
EPIA CL  EPIA PD
EPIA TC

Mini-ITX Online Store

Contact Us

Store: +44 (0) 845 475 8 475

Store enquiries: store@mini-itx.com

Other enquiries: feedback@mini-itx.com

Visit the Store

Click here to enter the online store

Social

Follow us on Twitter!

Join our Mailing List

Copyright: All content on this site is Copyright © 2002-2012 Mini-ITX.com and respective owners, all rights reserved.