The "Legobox"
I knew I wanted to build
a Mini-Itx computer from the first time I saw the power of
these tiny boards. I needed to have a simple computer for
e-mail, DVD's, and word processing. I also wanted it to share
my cable modem across my LAN, so it needed to be quiet. I
couldn't think of a good "gimmick" for the chassis,
but then it dawned on me: "Why not make a computer out
of Lego?!" It seemed like a perfect idea. I didn't have
to worry about the case being too small for everything to
fit inside, and I could focus on making it just the right
size so there was no wasted space. Also, it would be functional:
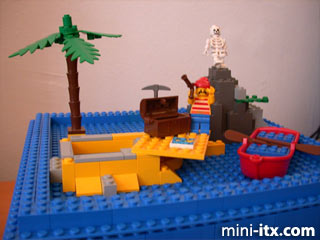
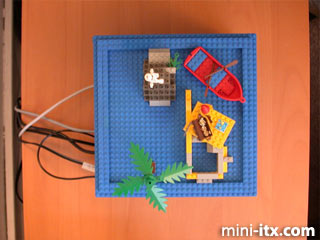
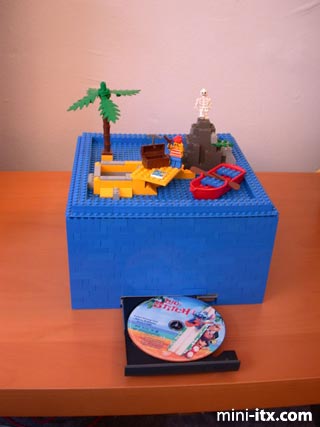
I could use the baseboard on top to display any kind of Lego
scene I wanted.
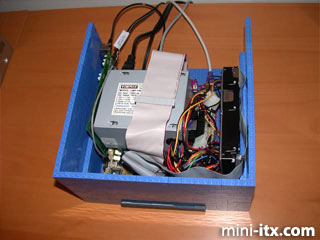
I had all of the guts of the computer ready
to go: ESP 5000 motherboard, 10GB HD, 45watt power supply,
RealMagic Hollywood Plus MPEG-2 decoder card, and a slimline
DVD-ROM drive (taken from my laptop with a broken screen).
I replaced the fan in the power supply with an ultra-quiet
Stealth double ball bearing fan. This brought down the noise
significantly. Then I added a slimline CD/DVD Rom slimline
converter, so I could plug it into a standard IDE cable and
plug in the standard power supply.
I was technically ready to start building
my computer when I rode my bike down to the Lego Store and
got a rude awakening! Legos are expensive! I never realized
just how much they were. So instead of buying a bunch of legos,
I just bought two 32x32 baseboards (about $5/each). On eBay
I bought "one pound of blue Legos" for $20 with
shipping. I had no idea if one pound would be enough or too
much, but I figured it would at least get me started.
Now that I had everything, it was time to
start building. Now this was not as easy as it seems! I tried
multiple configurations, and in each one I needed just a few
more Legos! I didn't want to order more Legos and have to
wait, so I just kept on trying. Finally I found one where
I would have enough Legos, and that would be small enough
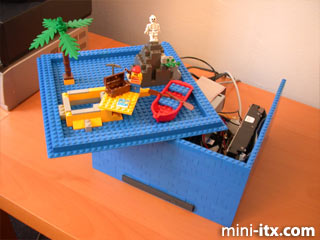
for my tastes. Like many other Mini-Itx projects, everything
is pretty crammed in there.
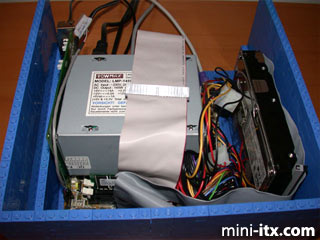
It is pretty difficult to see, but the DVD-ROM
is under the motherboard, and the power supply sits on top
of the board. The fan of the power supply actually sits above
the processor, so it does two jobs at once. I don't think
it's the best thing to have the power supply sitting on top
of the board, but it really isn't too heavy, and the entire
unit never gets very warm. Believe it or not, the most difficult
part wasn't getting all of the components in there, but it
was getting everything connected to each other.
In order for this configuration to work, the
IDE cable for the DVD-ROM had to go under the motherboard,
partially cover up some of the ports on back, then stretch
above the power supply before connecting into the board. I
really wanted the DVD drive to be in front, and I couldn't
figure out any other way to do it.
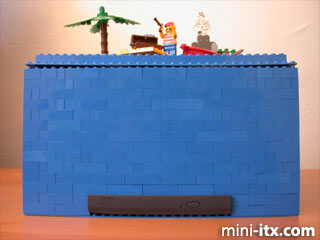
The Legobox alone is 32x32 Lego units wide
(10"/25cm), and 14 Lego bricks high (6"/15cm). This
doesn't include the toys on top. The cool thing is that I
can change the top scene whenever I want.
With Windows XP, the Legobox operates really
smoothly for what I need it to do. It was a really fun project,
but much more difficult than I thought it would be. Now I
am pretty happy with the final product. In the future I'd
like to add both a Jolly Roger and a Windows logo flag to
fly on the top!