
Posted on September 12th, 2008
Why?
It is said that there are two kinds of sysadmins:
- Those who have a verified, functional backup solution,
- and those whose systems haven't crashed yet.
Most of the data loss I've experienced has in fact been due to wetware failures rather than real hardware problems. (That's a fancy way to say it was user error, i.e. my own dang fault ;)
Manual backups to DVD-R are possible, but boooring, with a spindle of discs and a Sharpie pen, scribbling "16 Jan 2008 MP3 1 / 57" ... "16 Jan 2008 MP3 2 / 57" ... etc. Being the enterprising nerd that I am, I decided to to build an automated solution, which would take a stack of blank discs, burn them one at a time, label them for me, and then stack them neatly for me to put them away on a shelf.
Note that I do not use this machine for DVD ripping. Frequently folks think I've built this thing to somehow defraud the MPAA. Never mind the fact that the CPU is grossly underpowered for ripping, there are easier ways to deal with multiple discs! This unit lives solely to back up data and does not handle video.
Idea
The first step to research what was available commercially and what had been done by other hobbyists. There are commercial DVD robots, but they are costly. Many of the DIY solutions I saw were novel, but not what I'd consider reliable. It's impressive from a hobby standpoint to make machinery entirely from wood, for instance, or out of Lego (really!), but I suspect such a machine would wear out quickly or require intervention after a handful of operations.
My machine would be required to go through a stack of 100 or more discs without intervention. It would have to introduce minimal wear and tear on the discs. Any scratches would wreak havoc later should I want to actually be able to READ the discs, which is an important part of the "functional, verified backup solution"!
This is a project that screams "microcontrollers" for the people who are into such things; for me however, it screamed "Mini-ITX". By virtue of being a PC, the Mini-ITX is easily networked to the backup target. It's also far easier to make changes to the mechanism controller in software than having to modify the hardware of a dedicated controller.
That and I had a spare M10000 sitting around begging to be used :D
Design
While my buddies accuse me of having a machine shop in my garage, I don't, for instance, have a lathe, so making my own machine parts was largely out the question. One *can* buy slides and bearings and such new, of course, but they are costly, and I expected a certain amount of change to the design as the project progressed. Also, waiting a week for parts to arrive in the mail (and paying as much in shipping costs as parts) each time grates on me.
The second best choice, then, was to scour the surplus shops for devices which had assemblies and parts that might work. A round of Silicon Valley's surplus shops netted a pair of tape libraries and a small CD duplicating system. While I *hate* tape as a backup medium and the complexity of tape changers, that same complexity meant that the devices have lots of motors and slides and various moving parts for me to use. I lucked out with the CD duplicator. It was only made to do perhaps 20-25 discs and had a very odd setup of sliding discs from a stack, so I wasn't able to use it in its entirety, but the mechanism by which it picked up the discs was invaluable. I also gutted an old scanner for its slide mechanism, stepper motor, bearings, etc.
While I could visualize how most of the DVD changer would go together, the most important part was also the part I was most having trouble with. The mechanism to actually pick up and drop a disc worried me, as it would be the centerpiece of the entire affair. I spent quite some time in my shop trying various ways to pick up a disc: mechanical fingers to grab the disc at the outside, with varying angles from the vertical, vacuum suction cups, levers in the center hole, etc etc. None worked to my liking, as all would sometimes pick up one disc, sometimes two, and more often than not, none.
In order to automate a backup to a hundred or so discs, this thing would have to grab one -- and only one! -- disc, every time. In the end that CD duplicator worked out nicely; it has a solenoid-operated lever with three fingers that grab the disc in the center hole.
Once that was decided, the rest of the setup was engineered from that point out. I read up on labelling systems for burners, and while I liked the idea of color, the prospect of moving discs between two stacks, a burner AND a printer was rather daunting. I opted instead to use a Lightscribe burner, which merely requires that the disc be flipped over in the drive to be labelled.
Execution
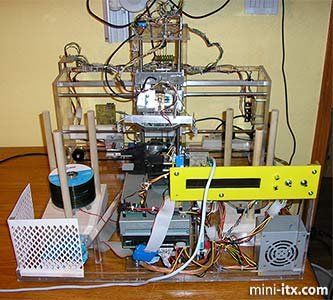
In general, I constructed the unit from acrylic for a number of reasons. It's easy to work, is available in a variety of shapes and sizes and is relatively inexpensive in comparison to, for instance, aluminum. Aluminum is used for those parts which required additional stiffness or for bridging a vertical surface to a horizontal one. The disc stacks are wood, as explained below, and a few bits are high density polyethylene ("HDPE", which I'll touch on again as well.)
One of the hobby robot places, Lynxmotion, had a gripper (they call "Little Grip") which seemed perfect for grasping and flipping discs. I already had a few RC servo motors from a previous project, as well as Lynxmotion's "Pan and Tilt" kit. These combined allow the flipper mechanism to rotate in all three dimensions. Not only can it therefore grasp a disc and flip it over in place, but the disc can also be rotated away from the drive and discarded into a coaster pile in case of bad burns.
Note that due to the extra weight of the gripper, there's a stack of fender washers as counter-weight to keep the unit balanced. The flipper mechanism and its servo controller (see below) are mounted to the shell from a CD-ROM drive, allowing it to be easily mounted in a stack with the burner.
The stack storage was also problematic; since the disc picker mechanism grabs from the center, I couldn't use a center pole the way that the spindles come at the store. I also discovered that even thick acrylic rods bend a fair bit over distance, preventing them from keeping the disc stack centered. The end solution was therefore hardwood dowels, which are stiff enough to keep the discs accurately stacked. They 're still reasonably light and more affordable than metal. They're mounted in balsa blocks, largely friction-fit into place, the holes being drilled with a 47/64" to be just slightly smaller than the 3/4" OD dowel.
With the central picking and burning mechanisms decided, the next piece would be the vertical movement of the picking mechanism. The mechanism is mounted to bearing slides riding metal rods, all from the tape libraries. Motion is achieved with a stepper motor driving a toothed belt. There's an idler gear at the bottom which provides torque multiplication. By half-stepping the motor there are about 7200 steps over the 11" travel, which allows very accurate location. The ends of the travel are detected by optical sensors on each end.
The lateral sliding mechanism is essentially a larger scale variation on the same theme. I didn't have a stepper motor with enough torque, so this one is driven by a regular DC motor with an attached gearbox. It's further reduced by another geared idler wheel setup. Initially this rode on a bearing assembly from the tape libraries, but in the end I had better luck with a piece of HDPE, drilled to slide on the rods. (The lateral travel actually uses three rods joined end to end with allthread.) HDPE is peculiar stuff, not least as it's allegedly self-lubricating for purposes such as this. (It's more traditionally used for plastic cutting boards, for instance.)
There are opto sensors at each end, as well as the center; the motor control software runs the motor in either direction until the desired sensor kicks (with a timeout in case of failure.) There are also sensors on the supply stack, to determine when it's empty, and around the drive, to determine when the drive is open.
Finally, there are two sets of sensors on the sides of the picking mechanism. The upper one is slightly skewed from the horizontal, and detects the presense of a disc in the picker. The lower set detects when the picker is positioned at the top of a stack of discs, i.e. is ready to pick one up.
There are fudge factors built into the motion control; for instance, when picking up a disc, the picker slides a hair side-to-side, to allow it to successfully grab discs which are not perfectly centered. You'll see this in the video below.
One of the problems I faced with this project is continually thinking in three dimensions; fitment issues are exponentially more complicated when it's not just cabling and figuring reach and such in a flat plane, but in space. The optical sensors on the picker have to clear the spindle rods as it moves up and down, but also as it moves across -- which, obviously can only happen if the picker is lifted to the very top. As a result, the motion control software must ensure that the various pieces which could interfere are in their proper position before moving. Otherwise, things get stuck, motors make bad noises, and occasionally things break :(
The computer part of this setup is straightforward. The motherboard is an Epia M10000 left over from previous projects. A 512MB stick of RAM and a hard drive grabbed at random from the spares (40GB, I think) make it boot. The burner was bought on price point, i.e. was the least expensive Lightscribe unit I could get. Both are PATA to match the motherboard.
Electronics
The stepper "controller", actually, is just four Darlington transistors, their accompanying base resistors, and then some LED's to indicate power in and coil engagement. The Darlingtons were required as I couldn't get enough gain from regular transistors to drive the stepper coils from a TTL output.
The pad-per-hole circuit boards are admittedly low-tech, but they're ideal for the simple circuits used here. They're cheap and easy to change as the design progressed, and diagnosing problems is simple with the color-coded telco wire used for point-to-point.
Most of wiring harnesses were liberated from old PC cases; when more length was required, multiples were soldered together and then heatshrink applied.
LED's, particularly blinking ones, are a critical part of any electronic project. Besides the stepper motor LED's, you'll notice at the top center a bank of sixteen LED's, which are ON (green)/ OFF (red) indicators for eight bits. It's used alternately as a diagnostic tool by the motor control software mirroring the status of the various optical sensors to the LED's, and then occasionally blinking them randomly or in a Knight Rider pattern to amuse passersby.
The basic idea for the stepper controller circuit came from this kind fellow, though I ended up not using the CMOS logic on the left side of the schematic and doing it entirely in software. Much of the controlling logic -- not just for the stepper but for the entire unit -- is done in software as it's easier to code than to solder ;) Everything you ever wanted to know about steppers can be found on this guy's web page.
The LCD display is driven by a gizmo to run it from a serial port, and is attached to a COM port on the motherboard. The backup scripts send status to the COM port, then so that the machine can operate headlessly (i.e. without monitor, and in fact without a keyboard or mouse as well.)
The other COM port uses a Scott Edwards SSC II to control the RC servos on the flipper mechanism.
The last PC interface is an ancient unit, that allows a parallel port to control 32 bits each input and output. It came from Australia's Dontronics and is no longer in production. LPT port stuff is blase' any more, it seems, and everyone wants USB. It's a shame, as it's simple and quite well laid out. This is the longer board at the rear of the setup, with all the colored wires. (Speaking of no longer around, the DC motor controller and the serial-LCD bridge both came from Wirz, who no longer cater to the kit crowd.)
Software
Without getting into the penguin-vs-Bill controversy, I happen to be a Microsoft shop, so Florian runs Windows XP. The desktop can be accessed remotely over RDP, and it's trivial to network to the various Windows servers and workstations to access the files to back up.
The controlling software is all in Perl, oddly enough, grouped into batch files for logical functions like loading a disc from the blank stack, flipping a disc, and unloading a disc into the done pile. While Perl is not necessarily well-suited to bit-banging, it has modules for serial port access, and can interface to the ubiquitous inpout32.dll for direct hardware access. The rest of the duties are a cakewalk for Perl: simple programmatic logic and text management, conditional looping, etc.
The grouping and splitting of files into ~4.3GB chunks is also done in Perl. Writing my own solution has both its benefits (all the features I want, and only the features I want) and its drawbacks (*I* have to write all those features, and there's nobody to blame for bugs but myself =))
Burning is scripted via Nero's command-line interface, and the labelling is handled via the Lightscribe SDK which also offers a CLI (woohoo!). I wrote a quick and dirty Winbatch EXE that takes text specified by the backup process (namely, the name of the backup set, the date and the disc number) and stamps them onto a BMP to be fed to the LightScribe CLI to label the disc.
 |
 |
 |
Quick Links
Mailing Lists:
Mini-ITX Store
Projects:
Show Random
Accordion-ITX
Aircraft Carrier
Ambulator 1
AMD Case
Ammo Box
Ammo Tux
AmmoLAN
amPC
Animal SNES
Atari 800 ITX
Attache Server
Aunt Hagar's Mini-ITX
Bantam PC
BBC ITX B
Bender PC
Biscuit Tin PC
Blue Plate
BlueBox
BMW PC
Borg Appliance
Briefcase PC
Bubbacomp
C1541 Disk Drive
C64 @ 933MHz
CardboardCube
CAUV 2008
CBM ITX-64
Coelacanth-PC
Cool Cube
Deco Box
Devilcat
DOS Head Unit
Dreamcast PC
E.T.PC
Eden VAX
EdenStation IPX
Encyclomedia
Falcon-ITX
Florian
Frame
FS-RouterSwitch
G4 Cube PC
GasCan PC
Gingerbread
Gramaphone-ITX-HD
GTA-PC
Guitar PC
Guitar Workstation
Gumball PC
Hirschmann
HTPC
HTPC2
Humidor 64
Humidor CL
Humidor II
Humidor M
Humidor PC
Humidor V
I.C.E. Unit
i64XBOX
i-EPIA
iGrill
ITX Helmet
ITX TV
ITX-Laptop
Jeannie
Jukebox ITX
KiSA 444
K'nex ITX
Leela PC
Lego 0933 PC
Legobox
Log Cabin PC
Lunchbox PC
Mac-ITX
Manga Doll
Mantle Radio
Mediabox
Mega-ITX
Micro TV
Mini Falcon
Mini Mesh Box
Mini-Cluster
Mobile-BlackBox
Moo Cow Moo
Mr OMNI
NAS4Free
NESPC
OpenELEC
Osh Kosh
Pet ITX
Pictureframe PC
Playstation 2 PC
Playstation PC
Project NFF
PSU PC
Quiet Cubid
R2D2PC
Racing The Light
RadioSphere
Restomod TV
Robotica 2003
Rundfunker
SaturnPC
S-CUBE
SEGA-ITX
SpaceCase
SpacePanel
Spartan Bluebird
Spider Case
Supra-Server
Teddybear
Telefunken 2003
TERA-ITX
The Clock
ToAsTOr
Tortoise Beetle
Tux Server
Underwood No.5
Waffle Iron PC
Windows XP Box
Wraith SE/30
XBMC-ION