
Posted on August 25, 2004
Introduction
After seeing all the great mini-ITX projects I was tempted to make one of my old 8-bit computers into a PC, but not being able to use the original keyboard was somewhat of a disappointment. Also I would have to invest in a laptop CDROM and a small HD in order to cram it all in. What I wanted was a mini-ITX project that would cost me as little as possible using parts I had from other PC's. Then while putting Christmas decorations away in the basement I noticed the old SEGA CD box I used to store old computer parts and voila I had my next project!
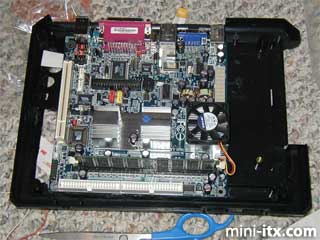
The motherboard I chose was the EPIA M10000 Nehemiah core 1GHz with CLE266 North Bridge. For parts I already had a stick of 256MB DDR, a DVD ROM, and an old 10 Gig HD. Everything else is built in to the MB. All I purchased was the MB, a power supply, and some buttons.
The original SEGA CD system was perfect for my project. The CD case is very tall and the original Genesis sits on top. After gutting the insides of both cases, saving the parts for nostalgia sake, I test fit a DVD and HD to see what configurations were possible. I hadn't yet purchased the MB so I wasn't sure how high it was.
My first arrangement looked something like this:
|
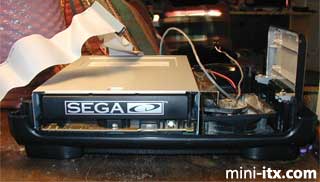
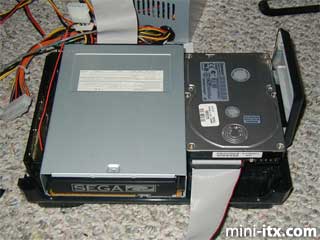
You can see at this point the right side of the CD case contains just a fan (not tied down). Notice I was able to save the SEGA CD face and with minimal trim fit it to the DVD.
|
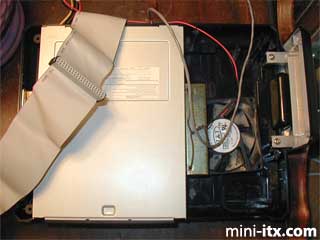
I used metal HD mounts on the sides of the DVD as horizontal spacers and my tie down of choice, bailing wire, to fasten the drive to the bottom of the case :) The DVD barely fits in the CD case. The SEGA CD is actually smaller than a standard CD drive. I had to try several IDE cables to find one that was thin enough, and I had to cut off about an eighth if an inch of the top of the power cable so the wires would bend around. You can see the plastic piece still hanging on the wires.
|
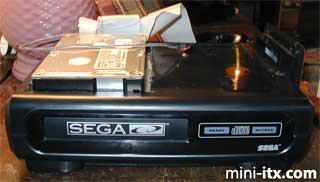
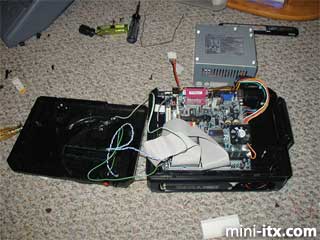
I cut a hole through the top of the CD case and in to the bottom of the Genesis case big enough to fit the HD on top (Don't do this! Read more later).
|
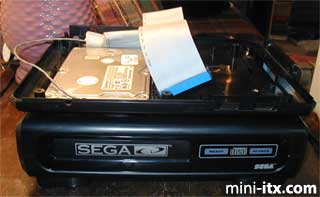
Here you can see the HD barely sticking up through the bottom along with the cables from below.
|
Once the MB arrived I immediately realized it wouldn't fit in the Genesis case with the HD sticking through, so don't try doing this. Just cut a small hole in the two cases to let the power and cables stick through. Having a big hole made it hard to mount the MB.
|
Here is plan B with the HD next to the DVD. Believe it or not I used Legos as spacers to raise the DVD up. The left side of the DVD still has a metal HD mount attached as a horizontal spacer, but the mount on the right side of the DVD is now screwed into the lower 2 holes as a riser for the HD. To cut down on vibration and to fasten it I used double faced thermal tape.
|
I wanted to use the SEGA power switch and volume control on top but that didn't work out. There wasn't enough vertical clearance with all the buttons hanging down so I had to cut off the bottoms (notice lots of black plastic chunks lying on the floor). On the back I put nice buttons to turn the system ON/OFF and Reset. I used front panel connectors I had from an old PC and wired them to the new switches, and I also replaced the Power ON LED.
|
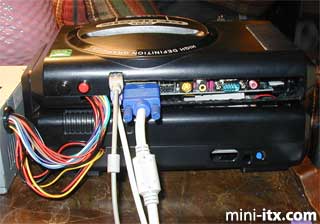
On the back I really didn't want to cut out so much plastic, and using the nice face plate was out of the question with the curved back of the SEGA case, so I only cut out enough space to fit the cables I was most likely to use. With a minimal cut I can access everything except the printer port which I doubt I'll ever use. I may also have to cut out a little more on the right side to reach the top audio connector. The power and reset buttons can be seen here and the big ugly internal power supply cables going into the top and bottom. I have looked into replacing those with one cable from a nice external supply but from what I have read the external supplies don't have enough watts for full size CD or DVD drives.
 |
 |
 |
Quick Links
Mailing Lists:
Mini-ITX Store
Projects:
Show Random
Accordion-ITX
Aircraft Carrier
Ambulator 1
AMD Case
Ammo Box
Ammo Tux
AmmoLAN
amPC
Animal SNES
Atari 800 ITX
Attache Server
Aunt Hagar's Mini-ITX
Bantam PC
BBC ITX B
Bender PC
Biscuit Tin PC
Blue Plate
BlueBox
BMW PC
Borg Appliance
Briefcase PC
Bubbacomp
C1541 Disk Drive
C64 @ 933MHz
CardboardCube
CAUV 2008
CBM ITX-64
Coelacanth-PC
Cool Cube
Deco Box
Devilcat
DOS Head Unit
Dreamcast PC
E.T.PC
Eden VAX
EdenStation IPX
Encyclomedia
Falcon-ITX
Florian
Frame
FS-RouterSwitch
G4 Cube PC
GasCan PC
Gingerbread
Gramaphone-ITX-HD
GTA-PC
Guitar PC
Guitar Workstation
Gumball PC
Hirschmann
HTPC
HTPC2
Humidor 64
Humidor CL
Humidor II
Humidor M
Humidor PC
Humidor V
I.C.E. Unit
i64XBOX
i-EPIA
iGrill
ITX Helmet
ITX TV
ITX-Laptop
Jeannie
Jukebox ITX
KiSA 444
K'nex ITX
Leela PC
Lego 0933 PC
Legobox
Log Cabin PC
Lunchbox PC
Mac-ITX
Manga Doll
Mantle Radio
Mediabox
Mega-ITX
Micro TV
Mini Falcon
Mini Mesh Box
Mini-Cluster
Mobile-BlackBox
Moo Cow Moo
Mr OMNI
NAS4Free
NESPC
OpenELEC
Osh Kosh
Pet ITX
Pictureframe PC
Playstation 2 PC
Playstation PC
Project NFF
PSU PC
Quiet Cubid
R2D2PC
Racing The Light
RadioSphere
Restomod TV
Robotica 2003
Rundfunker
SaturnPC
S-CUBE
SEGA-ITX
SpaceCase
SpacePanel
Spartan Bluebird
Spider Case
Supra-Server
Teddybear
Telefunken 2003
TERA-ITX
The Clock
ToAsTOr
Tortoise Beetle
Tux Server
Underwood No.5
Waffle Iron PC
Windows XP Box
Wraith SE/30
XBMC-ION