
Posted on May 23, 2003
Introduction
We've all been there; you're at the LAN party, quietly reveling in your own smugness as you sit comfortably at the top of the UT scoreboard. You're wading through a seemingly un-ending procession of newbie cannon fodder, when all of a sudden your ping goes into orbit, and your top-of-line beast of a gaming rig is reduced to a pathetic shadow of its former self. After a hasty sniff of the air to make sure your peltier cooling element hasn't toasted your CPU, you realize that some wretch has discovered the 5GB of Jackass episodes that you'd inadvertently left shared on your machine and is in the process of leeching the lot while he pops outside for a quick nicotine fix.
I recently decided that it isn't much fun having to sit waiting for massive file transfers to complete, what I needed was a dedicated file server. Not just a file server, but a highly portable mini-PC with massive storage space and a 10/100 NIC. I have always liked the idea putting a PC in an ammunition box, but the complexities of transferring a full size ATX system are somewhat daunting. When I came across the mini-itx format, things fell into place. Smaller parts plus smaller enclosure equals reduced complexity.
Break out Mr Plastic
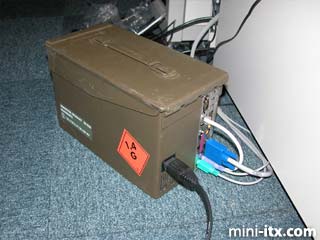
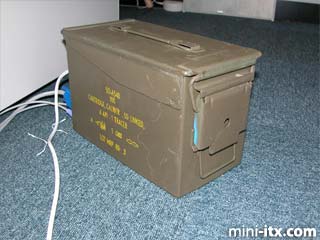
After what seemed like an exhaustive search, I found an online army surplus store willing to sell me .50 ammo cans at a reasonable price. I bought two, anticipating the usual first round disaster that accompanies this kind of project. It seems to be pot luck as to what kind of labelling you'll get on your box, I received one .50 round box (4:1 tracer no less) and one Fragmentation Grenade box.
I had originally designed the installation to make use of a full size ATX PSU, but it was pretty big, and I was concerned by the amount of noise and heat it would produce. That left a 150W 1U PSU or 55W external PSU as a suitable power source, there are other options, but all but these two were unavailable at the time of building. The 55W PSU limited my drive options quite a bit, I was concerned that it may not be able to cope with the two full size IDE drives I intended to hook it up to. The 150W option had plenty of poke, and has its own extraction fan which would definitely come in handy..
I retrieved a spare 20GB HD for the boot drive and a power switch from an old server box. From the start I had not planned to have a CD drive in the system, but as it turns out there is plenty of room in the box should it be required. Anyone who's transferred files on a laptop knows that those pathetic little 2.5 IDE drives are damn slow, so I went for a 20GB 3.5" 7200RPM drive, which just storms along.
Early on, I made a decision to spoil the external look of the box by drilling holes all over the place for mounting components. So I obtained plenty of my secret weapon, sticky back Velcro! The glue side bonds like a demon on a properly prepared surface, i.e. one that has been scrubbed clean with alcohol (Isoclene), and the Velcro isn't going to let go with out a fight.
Dremel ON!
I'm lucky enough to have a fully stocked workshop at the office, so all the tools required were already to hand. Realistically though all I used was a Dremel and a file to de-burr the edges. After measuring and marking up the areas to be cut, the Dremel came into play; I used a type 409 cutting disk which I believe is fairly standard. It took me a while to get the right speed and force to cut the 2mm steel box material, but once I got it sorted it ripped right through. Keeping a straight line was a bit tricky, but I assume it'll come with practice. Be warned this is a very noisy operation. I used up about 10 cutting disks making the I/O panel cut, the power connector cut and some slits for the exhaust fan to breath through. By including the I/O panel, rather than just cutting holes for the various connectors, flexibility was provided for future mini-itx boards.
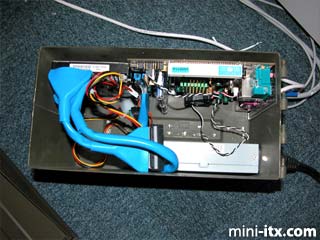
Once the cuts were made I just fitted the parts in. The motherboard is Velcro'd to a plastic stand-off which keeps it locked in the I/O panel and away from the metal sides of the box. The IDE drive went in next to it, two strips of Velcro on its back and one on the end due to its weight. And the PSU went in last, two strips, one on the back and one underneath. I had a few problems getting all the connectors on securely, and most of the parts went in and came out a few times, but I got there in the end.
At present the power switch is internal, but as soon as a suitable toggle switch crosses my path I'll install it in the back near the power connector, maybe along with some tasteful LED's.
Moment of Truth
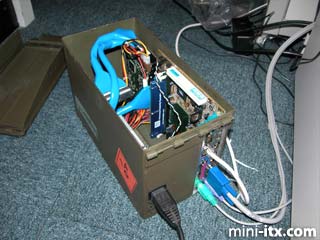
I checked and double checked to make sure there were no obvious shorts or dodgy connections, and fired it up, to my immense surprise it worked first time! I temporarily connected a spare CD-ROM to load on Windows 2000 and got it networked straight away. Since then it's been sat on the internet leeching files 24/7, for about 2 weeks now. I'm quite concerned by the operating temperatures in the box, I'm not sure I have enough airflow running through it. It seems OK for leeching files, but it does get hot quickly under load, although it's never failed from thermal rise.
I should point out that this box is very much the prototype, and I plan to do another to a much high standard of quality in the next few months, probably when the new 1GHz boards become available, coupled to a fat 120GB drive. There's not really much to this machine, just a cunning assembly/integration. But it does the job and looks damn fine while it's doing it. Total cost, about £150 (GBP) but I used a spare HD and RAM I had lying around. A cynic would balk at my Velcro based assembly, but I stand by my cheapness and shoddy workmanship.
Specs:-
Via EPIA 800 Motherboard
150W 1U ATX PSU
20GB Quantum 7200 3.5" IDE
128MB Crucial PC133 SDRAM
Windows 2000
 |
 |
 |
Quick Links
Mailing Lists:
Mini-ITX Store
Projects:
Show Random
Accordion-ITX
Aircraft Carrier
Ambulator 1
AMD Case
Ammo Box
Ammo Tux
AmmoLAN
amPC
Animal SNES
Atari 800 ITX
Attache Server
Aunt Hagar's Mini-ITX
Bantam PC
BBC ITX B
Bender PC
Biscuit Tin PC
Blue Plate
BlueBox
BMW PC
Borg Appliance
Briefcase PC
Bubbacomp
C1541 Disk Drive
C64 @ 933MHz
CardboardCube
CAUV 2008
CBM ITX-64
Coelacanth-PC
Cool Cube
Deco Box
Devilcat
DOS Head Unit
Dreamcast PC
E.T.PC
Eden VAX
EdenStation IPX
Encyclomedia
Falcon-ITX
Florian
Frame
FS-RouterSwitch
G4 Cube PC
GasCan PC
Gingerbread
Gramaphone-ITX-HD
GTA-PC
Guitar PC
Guitar Workstation
Gumball PC
Hirschmann
HTPC
HTPC2
Humidor 64
Humidor CL
Humidor II
Humidor M
Humidor PC
Humidor V
I.C.E. Unit
i64XBOX
i-EPIA
iGrill
ITX Helmet
ITX TV
ITX-Laptop
Jeannie
Jukebox ITX
KiSA 444
K'nex ITX
Leela PC
Lego 0933 PC
Legobox
Log Cabin PC
Lunchbox PC
Mac-ITX
Manga Doll
Mantle Radio
Mediabox
Mega-ITX
Micro TV
Mini Falcon
Mini Mesh Box
Mini-Cluster
Mobile-BlackBox
Moo Cow Moo
Mr OMNI
NAS4Free
NESPC
OpenELEC
Osh Kosh
Pet ITX
Pictureframe PC
Playstation 2 PC
Playstation PC
Project NFF
PSU PC
Quiet Cubid
R2D2PC
Racing The Light
RadioSphere
Restomod TV
Robotica 2003
Rundfunker
SaturnPC
S-CUBE
SEGA-ITX
SpaceCase
SpacePanel
Spartan Bluebird
Spider Case
Supra-Server
Teddybear
Telefunken 2003
TERA-ITX
The Clock
ToAsTOr
Tortoise Beetle
Tux Server
Underwood No.5
Waffle Iron PC
Windows XP Box
Wraith SE/30
XBMC-ION