
Posted on October 24, 2003
Introduction
For those thinking of building a mini-itx project, I've summarised the process below:
1) Come up with a good idea
2) Recognize that the good idea actually sucks
3) Come up with a great idea
4) Spend 3 days surfing the internet for parts
5) Realize Velcro will work better than 90% of those parts
6) Make 10 trips to the hardware store for the wrong size screws, nuts and bolts
7) Burn out the motor on your dremel
8) Repeat steps 1-7 for each portion of the project
I noticed several years ago how much better a party was when you had a massive hard drive full of MP3s to DJ from instead of a pile of badly organized cds. This was no problem when the party was at my house, but what to do when its somewhere else? Moving a whole PC setup across town (or cross-country) was too much trouble. I considered getting a laptop, but they seemed too expensive, have small hard drives, and aren't upgradable. Then I stumbled upon Mini-ITX.com <cue church music>.
I was very impressed with the Lunchbox PC. Compact. Stylish. It didn't look like an insane amount of work. As I shopped around for the right box (Underdog, Hong Kong Phooey, etc) and measured out what I wanted to put inside it, I realized a lunchbox wasn't going to be large enough. Even if I managed to squeeze in a dvd player, I'd still need to carry around something to put the mouse, keyboard, and power cables in.
|
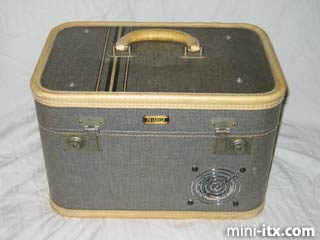
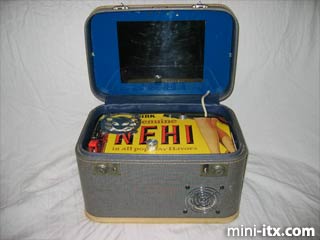
I spent the next 2 weeks critically examining any object bigger than a lunchbox, but smaller than a PC. Finally, wandering through a thrift store, I found it - a vintage Osh-Kosh vanity case. It was perfect - sturdy construction, plenty of room, portable, retro stylish, and slightly absurd.
The Construction
|
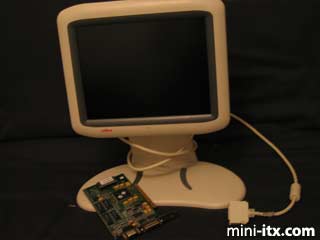
The lid was begging to have a monitor built into it. Not wanting to spend a fortune, I was about to buy a crummy 5" playstation monitor when I came across this 10.5" LCD for $100, which fit the lid precisely. As an interesting bonus, the monitor is powered from its own pci card -saving me the trouble of another wiring connection.
|
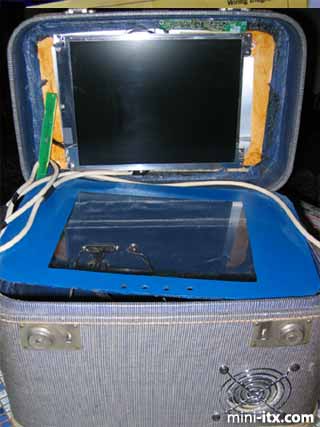
I stripped the LCD panel out of its casing and screwed it to the lid. The bezel was cut out of Lexan, masked, and painted blue.
|
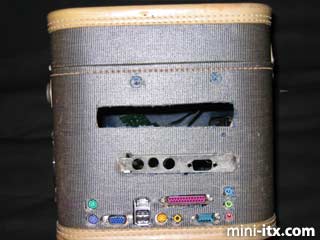
Now it was time to break out the dremel and cut holes for the various ports. You'll notice from the photo that I didn't do the best job here. It turns out the reason the luggage is so sturdy is because the walls are made out of 1/8" hardwood - which made it difficult to get the motherboard and the holes lined up. I cut a hole in the front for ventilation intake, and one in the back for the power plug.
|
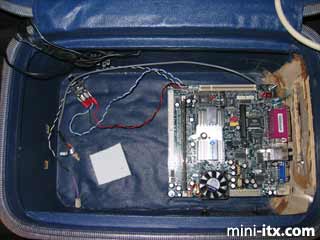
Here's a shot of the motherboard installed.
The more observant among you will have noticed notice 2 large slots cut out above the standard ports. One of these is for the DVD player. The other is for an AVI All-in-Wonder VE video card. Why did I need another video card (considering I already had 2)? During early testing using a video projector, I noticed that while the M-9000 plays MP3s with no difficulty, it was excruciatingly slow at running Winamp's Milkdrop visualizations. Now, I really like funky lights with my music, so adding a video card with better 3D graphics became a high priority.
 |
 |
 |
Quick Links
Mailing Lists:
Mini-ITX Store
Projects:
Show Random
Accordion-ITX
Aircraft Carrier
Ambulator 1
AMD Case
Ammo Box
Ammo Tux
AmmoLAN
amPC
Animal SNES
Atari 800 ITX
Attache Server
Aunt Hagar's Mini-ITX
Bantam PC
BBC ITX B
Bender PC
Biscuit Tin PC
Blue Plate
BlueBox
BMW PC
Borg Appliance
Briefcase PC
Bubbacomp
C1541 Disk Drive
C64 @ 933MHz
CardboardCube
CAUV 2008
CBM ITX-64
Coelacanth-PC
Cool Cube
Deco Box
Devilcat
DOS Head Unit
Dreamcast PC
E.T.PC
Eden VAX
EdenStation IPX
Encyclomedia
Falcon-ITX
Florian
Frame
FS-RouterSwitch
G4 Cube PC
GasCan PC
Gingerbread
Gramaphone-ITX-HD
GTA-PC
Guitar PC
Guitar Workstation
Gumball PC
Hirschmann
HTPC
HTPC2
Humidor 64
Humidor CL
Humidor II
Humidor M
Humidor PC
Humidor V
I.C.E. Unit
i64XBOX
i-EPIA
iGrill
ITX Helmet
ITX TV
ITX-Laptop
Jeannie
Jukebox ITX
KiSA 444
K'nex ITX
Leela PC
Lego 0933 PC
Legobox
Log Cabin PC
Lunchbox PC
Mac-ITX
Manga Doll
Mantle Radio
Mediabox
Mega-ITX
Micro TV
Mini Falcon
Mini Mesh Box
Mini-Cluster
Mobile-BlackBox
Moo Cow Moo
Mr OMNI
NAS4Free
NESPC
OpenELEC
Osh Kosh
Pet ITX
Pictureframe PC
Playstation 2 PC
Playstation PC
Project NFF
PSU PC
Quiet Cubid
R2D2PC
Racing The Light
RadioSphere
Restomod TV
Robotica 2003
Rundfunker
SaturnPC
S-CUBE
SEGA-ITX
SpaceCase
SpacePanel
Spartan Bluebird
Spider Case
Supra-Server
Teddybear
Telefunken 2003
TERA-ITX
The Clock
ToAsTOr
Tortoise Beetle
Tux Server
Underwood No.5
Waffle Iron PC
Windows XP Box
Wraith SE/30
XBMC-ION