
Posted on March 13, 2004
Introduction
|
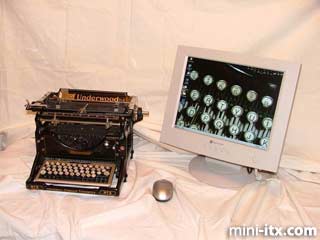
Quite a while back, one of my friends sent me a "photoshopped" picture of an old typewriter (it looked like a Remington) fitted with a monitor, mouse, and printer (the printer had the platten and carriage attached to it). I looked to see if "true" retrofit would be possible, but, at the time I researched the possibility, Mini-ITX motherboards were not yet available.
I stored the picture in my archives and pretty much forgot about it. After I had completed an Apple IIe retrofit, I sent a picture of it to my friends. One of them sent a link to this website.
I looked through all of the unusual mods and came across a mantle clock mod. The clock was from the 20s or 30s and it got me thinking about the possibility of doing a typewriter mod. I pulled the picture out of my archives and did some measurements. It would work.
I really didn't want to nuke one of my good typewriters (I collect vintage typewriters). The only No. 5 I had was one which started my collection. I looked on eBay and found a couple of "non-working" No. 5s. Well, one of the "non-working" No.5's was actually a No. 3 and needed to be re-sprung and oiled up (it was one of the few made in Canada, so it was NOT coming apart) before it typed flawlessly. The other, was a No. 5 and had better chrome than my original. A couple of unbent typebars, and a few shots of oil, later, it worked better than my first No. 5. I didn't have the heart to take either eBay purchase apart. I looked on eBay for old typewriter frames and found one guy selling typewriter keys, who agreed to look for one of his old frames. When he realized I was in Canada, he did not want to send it to me (too much hassle and too much for shipping). I decided that I would be taking apart my original No. 5.
Now that the Underwood retrofit is done, I'm quite glad that I took apart my original No. 5.
The "Underwood No. 5"
|
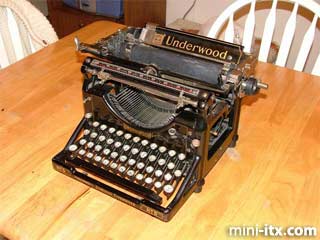
The "Before" picture. This is an Underwood No. 5 typewriter from 1924. The last patent date on the rear of the typewriter is August of 1923, however research into the serial number on the typewriter carriage has the manufacture date as June 1924.
|
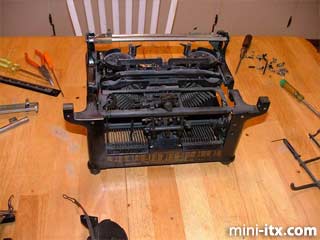
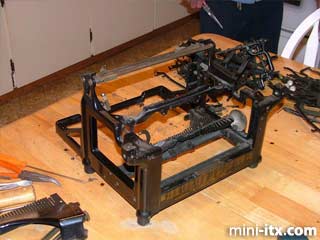
I began the de-construction phase on my kitchen table.Off with the carriage!! All of the screws were flat headed and had not been touched for almost 80 years. Liberal doses of WD-40 were required.
|
The pile of useless parts slowly grew. It took almost an hour to get this far along. With a closer look at the dismantled No. 5, one can see that the keys are now seriously misaligned.
|
The rear of the dismantled No. 5.
|
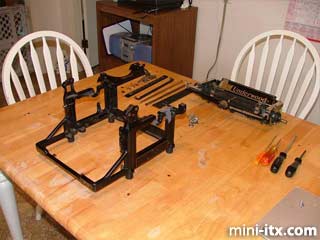
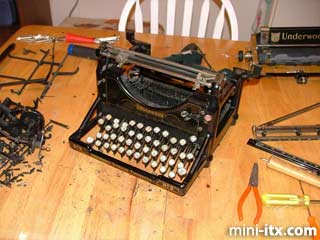
I stripped the typewriter of its internals to the frame. Well, almost to the frame. The typebar stabilizer was pinned to the frame, not screwed. Non wanting to damage the cast iron frame, I tried to punch out the pins. I was unsuccessful. In the end, I took the hammer and gave the stabilizer a good whack. It shattered and I was able to remove it. I was really worried that the jar would break the frame, but it didn't.... yet. The top of the frame had another rigid bar, like the one on the bottom, which held the strikers. I thought I could hammer it out like the bottom, but a fast whack, an "oops," and a string of explitives later, I had a broken frame. Thankfully, I had a container of plastic weld in the misc. drawer. This paused my project for a few days while the plastic weld set.
|
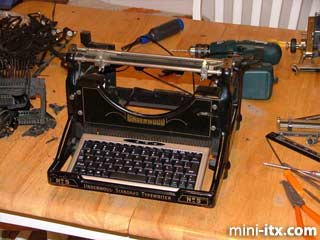
I bought a mini 77 key USB keyboard for this project. It was (and is) a little small, but it fit within the frame. I tried to use some of the mini - full-sized keyboards (81 and 88 key), but they either didn't fit or looked too gaudy.
|
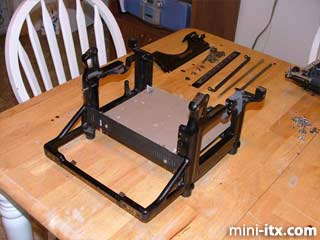
The baseplate template was created out of cardboard and then used as a guide to cut from thin steel. The steel came from the side panel of an old AT case. The thin side panel was easy to cut, but the result was a slightly flimsy baseplate. I placed the original cardboard template onto the steel for added rigidity. I cut a rectangular hole in the baseplate for the CD-RW data and power cables.
 |
 |
 |
Quick Links
Mailing Lists:
Mini-ITX Store
Projects:
Show Random
Accordion-ITX
Aircraft Carrier
Ambulator 1
AMD Case
Ammo Box
Ammo Tux
AmmoLAN
amPC
Animal SNES
Atari 800 ITX
Attache Server
Aunt Hagar's Mini-ITX
Bantam PC
BBC ITX B
Bender PC
Biscuit Tin PC
Blue Plate
BlueBox
BMW PC
Borg Appliance
Briefcase PC
Bubbacomp
C1541 Disk Drive
C64 @ 933MHz
CardboardCube
CAUV 2008
CBM ITX-64
Coelacanth-PC
Cool Cube
Deco Box
Devilcat
DOS Head Unit
Dreamcast PC
E.T.PC
Eden VAX
EdenStation IPX
Encyclomedia
Falcon-ITX
Florian
Frame
FS-RouterSwitch
G4 Cube PC
GasCan PC
Gingerbread
Gramaphone-ITX-HD
GTA-PC
Guitar PC
Guitar Workstation
Gumball PC
Hirschmann
HTPC
HTPC2
Humidor 64
Humidor CL
Humidor II
Humidor M
Humidor PC
Humidor V
I.C.E. Unit
i64XBOX
i-EPIA
iGrill
ITX Helmet
ITX TV
ITX-Laptop
Jeannie
Jukebox ITX
KiSA 444
K'nex ITX
Leela PC
Lego 0933 PC
Legobox
Log Cabin PC
Lunchbox PC
Mac-ITX
Manga Doll
Mantle Radio
Mediabox
Mega-ITX
Micro TV
Mini Falcon
Mini Mesh Box
Mini-Cluster
Mobile-BlackBox
Moo Cow Moo
Mr OMNI
NAS4Free
NESPC
OpenELEC
Osh Kosh
Pet ITX
Pictureframe PC
Playstation 2 PC
Playstation PC
Project NFF
PSU PC
Quiet Cubid
R2D2PC
Racing The Light
RadioSphere
Restomod TV
Robotica 2003
Rundfunker
SaturnPC
S-CUBE
SEGA-ITX
SpaceCase
SpacePanel
Spartan Bluebird
Spider Case
Supra-Server
Teddybear
Telefunken 2003
TERA-ITX
The Clock
ToAsTOr
Tortoise Beetle
Tux Server
Underwood No.5
Waffle Iron PC
Windows XP Box
Wraith SE/30
XBMC-ION