|  | July 15, 2024
KUBIC is a Nintendo-themed, 3D Printable Mini-ITX case September 05, 2017
Choosing the right DC-DC PSU August 27, 2015
AMD's Project Quantum August 13, 2015
The Redstone PC is the ultimate Mini-ITX Minecraft Machine October 09, 2014
The "Restomod TV" April 09, 2013
Installing NAS4Free February 28, 2013
Building an XBMC 12 Home Theatre PC January 25, 2011
XBMC Guide updated to version 10.0 August 06, 2010
Building a Green PC February 15, 2010
Building an ION powered HTPC with XBMC |
| | | | October 10, 2008
The "Cambridge Autonomous Underwater Vehicle 2008" September 12, 2008
"Florian", the DVD burning robot September 05, 2008
The "i-EPIA" May 22, 2008
The "GTA-PC" April 14, 2007
The "Digg" Case January 19, 2007
The "ITX-Laptop" December 07, 2006
The "Tortoise Beetle" October 02, 2006
The "DOS Head Unit" August 31, 2006
The "Janus Project" August 05, 2006
The "Leela PC" June 26, 2006
Nano-ITX in a Football May 17, 2006
The "EPIA Alloy Mod" April 11, 2006
Neatorama's Collection of Case Mods February 18, 2006
The "Rundfunker" October 24, 2005
The "ITX TV" October 06, 2005
The K'nex-ITX August 05, 2005
The "Waffle Iron PC" July 21, 2005
The "Supra-Server" July 18, 2005
The "Mega-ITX" July 07, 2005
The "Encyclomedia" |
| | | | May 25, 2005
The "Accordion ITX" May 16, 2005
The "FileServerRouterSwitch" May 15, 2005
The "Mini Falcon" May 13, 2005
The "Bender PC" May 11, 2005
The "BBC ITX B" May 10, 2005
The "Frame" April 20, 2005
The "Jeannie" March 09, 2005
The "Cool Cube" January 30, 2005
First Nano-ITX Project? January 17, 2005
The "iGrill" January 15, 2005
The "Gumball PC" December 15, 2004
The "Deco Box" December 03, 2004
The "TERA-ITX" October 06, 2004
The "Coealacanth-PC" September 17, 2004
The "Gramaphone-ITX-HD" August 26, 2004
The "C1541 Disk Drive ITX" August 25, 2004
The "SEGA-ITX" August 13, 2004
The "Quiet Cubid" August 06, 2004
The "BMWPC" July 14, 2004
The "Moo Cow Moo" Full alphabetical archive on right hand side of page... |
|
|
IPCop based Home Gateway
Posted on June 1, 2002
Contents
Introduction
Requirements
- Assembling the hardware
- Installing IPCop
- Connecting
your Home LAN
- Using IPCop
Introduction
The time of the single-PC household are numbered.
Very often these days homes have more than one PC (possibly
due to the fact you have to upgrade them every 18 months!).
The cost of PC's is continually in a downward spiral and home-networking
hardware is flying off the shelves.
Once people have a couple of PC's a very common
request is to share the household Internet connection, be
it (A)DSL, Cable or just a dial-up modem. There are various
ways of doing this, but most commonly you just use the Internet
sharing wizards in Windows 98 or 2000. This works fine in
most cases but it's not ideal, and not very flexible. There
are also hardware-based routers, which are great in my opinion
but like all hardware-based solutions have limited upgradability.
Hardware devices from such manufacturers as
D-Link, NetGear and Linksys usually include four things:
- DHCP Server for your home LAN so all your
PC's get their settings automatically
- Network Address Translation to enable sharing
of your Internet connection with a single IP address
- Simple Firewalling to protect your network
from intruders
- Port forwarding so that you can make certain
software work (like hosting multi-player games for you and
your friends) from the Internet
What if we told you that for about the same
money you're going to spend on that hardware router you could
make a high performance EPIA firewall based on Linux? Well,
it's true - but what are the advantages?
- It's totally upgradable, not just simple
stuff but things like IPV6 which will break ALL other home
routers
- The packet-handling abilities of Linux are
far better than any Windows or hardware based firewall (in
my experience).
- You can easily add other software to do things
like web caching and traffic shaping (which prioritises
your most important traffic - such as voice over IP or gaming)
- It's small and quiet and being Linux will
run indefinitely but if you get bored with it you can install
something else...
- It's a cool project and you'll probably learn
something from it!
When we started this project, we planned to
use Redhat Linux 7.3, adding all the required software components
to make it into a home gateway. But once we actually
started writing that project wequickly realised that it was
just too much to present in an easy manner, so we went back
to the drawing board. After looking at a few pre-built Linux
firewall distributions we came across IPCop,
and it's perfect - easy to install, simple to use and powerful.
Requirements:
- 1 x Bootable IPCop CD - Click
here to download (at the time of writing the latest
version is ipcop-0.1.2b2.iso). Write this to CD using your
favourite CDR software. The file is about 25Mb and takes
just over an hour to download over 56K.
- 1 x EPIA Motherboard with either 533Mhz
Eden ESP5000 or 800mhz C3 (the ESP5000 is more than fast
enough)
- 64MB or more of Memory
- A Hard Disk (any size, the quieter the better)
- 1 x extra Network Interface Card, USB (A)DSL
Adapter or Analogue modem.
- a CD-ROM drive - only needed during the
install process.
1. Assemble the hardware:
I'm not going to go into minute detail here,
if you're attempting this project I am assuming you know how
to assemble a PC. Remember a few ground-rules. The Blue IDE
connector goes onto the motherboard, the Black one onto the
Hard Disk - everything else should be easy.
If you're using the 2677 case you should find
that a low profile NIC should match up with the hole on the
back of the case - push out the metal covering the hole and
discard it. Remove the metal blanking slot from the card and
push it into the motherboard.
You'll need a CD-ROM only for the install process,
so take one out of another PC, connect it to IDE2 and leave
the case's cover off.
2. Installing IPCop:
Insert the CD & power-on.
As this article is meant to for people who have
had no experience with Linux or IPCop before, I am going to
go into a lot of detail to make sure nothing goes wrong.
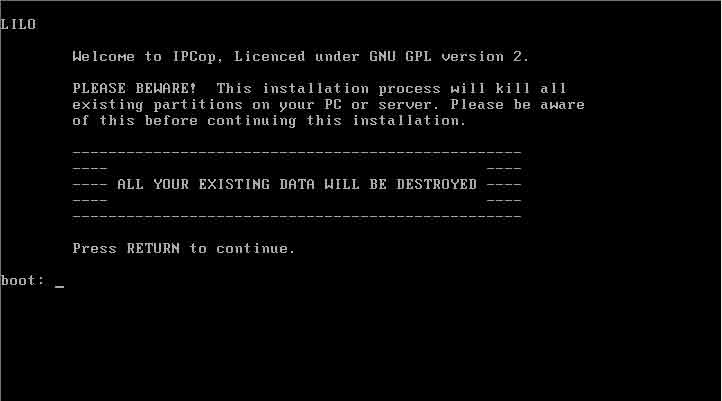
2.1
If the boot CD is working, you should see this
screen warning you that your hard-disk is about to be wiped.
Only proceed if you're sure your hard-disk's contents are
no longer needed! Hit the Enter key when ready.
2.2
If you speak English, select English,
if not select -erm- Deutsch.
2.3
We're installing from CD, so just select CDROM.
2.4
Keep pressing enter until you see this...
2.5
99% of the time a probe of the network adapters
will work, so just select PROBE.
|
|