
Posted on April 9, 2013
Installation onto USB stick
You will need 2 USB memory sticks at least 512MB in size. One will become your machine's boot drive. Try to choose reliable, branded units.
Overview
The installation takes 3 parts:
- Create installation stick
- Boot installation stick
- Install NAS4Free onto destination stick.
1. Create installation ("source") stick
This stage can be conducted on any Windows machine you have handy. You will need 2 files to install the NAS4Free operating system:
1. The "Win32 Disk Imager" tool which is available from
http://sourceforge.net/projects/win32diskimager/files/latest/download
2. The NAS4Free disk image, which is available from
http://sourceforge.net/projects/nas4free/files/
Click on the most recent version (currently 9.1.0.1), then the latest build (currently 9.1.0.1.636), then choose the "LiveUSB" image. Choose 64-bit (x64) if your processor supports it, otherwise choose 32-bit (x86).
Once you have downloaded these files, insert your first (installation) USB stick into a USB slot.
Writing the disk image to your USB stick
Press the Windows Key and E together to bring up "My Computer". Note the drive-letter of the USB drive (e.g. H:).
Unzip the "Win32 Disk Imager" file, double-click on the Win32DiskImager.exe file and click "yes" to any User Account Control questions.
Click on the blue "disk" icon and browse for your "LiveUSB" NAS4Free image.
Select the correct drive letter for your USB key in the "device" section.
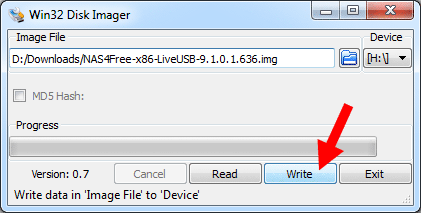
Now click "Write". DO NOT OVERWRITE THE WRONG DISK!
Once this is finished, press Windows Key+E again to bring up My Computer, now right-click on the USB drive and click "Eject". Remove the drive when Windows tells you it's safe to do so.
A bit of background information:
The key you have in your hand is a "Live" version of NAS4Free. It is designed as a "try before you buy" installation. It will operate as a full installation but does not save its configuration between reboots. The next stages of the installation create a permanant "embedded" system.
2. Boot installation stick
Power on your NAS system and boot from the memory stick. This is most easily achieved by pressing the "boot menu" key during initial boot-up.
The Boot Menu is usually accessed by either the F8, F10, F11 or F12 key when booting, depending on your motherboard. For instance on the Gigabyte E350N use F12. Many Jetway motherboards use F11.
Some BIOSes do not have boot menu, so the first boot device will need to be temporarily changed in the BIOS to your USB Stick.
If all goes well you will be presented with immediately see some text like this:
BTX loader 1.00 BTX version is 1.02
Consoles: internal video/keyboard
BIOS CD is cd0
BIOS drive C: is disk0
BIOS drive D: is disk1
BIOS 636kB/261056kB available memory
3. Install NAS4Free onto destination stick
Your system should now boot into NAS4Free "Live", eventually you should be presented with a menu like this one:
Console setup
 -------------
 1) Configure Network Interfaces
 2) Configure Network IP Address
 3) Reset WebGUI Password
 4) Reset to Factory Defaults
 5) Ping Host
 6) Shell
 7) Reboot System
 8) Shutdown System
 9) Install/Upgrade NAS4Free from LiveCD/LiveUSB
At this point you should also insert your "destination" USB memory stick and choose option 9. You will now see the following menu:
1 Install 'Embedded' OS on CF/USB Flash Drive or Hard Drive
2 Install 'Embedded' OS on HDD/Flash/USB + DATA + SWAP partition
3 Install 'Full' OS on HDD + DATA + SWAP partition
4 Upgrade 'Embedded' OS from LiveCD
5 Upgrade 'Full' OS from LiveCD
4 Upgrade 'Embedded' OS from LiveCD/LiveUSB
5 Upgrade 'Full' OS from LiveCD/LiveUSB
6 Upgrade and convert 'Full' OS to 'Embedded'
As you wish to install an "embedded" version of the OS (which is most easily upgraded later), choose option #1. Which should show you the following page:
NAS4Free 'embedded' installer for Flash device or HDD.
- Create 1 partition for OS image
- Uses a RAM disk to limit read/write access to the device
Warning: There will be some limitations:
1. This will erase ALL partition and data on the destination disk
2. You can't use your destination disk for sharing data
Installing on USB key is the preferred way:
It saves you an IDE or SCSI channel for more hard drives.
Choose "OK". You will now be asked for the "source" stick - the stick you created using the steps above. This stick should be automatically detected so just press Enter.
Now choose the destination stick. This stick will be over-written with the embedded NAS4Free operating system. This will probably be labelled as da0 or da1.
Your NAS4Free OS will now be installed. Once installed return to the menu and choose option #8 "Shutdown System".
Once your system has shutdown, remove the "source" USB stick. Move the NAS4Free "embedded" stick into its permanent location if necessary.
Install or connect any hard-drives or SSDs that you wish to use in your storage server at this point.
You will probably want to permanently change the drive boot order in your BIOS so that the USB stick is always booted first. To do this press DEL during boot-up on most systems, or F2 on most Intel motherboards.
Now boot the system again. You will be presented with the familiar NAS4Free menu on the console. Your IP address will probably be shown as 192.168.1.250 which may or may not be correct for your network. If it is correct (or you don't know if it is) open a web browser on another PC and type http://192.168.1.250 in the address bar. If you get a NAS4Free login screen you are good to go.
If you do not get a NAS4Free login screen, go back to the NAS4Free system's console and choose option #2 "Configure Network IP Address", then choose Yes to the question "Do you want to use DHCP for this interface?". Choose No to the question "Do you want to configuration IPv6 for this interface?" [sic].
You will now be told the correct address for your NAS4Free system... type it into your browser on another PC.
You should now see the NAS4Free login screen in your browser:
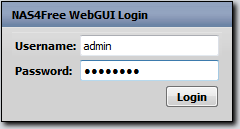
If you don't see it, double-check both systems are connected to the network. The default login name is "admin" and the password is "nas4free".
WE ARE READY TO CONFIGURE OUR APPLIANCE!
Configuration -->
 |
 |
 |
Quick Links
Mailing Lists:
Mini-ITX Store
Projects:
Show Random
Accordion-ITX
Aircraft Carrier
Ambulator 1
AMD Case
Ammo Box
Ammo Tux
AmmoLAN
amPC
Animal SNES
Atari 800 ITX
Attache Server
Aunt Hagar's Mini-ITX
Bantam PC
BBC ITX B
Bender PC
Biscuit Tin PC
Blue Plate
BlueBox
BMW PC
Borg Appliance
Briefcase PC
Bubbacomp
C1541 Disk Drive
C64 @ 933MHz
CardboardCube
CAUV 2008
CBM ITX-64
Coelacanth-PC
Cool Cube
Deco Box
Devilcat
DOS Head Unit
Dreamcast PC
E.T.PC
Eden VAX
EdenStation IPX
Encyclomedia
Falcon-ITX
Florian
Frame
FS-RouterSwitch
G4 Cube PC
GasCan PC
Gingerbread
Gramaphone-ITX-HD
GTA-PC
Guitar PC
Guitar Workstation
Gumball PC
Hirschmann
HTPC
HTPC2
Humidor 64
Humidor CL
Humidor II
Humidor M
Humidor PC
Humidor V
I.C.E. Unit
i64XBOX
i-EPIA
iGrill
ITX Helmet
ITX TV
ITX-Laptop
Jeannie
Jukebox ITX
KiSA 444
K'nex ITX
Leela PC
Lego 0933 PC
Legobox
Log Cabin PC
Lunchbox PC
Mac-ITX
Manga Doll
Mantle Radio
Mediabox
Mega-ITX
Micro TV
Mini Falcon
Mini Mesh Box
Mini-Cluster
Mobile-BlackBox
Moo Cow Moo
Mr OMNI
NAS4Free
NESPC
OpenELEC
Osh Kosh
Pet ITX
Pictureframe PC
Playstation 2 PC
Playstation PC
Project NFF
PSU PC
Quiet Cubid
R2D2PC
Racing The Light
RadioSphere
Restomod TV
Robotica 2003
Rundfunker
SaturnPC
S-CUBE
SEGA-ITX
SpaceCase
SpacePanel
Spartan Bluebird
Spider Case
Supra-Server
Teddybear
Telefunken 2003
TERA-ITX
The Clock
ToAsTOr
Tortoise Beetle
Tux Server
Underwood No.5
Waffle Iron PC
Windows XP Box
Wraith SE/30
XBMC-ION