
Posted on May 24, 2004
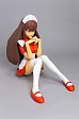
The Completed Model
|
|
|
|


|
|
|
|


|
|
 |
|


The the clay-surface was smoothed and finished with sandpaper. No polystyrene can be seen.
Painting
|
|
|
|


This time I cannot find my favorite Neo-Color so I used gesso for the base.
Painting is done using liquid acrylic as usual. Several layers are applied for brightness and graduation. I dried the paint with a heat-gun between coats.
Location of Components
|
|
|
|


PC components are located at the back and in the hair. First, we position the head. The switches and LEDs are integrated into a single part and located inside the hair.
Completion
|
|
|
|


|
|
|
|


|
|
|
|


|
|
|
|


Approximately 3/4 scale, perhaps. Quite different from the first draft. Miss Kanna I pray thee mercy!
Photos for PC-DIY Monthly
(Courtesy of the editors of PC-DIY Monthly)
|
|
|
|


|
|
|
|


It seems the editors made a mistake at the photo shoot, they placed the power supply unit in the wrong place. It's due to the lack of communication between them and I, who was not able to attend.
Specifications
VIA EPIA CL 10000 Motherboard
Hitachi DK23AA-12 12GB HDD
NEC x24 Speed DVD-RW
Seventeam ST-150SL PSU
 |
 |
 |
Quick Links
Mailing Lists:
Mini-ITX Store
Projects:
Show Random
Accordion-ITX
Aircraft Carrier
Ambulator 1
AMD Case
Ammo Box
Ammo Tux
AmmoLAN
amPC
Animal SNES
Atari 800 ITX
Attache Server
Aunt Hagar's Mini-ITX
Bantam PC
BBC ITX B
Bender PC
Biscuit Tin PC
Blue Plate
BlueBox
BMW PC
Borg Appliance
Briefcase PC
Bubbacomp
C1541 Disk Drive
C64 @ 933MHz
CardboardCube
CAUV 2008
CBM ITX-64
Coelacanth-PC
Cool Cube
Deco Box
Devilcat
DOS Head Unit
Dreamcast PC
E.T.PC
Eden VAX
EdenStation IPX
Encyclomedia
Falcon-ITX
Florian
Frame
FS-RouterSwitch
G4 Cube PC
GasCan PC
Gingerbread
Gramaphone-ITX-HD
GTA-PC
Guitar PC
Guitar Workstation
Gumball PC
Hirschmann
HTPC
HTPC2
Humidor 64
Humidor CL
Humidor II
Humidor M
Humidor PC
Humidor V
I.C.E. Unit
i64XBOX
i-EPIA
iGrill
ITX Helmet
ITX TV
ITX-Laptop
Jeannie
Jukebox ITX
KiSA 444
K'nex ITX
Leela PC
Lego 0933 PC
Legobox
Log Cabin PC
Lunchbox PC
Mac-ITX
Manga Doll
Mantle Radio
Mediabox
Mega-ITX
Micro TV
Mini Falcon
Mini Mesh Box
Mini-Cluster
Mobile-BlackBox
Moo Cow Moo
Mr OMNI
NAS4Free
NESPC
OpenELEC
Osh Kosh
Pet ITX
Pictureframe PC
Playstation 2 PC
Playstation PC
Project NFF
PSU PC
Quiet Cubid
R2D2PC
Racing The Light
RadioSphere
Restomod TV
Robotica 2003
Rundfunker
SaturnPC
S-CUBE
SEGA-ITX
SpaceCase
SpacePanel
Spartan Bluebird
Spider Case
Supra-Server
Teddybear
Telefunken 2003
TERA-ITX
The Clock
ToAsTOr
Tortoise Beetle
Tux Server
Underwood No.5
Waffle Iron PC
Windows XP Box
Wraith SE/30
XBMC-ION