
Posted on October 28, 2003
Software
Well that was the physical side of things, onto the software. Why go to the trouble of making a case as cool as most of the projects I've seen and then ruin the whole thing with Windows??? Linux it baby! One of the features I was most surprised with was PXE, having never touched it before. A few stages are involved in booting it, but once done they seem really trivial:
DHCP
This was easy enough, I already had a working DHCP server on my network, and just had to specific details of the MAC address to the dhcpd.conf file, as PXE won't load up at all without it. So to the end I just added:
host animal {
hardware ethernet 12:34:56:78:90:ab;
filename "/pxelinux.0";
}
After this I turned the machine on and it picked up an IP address and started trying to find a boot file to boot to.
|
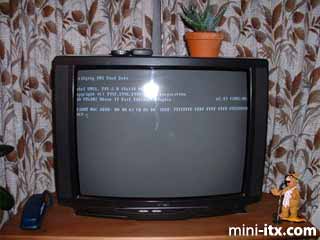
PXE searching for a DHCP server
TFTP
Originally I installed the netkit-tftp server and configured it via xinetd. It complained on reboot that the server did not support the tsize option though (and google confirmed this) so it was then replaced with tftpd-hpa, which I ran as a full service, and it works fine. It ishere that we choose the actual location to export, which I chose to be /home/netboot. The full tftpd server command then is:
/usr/sbin/in.tftpd -l -s /home/netboot -u netboot -v
And this is run as a startup service. So now I had a way to transfer files, I needed something to transfer.
PXELinux
PXELinux is a version of the common syslinux tools for booting Linux from floppies etc, which has been modified to allow booting of PXE systems. A bit of messing around here due to a slight lack of correct documentation, but eventually all I needed to do was copy the pxelinux.0 to the root of my exported root file system. Rebooting now left PXE searching the PXE configuration for a config file to boot from (it’s quite clever as it searches subnets of increasing scope until it gets back to a full default config. This configuration file, /pxelinux.cfg/default (relative to the networked file system), simply reads
name linux
kernel boot/vmlinuz
append nfsroot=192.69.0.10:/home/netboot vga=788 initrd=boot/initrd
ipappend 1
the ipappend attribute is a nifty PXE only thing which tags the previously obtained IP address to the kernel, so the eth0 interface will come up instantly.
Linux Kernel
I now needed an actual image to boot. This was yet another step easier than I had hoped. First I tested it just by copying my existing Athlon image there, and it found it and begin to boot. Unsurprisingly it quickly fell to a kernel panic, but that’s to be expected.
To make a real kernel I just cloned my standard server source and modified it for C3 architecture. Over a number of revisions I ended up removing a huge amount of stuff from the kernel, including any IDE support and any file systems other than NFS and tmpfs. Also no module support as I had such a small default image I just added the via86cxxx module in to the kernel directly. The closest thing I had to a problem was allowing NFS root file systems, which relied on a couple of other features I was slow at tracking down.
The current .config can be seen here (remove the .txt extension)
NFS
NFS is always easy. All I did here was to add to my currently /etc/exports:
/home/netboot 192.168.0.0/24(rw,no_root_squash,sync)
and restart the server, what a doddle!
Linux
At this stage we were getting as far as a nice manageable...
No init found! Try passing init= to kernel
No suprise there as there was still no OS as such. I was thinking about trying something new for me, like Arch, Slackware or Debian, but as I already had a full stage 3 tarball for Gentoo, it was too tempting to ignore. A superbly hands on yet simple distro to use. After untarring the tarball onto the exported root system and rebooting it booted first time! A few personalisations and bam, all done. One OS booting fine.
There are still a number of software issues separate to the actual install, which I'll mention now.
Tv-Out / Framebuffer
During the months I'd been drooling over the thought of getting one of these things I'd read of people having issues with the TV-Out under Linux, and I'd found a number of driver projects I’d planned on getting to grips with. These were never relevant though, the TV-Out is still fed by a standard VESA 2.0 compliant framebuffer chipset, which I’d assumed was not the case, and when I added vga=788 to the PXE config I wasn't even expecting a result. I was happily proved wrong though. A little fuzzy on coloured text, but that's just a little quibble.
The one thing that was an issue though was the fact that, as you can tell if you compare a program watched on a real tv and a TV Capture card, the TV screen loses a lot of picture round the edge of the screen (when the BIOS is set to display in overscan mode). This meant that I couldn’t actually see what I was typing etc, as the bottom of the screen was chopped off. Ack! Gentoo to the rescue though, as a superb thread on their forums gives a guide on installing a full framebuffer with background images using bootsplash, which - most critically - involves defining a box on the screen for text. So I was able to put an 80 pixel border round the screen, reducing the amount of text I can see on the screen, but hardly an issue if you can actually see what you're typing. So my screen ended up looking like this:
|
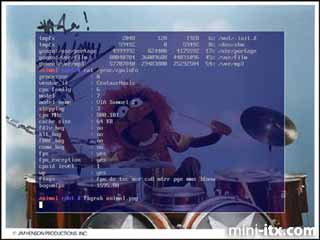
Screenshot of the bootsplash-ed framebuffer console
And in the photo below you can see just how much is missing when the bootsplash is shown on a TV.
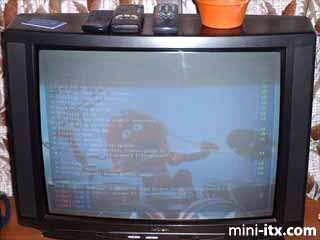
Real life version of the bootsplash-ed framebuffer console
And yes, I do have a fetish for the Muppet Show (other machines at home are Kermit, Gonzo, Fozzie and Crazy Harry).
Watching Videos
MPlayer was the obvious contender for watching titles on the system, as it has a number of good framebuffer outputs already built in � VESA, fbdev, DirectFB, SDL(vesa) and a couple of more obscure ones. The generic VESA worked great first time, and the audio was never an issue in the first place.
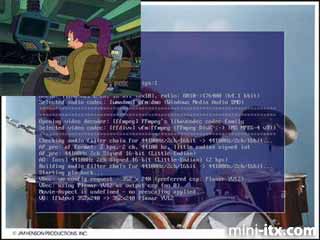
MPlayer in a window
Heat/airflow seemed to be an little issue. The temperature of the Northbridge heat sink while watching a video was very hot. Luckily this and much of the CPU fan is directly beneath the game slot, so I decided to remove the spring loaded flap there - and immediately got decent airflow. Within 5 minutes of finishing the CPU intensive DivX decoding, the heatsink was back to being very cool.
Other Applications
I'm not planning on even trying to use X, as the framebuffer does everything I'm expecting, and I'm not going to be using it as just another computer. I have been looking at other framebuffer compatible applications though, such as links, the web browser. When compiled right links will use a VESA compliant driver giving full graphic web pages. This runs at full screen though, so as above, the edges are not visible in overscan mode. A work-in-progress though. I did also look into DirectFB for running some GTK applications, but DirectFB doesn't seem to work on the TV-Out at all. You never know though�
links running on the fb driver
Future Plans
There are a few things still hoping to be developed:
- Infrared input via the FIR connector
- An interface to use the SNES controller in Linux itself
- Some sort of file browser so we can avoid typing in file names, maybe in SDL
Conclusions
So that's that. It's a superb little machine that is finally letting me watch downloaded and otherwise obtained videos. It works better than I ever expected it too, superb!
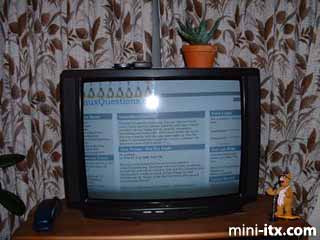
AnimalSNES in residence beneath the TV
 |
 |
 |
Quick Links
Mailing Lists:
Mini-ITX Store
Projects:
Show Random
Accordion-ITX
Aircraft Carrier
Ambulator 1
AMD Case
Ammo Box
Ammo Tux
AmmoLAN
amPC
Animal SNES
Atari 800 ITX
Attache Server
Aunt Hagar's Mini-ITX
Bantam PC
BBC ITX B
Bender PC
Biscuit Tin PC
Blue Plate
BlueBox
BMW PC
Borg Appliance
Briefcase PC
Bubbacomp
C1541 Disk Drive
C64 @ 933MHz
CardboardCube
CAUV 2008
CBM ITX-64
Coelacanth-PC
Cool Cube
Deco Box
Devilcat
DOS Head Unit
Dreamcast PC
E.T.PC
Eden VAX
EdenStation IPX
Encyclomedia
Falcon-ITX
Florian
Frame
FS-RouterSwitch
G4 Cube PC
GasCan PC
Gingerbread
Gramaphone-ITX-HD
GTA-PC
Guitar PC
Guitar Workstation
Gumball PC
Hirschmann
HTPC
HTPC2
Humidor 64
Humidor CL
Humidor II
Humidor M
Humidor PC
Humidor V
I.C.E. Unit
i64XBOX
i-EPIA
iGrill
ITX Helmet
ITX TV
ITX-Laptop
Jeannie
Jukebox ITX
KiSA 444
K'nex ITX
Leela PC
Lego 0933 PC
Legobox
Log Cabin PC
Lunchbox PC
Mac-ITX
Manga Doll
Mantle Radio
Mediabox
Mega-ITX
Micro TV
Mini Falcon
Mini Mesh Box
Mini-Cluster
Mobile-BlackBox
Moo Cow Moo
Mr OMNI
NAS4Free
NESPC
OpenELEC
Osh Kosh
Pet ITX
Pictureframe PC
Playstation 2 PC
Playstation PC
Project NFF
PSU PC
Quiet Cubid
R2D2PC
Racing The Light
RadioSphere
Restomod TV
Robotica 2003
Rundfunker
SaturnPC
S-CUBE
SEGA-ITX
SpaceCase
SpacePanel
Spartan Bluebird
Spider Case
Supra-Server
Teddybear
Telefunken 2003
TERA-ITX
The Clock
ToAsTOr
Tortoise Beetle
Tux Server
Underwood No.5
Waffle Iron PC
Windows XP Box
Wraith SE/30
XBMC-ION