
Posted on 21 January 2003
Toys, Toys, Toys
I've said it before, and I'll say it again. One of the best things about being an adult is being able to walk into a toy store and know that if I really want something, I can buy it. I have only myself to be accountable to. It almost makes up for having to pay taxes...
|
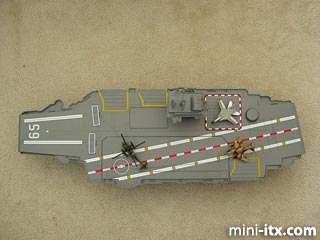
The toy I bought that gave me the idea. The planes that came with it are metal die-cast, and sucked - really cheap construction. The ship itself was much nicer.
The Hull
The main hull and deck are, of course, where the majority of the work was performed. In general, the work proceeded in three stages - plan the components with respect to location and function, perform all modifications to the case' itself, and assemble everything together. That completely ignores all the difficulty actually associated with each task, however.
The planning of the hull was actually a gradual thing. I knew which motherboard I would be using, and I knew which power supply. But items such as the sound circuit, DVD-ROM drive, and memory card reader/writer were relative late-comers in the process. One significant problem with the planning stage was that despite the size of the toy, there were few areas which were flat enough on the hull to add all the ports I needed.
There were quite a lot of modifications to the basic structure that may not be readily apparent. A lot of plastic was removed from the toy to make sure that everything would fit. I had to be careful not to remove any critical structures. Obviously, I needed to remove at least one main screw mounting hole in the center or the motherboard wouldn't fit. I had to make sure that losing that mount didn't affect the structural integrity of the mod overall.
Trying to cut holes for the memory card reader/writer and the DVD-ROM was especially difficult. While the pictures may not totally show the state of the hull, it's actually slightly curved. Trying to cut precise holes for non-curved pieces in a curved structure is not the easiest thing to do.
The deck of the aircraft carrier went through a lot. There was a lot of painting, of course. But also quite a few lights were added so that the runway would light up (actually, the white lights down the side simply light up while the lights in the center of the runway light up in sequence). Over twenty-two LEDs were each individually sanded and wired into the runway alone. Also, the command center went through serious modification. It was painted, had electronics for switches added, and had additional detail added with sheet plastic.
All in all, these modifications were the hardest part of the mod. Knowing that a single accidental cut with my Dremel could ruin weeks of work was certainly somewhat stressful.
|
The command center - there was detailing only on 2 sides. I used some spare plastic to add details to the other sides.
|
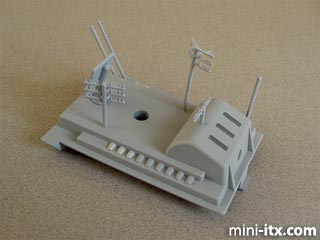
The is the top of the command center without the main antennas. I added some more antennas with model railroad telephone poles.
|
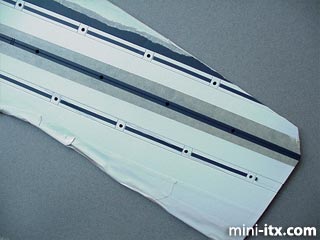
The runway took a good deal of paint. It was painted with 5 colors, each requiring separate masking.
|
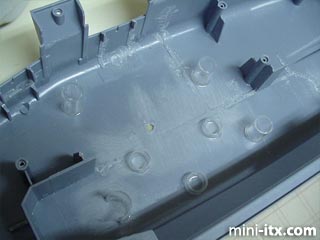
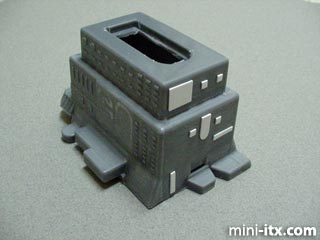
The main hull, already hacked up to fit the motherboard. The risers for the DVD-ROM and the motherboard are in place.
|
The hole for the memory card reader. It may not look like it, but the hull is slightly curved here making this addition very difficult.
 |
 |
 |
Quick Links
Mailing Lists:
Mini-ITX Store
Projects:
Show Random
Accordion-ITX
Aircraft Carrier
Ambulator 1
AMD Case
Ammo Box
Ammo Tux
AmmoLAN
amPC
Animal SNES
Atari 800 ITX
Attache Server
Aunt Hagar's Mini-ITX
Bantam PC
BBC ITX B
Bender PC
Biscuit Tin PC
Blue Plate
BlueBox
BMW PC
Borg Appliance
Briefcase PC
Bubbacomp
C1541 Disk Drive
C64 @ 933MHz
CardboardCube
CAUV 2008
CBM ITX-64
Coelacanth-PC
Cool Cube
Deco Box
Devilcat
DOS Head Unit
Dreamcast PC
E.T.PC
Eden VAX
EdenStation IPX
Encyclomedia
Falcon-ITX
Florian
Frame
FS-RouterSwitch
G4 Cube PC
GasCan PC
Gingerbread
Gramaphone-ITX-HD
GTA-PC
Guitar PC
Guitar Workstation
Gumball PC
Hirschmann
HTPC
HTPC2
Humidor 64
Humidor CL
Humidor II
Humidor M
Humidor PC
Humidor V
I.C.E. Unit
i64XBOX
i-EPIA
iGrill
ITX Helmet
ITX TV
ITX-Laptop
Jeannie
Jukebox ITX
KiSA 444
K'nex ITX
Leela PC
Lego 0933 PC
Legobox
Log Cabin PC
Lunchbox PC
Mac-ITX
Manga Doll
Mantle Radio
Mediabox
Mega-ITX
Micro TV
Mini Falcon
Mini Mesh Box
Mini-Cluster
Mobile-BlackBox
Moo Cow Moo
Mr OMNI
NAS4Free
NESPC
OpenELEC
Osh Kosh
Pet ITX
Pictureframe PC
Playstation 2 PC
Playstation PC
Project NFF
PSU PC
Quiet Cubid
R2D2PC
Racing The Light
RadioSphere
Restomod TV
Robotica 2003
Rundfunker
SaturnPC
S-CUBE
SEGA-ITX
SpaceCase
SpacePanel
Spartan Bluebird
Spider Case
Supra-Server
Teddybear
Telefunken 2003
TERA-ITX
The Clock
ToAsTOr
Tortoise Beetle
Tux Server
Underwood No.5
Waffle Iron PC
Windows XP Box
Wraith SE/30
XBMC-ION