
Posted on October 2, 2006
Building the Controller
MPXPLAY supports input from a keyboard, mouse, joystick, serial port, or parallel port. A keyboard offered the most options, though obviously using a full size keyboard in a car would be cumbersome. A more suited solution was required. Borrowing inspiration from another install by TomG involving the adaption of a stock Ford headunit to control a IR remote for his Nakamichi headunit which was hidden out of sight, I decided to use the stock Toyota headunit in the car as the controller. This also added an extra element of stealth to the install.
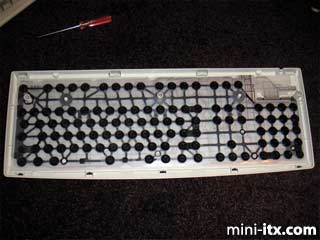
The initial phase was much easier than expected, as the donor keyboard itself undid via 9 clips:
This opened to reveal 3 layers of plastic film and a circuit board that sat under the caps-lock/scroll-lock/num-lock LEDs. In this shot the circuit board has been removed:
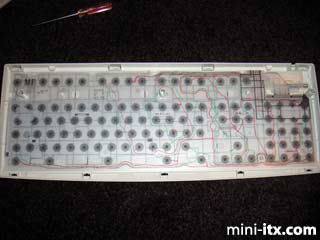
Under the top layer of rubber "springs" that activated the keys, the key switches themselves were simple tracks printed on the plastic that once depressed connected to the layer beneath in a matrix fashion:
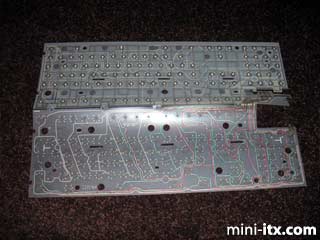
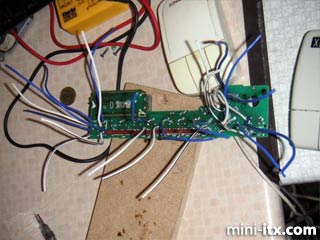
Once opened out to show the two layers it is possible to trace where the various lines run. These coincide with various pins on the circuit board. From there it is possible to draw up a matrix of what pin connections coincide with which "key", in the photo below I'd already started marking some out in pen:
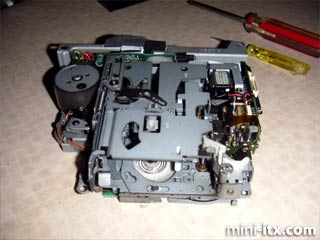
Once I had a list of keys I then set about stripping the stock head unit out to just a case and the fascia:

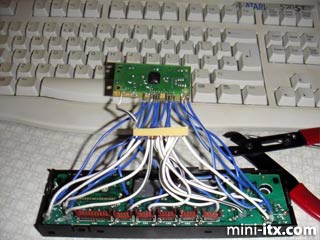
Then I set about wiring buttons on the head unit to the relevant pins on the keyboard controller circuit. To make life easier I only used one "row" of keys, though if I chose I could wire up more keys at a later date:
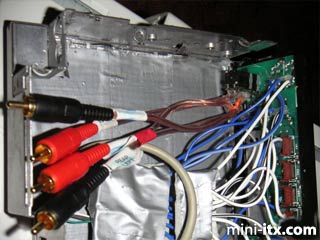
For good measure I also took the stock volume controller and wired RCAs to it so I could feed my output into it before it went to the EQs, to enable me to have an analogue volume control for ease of adjustment.
 |
 |
 |
Quick Links
Mailing Lists:
Mini-ITX Store
Projects:
Show Random
Accordion-ITX
Aircraft Carrier
Ambulator 1
AMD Case
Ammo Box
Ammo Tux
AmmoLAN
amPC
Animal SNES
Atari 800 ITX
Attache Server
Aunt Hagar's Mini-ITX
Bantam PC
BBC ITX B
Bender PC
Biscuit Tin PC
Blue Plate
BlueBox
BMW PC
Borg Appliance
Briefcase PC
Bubbacomp
C1541 Disk Drive
C64 @ 933MHz
CardboardCube
CAUV 2008
CBM ITX-64
Coelacanth-PC
Cool Cube
Deco Box
Devilcat
DOS Head Unit
Dreamcast PC
E.T.PC
Eden VAX
EdenStation IPX
Encyclomedia
Falcon-ITX
Florian
Frame
FS-RouterSwitch
G4 Cube PC
GasCan PC
Gingerbread
Gramaphone-ITX-HD
GTA-PC
Guitar PC
Guitar Workstation
Gumball PC
Hirschmann
HTPC
HTPC2
Humidor 64
Humidor CL
Humidor II
Humidor M
Humidor PC
Humidor V
I.C.E. Unit
i64XBOX
i-EPIA
iGrill
ITX Helmet
ITX TV
ITX-Laptop
Jeannie
Jukebox ITX
KiSA 444
K'nex ITX
Leela PC
Lego 0933 PC
Legobox
Log Cabin PC
Lunchbox PC
Mac-ITX
Manga Doll
Mantle Radio
Mediabox
Mega-ITX
Micro TV
Mini Falcon
Mini Mesh Box
Mini-Cluster
Mobile-BlackBox
Moo Cow Moo
Mr OMNI
NAS4Free
NESPC
OpenELEC
Osh Kosh
Pet ITX
Pictureframe PC
Playstation 2 PC
Playstation PC
Project NFF
PSU PC
Quiet Cubid
R2D2PC
Racing The Light
RadioSphere
Restomod TV
Robotica 2003
Rundfunker
SaturnPC
S-CUBE
SEGA-ITX
SpaceCase
SpacePanel
Spartan Bluebird
Spider Case
Supra-Server
Teddybear
Telefunken 2003
TERA-ITX
The Clock
ToAsTOr
Tortoise Beetle
Tux Server
Underwood No.5
Waffle Iron PC
Windows XP Box
Wraith SE/30
XBMC-ION