
Posted on August 21, 2003
Last year at my workplace I salvaged this little beauty from a pile of obsolete equipment sent to destruction. Not only did I like its good looks, but I thought it had "Mini-ITX" written all over it ;-)
This summer when I finally got my DSL connection at home I wanted a small domestic 24/7 server, so I gave it a new life as host to a VIA EPIA 800 motherboard (running Gentoo Linux).
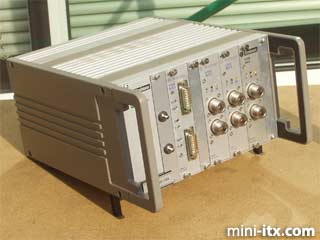
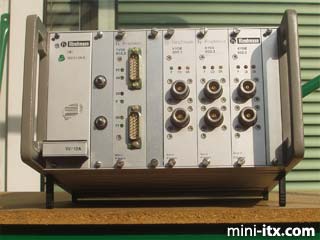
Hirschmann is a German maker of industrial network gear and other things that has been around for a while. This is an early Ethernet hub of theirs (probably mid-eighties) in an aluminum rack-like modular chassis. A nice example of German engineering, sturdy and neatly designed. It had a backplane with connectors and plastic rails into which you could slot various components, like the internal PSU and interface cards. Probably was still in working order when I regretfully took it apart...
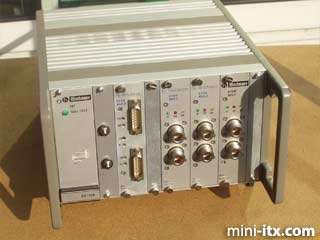
From left to right, the power supply module (unfortunately only 5V), a module with two "AUI" ports, and three modules with two "thick BNC" ports, and some spacers in between (all labeled "802.3" - guess that was important back then ;-)
The top and bottom aluminum panels both have cooling vents (the original PSU was fanless).
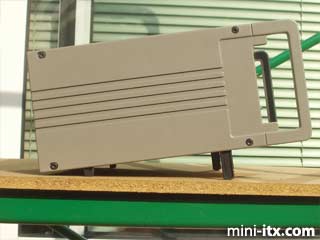
The sides are from lacquered cast aluminum, with built-in handles. The four plastic "feet" are retractable, so the unit could be stacked or sit standalone (for better air flow).
At 21 x 13 x 22 (inside volume, W x H x D, in centimeters), it's not the smallest Mini-ITX box out there, but it means I can have an internal PSU (150W Enhance), a regular 3.5" hard disk (40 GB IBM) -- and even, initially, a full-size CD-ROM drive for installation. The HDD and the 128 MB SDRAM stick I had lying around, so I only had to buy the Epia board and the PSU.
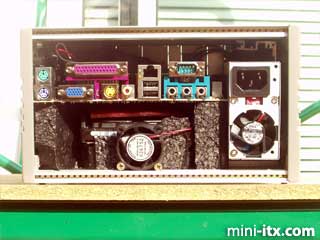
The original back panel was nothing special (plain aluminum plate with just the power socket), so I did not reuse it and left the back open for cooling. The original PSU was mounted in an aluminum cage (visible top right) - I kept three sides of that cage so it would still slide in its rails, and the new PSU was mounted inside with rubber spacers.
I came across a piece of strong, rigid packing material (black foam) that I used to mount the other items. The hard disk sits in a sort of cradle at the bottom - it was difficult to carve but gives good support, dampens vibrations, and its peculiar shape exposes much of the drive for heat dissipation.
The VIA board is mounted above on four foam "pillars", not too close to the top. The loud CPU fan is under-volted (plugged in backwards) to reduce noise. I found an old 486 CPU fan in my treasure chest ; also under-volted it is practically silent (good old days !) so I stuck it in front of the hard disk for good measure, as this is an always-on machine... That's three fans with the one on the PSU so this is not the most quiet Mini-ITX case by far, but that's acceptable to me because it sits in a closet next to the DSL modem and the Wi-Fi router (a shame ;-)
It's also a shame that only one of that impressive stack of back panel ports is actually used (the RJ45) : keyboard and monitor were only present during OS installation and tests. At that time I also had a regular CD-ROM drive in there, but it was just sort of all piled up tightly, so it rattled a lot, was very noisy, and tended to overheat...
My goal was to keep the front panel strictly identical to the original ; I did have to add the power (ATX) and reset switches though, so I looked for push-buttons that had an appropriate "industrial" (sturdy, metallic) look and drilled them through one of the original "spacer" front panels.
Of course I had to rip out everything inside : PSU, backplane, most guide rails, mounting struts, the printed circuit boards of the interface cards behind the front panels... and glue back on most of the LEDs afterwards ;-)
The original power LED
on the left still works (plugged into the motherboard) ;
the red LED labeled "CD" on
the AUI interface board (first left) was re-soldered to act
as the disk activity monitor.
As usual, the cabling issues (switches, LEDs, stuffing in
excess IDE and ATX cable length, etc.) were the most vexing
details of the entire project, so I stopped there : too bad,
the original box must have been quite the Christmas tree...
And yes, I REALLY need to scrape off that last bit of barcode
sticker ;-)
 |
 |
 |
Quick Links
Mailing Lists:
Mini-ITX Store
Projects:
Show Random
Accordion-ITX
Aircraft Carrier
Ambulator 1
AMD Case
Ammo Box
Ammo Tux
AmmoLAN
amPC
Animal SNES
Atari 800 ITX
Attache Server
Aunt Hagar's Mini-ITX
Bantam PC
BBC ITX B
Bender PC
Biscuit Tin PC
Blue Plate
BlueBox
BMW PC
Borg Appliance
Briefcase PC
Bubbacomp
C1541 Disk Drive
C64 @ 933MHz
CardboardCube
CAUV 2008
CBM ITX-64
Coelacanth-PC
Cool Cube
Deco Box
Devilcat
DOS Head Unit
Dreamcast PC
E.T.PC
Eden VAX
EdenStation IPX
Encyclomedia
Falcon-ITX
Florian
Frame
FS-RouterSwitch
G4 Cube PC
GasCan PC
Gingerbread
Gramaphone-ITX-HD
GTA-PC
Guitar PC
Guitar Workstation
Gumball PC
Hirschmann
HTPC
HTPC2
Humidor 64
Humidor CL
Humidor II
Humidor M
Humidor PC
Humidor V
I.C.E. Unit
i64XBOX
i-EPIA
iGrill
ITX Helmet
ITX TV
ITX-Laptop
Jeannie
Jukebox ITX
KiSA 444
K'nex ITX
Leela PC
Lego 0933 PC
Legobox
Log Cabin PC
Lunchbox PC
Mac-ITX
Manga Doll
Mantle Radio
Mediabox
Mega-ITX
Micro TV
Mini Falcon
Mini Mesh Box
Mini-Cluster
Mobile-BlackBox
Moo Cow Moo
Mr OMNI
NAS4Free
NESPC
OpenELEC
Osh Kosh
Pet ITX
Pictureframe PC
Playstation 2 PC
Playstation PC
Project NFF
PSU PC
Quiet Cubid
R2D2PC
Racing The Light
RadioSphere
Restomod TV
Robotica 2003
Rundfunker
SaturnPC
S-CUBE
SEGA-ITX
SpaceCase
SpacePanel
Spartan Bluebird
Spider Case
Supra-Server
Teddybear
Telefunken 2003
TERA-ITX
The Clock
ToAsTOr
Tortoise Beetle
Tux Server
Underwood No.5
Waffle Iron PC
Windows XP Box
Wraith SE/30
XBMC-ION