
or "Roll-Your-Own" Network Attached Storage Device
Posted on October 4, 2003
Adding the CD/RW Drive
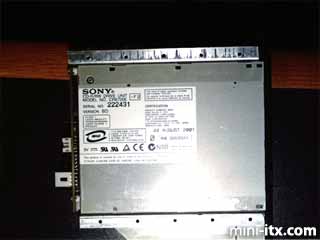
In order to add a CD-RW to the unit, it must be mounted to the side of the case opposite from the motherboard. First, we make mounting bracket from aluminum and attach them to the drive. Next, we remove the other half of the Faraday shield from the side of the Snap Server case with the vent holes. Using a Dremel to reduce the length of the shield exposes the vent holes and prevents the shield from blocking the air intake for the hard drives.
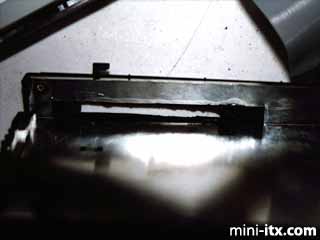
An opening is cut in the top of the Faraday shield and the case for the CD-RW to open to the outside. Cutting the hole in this plastic was a real job; the plastic is a good 5mm thick and a standard nibbler won't work because of thickness. Dremel cutting wheels just melted the plastic, as you can see in the picture. A rough opening was cut then a file was used to complete the opening.
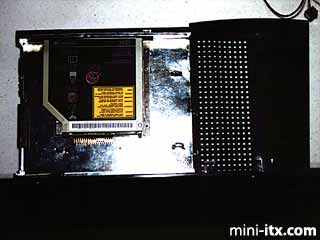
A test fitting of the altered Faraday shield and the CD-RW drive allows us to position and mark where the mounting holes in the shield need to go. We remove the shield, drill the holes, attach the drive to the shield. then put the shield back into the case.
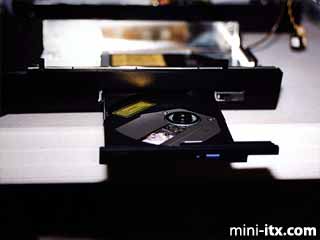
The choice of this CD-RW drive was a good one as the front of the drive is sloped in just the right way to match the rounded top of the Snap Server case. You'll also notice that the front of the drive has a notch on the right-hand side while the opening was cut rectangular. This was due to how well the front matched the slope of the case. The spring that opens the drive isn't strong enough to pop the drive open when the server is assembled. The rectangular opening allows me to get a finger under the front of the drive so I can pull it open.
 |
 |
 |
Quick Links
Mailing Lists:
Mini-ITX Store
Projects:
Show Random
Accordion-ITX
Aircraft Carrier
Ambulator 1
AMD Case
Ammo Box
Ammo Tux
AmmoLAN
amPC
Animal SNES
Atari 800 ITX
Attache Server
Aunt Hagar's Mini-ITX
Bantam PC
BBC ITX B
Bender PC
Biscuit Tin PC
Blue Plate
BlueBox
BMW PC
Borg Appliance
Briefcase PC
Bubbacomp
C1541 Disk Drive
C64 @ 933MHz
CardboardCube
CAUV 2008
CBM ITX-64
Coelacanth-PC
Cool Cube
Deco Box
Devilcat
DOS Head Unit
Dreamcast PC
E.T.PC
Eden VAX
EdenStation IPX
Encyclomedia
Falcon-ITX
Florian
Frame
FS-RouterSwitch
G4 Cube PC
GasCan PC
Gingerbread
Gramaphone-ITX-HD
GTA-PC
Guitar PC
Guitar Workstation
Gumball PC
Hirschmann
HTPC
HTPC2
Humidor 64
Humidor CL
Humidor II
Humidor M
Humidor PC
Humidor V
I.C.E. Unit
i64XBOX
i-EPIA
iGrill
ITX Helmet
ITX TV
ITX-Laptop
Jeannie
Jukebox ITX
KiSA 444
K'nex ITX
Leela PC
Lego 0933 PC
Legobox
Log Cabin PC
Lunchbox PC
Mac-ITX
Manga Doll
Mantle Radio
Mediabox
Mega-ITX
Micro TV
Mini Falcon
Mini Mesh Box
Mini-Cluster
Mobile-BlackBox
Moo Cow Moo
Mr OMNI
NAS4Free
NESPC
OpenELEC
Osh Kosh
Pet ITX
Pictureframe PC
Playstation 2 PC
Playstation PC
Project NFF
PSU PC
Quiet Cubid
R2D2PC
Racing The Light
RadioSphere
Restomod TV
Robotica 2003
Rundfunker
SaturnPC
S-CUBE
SEGA-ITX
SpaceCase
SpacePanel
Spartan Bluebird
Spider Case
Supra-Server
Teddybear
Telefunken 2003
TERA-ITX
The Clock
ToAsTOr
Tortoise Beetle
Tux Server
Underwood No.5
Waffle Iron PC
Windows XP Box
Wraith SE/30
XBMC-ION