
Posted on 21 January 2003
Keyboard
The keyboard was the easiest piece. Basically, modding the keyboard amounted to buying a cheap keyboard and disassembling it so I could replace the LEDs for the caps lock (and other lights) with red/white/blue LEDs. I also painted (actually dyed using vinyl dye) the keyboard.
The keyboard top was painted grey to remind people of a ship hull. The bottom was painted grey to simulate the water line. Lastly, the grey multi-media keys were painted white to remind people of missiles.
The cord was dyed similar to what I did for the mouse.
|

This is the keyboard I started with. It was only $15 new.
|

The final result. Note the custom dyed cable and white buttons up top. Both were white to begin with and were dyed colors that went with the theme better.
Planes
On the deck of the aircraft carrier, I wanted several planes to give the mod a cool, realistic look. The die-cast planes that came with the toy were junk, so I went to a hobby store to find some plastic model kits. Finding appropriate types of planes/helicopters was difficult in the scale I needed. Everything was too big or too small. Eventually I found 2 F-14 aircraft and decided that would have to be good enough.
I wanted to make at least one of the F-14s light up, so I decided I would put lights in the engines and cockpit of one of them and have it be the hard drive activity light. I came up with the idea that if I used a couple of solid metal pieces as the power leads (like the pins from an LED), I could make the plane removable. What good is a toy with small planes if you can't remove the planes and play with them?
There were only a couple of problems with the planes above and beyond what building any plastic model kit entails.
First, since these were very cheap kits from some company I had never heard from before these kits were of pretty low quality. Thus when gluing the top/bottom halves together the pieces didn't line up very well. I ended up using modeling putty to fill the holes and sanding the pieces down. Very difficult when the section you are trying to sand is only a few millimeters long. In the end, looking closely you can tell things didn't line up well. But without someone mentioning it, you probably wouldn't notice.
Second, adding the lights to one of the planes was pretty difficult. Besides the small spaces I had to work with, the main section of the plane was best painted as one piece, rather than gluing two already painted pieces together and have it looking poor. I had to seal the electronics into the already glued together model, but cover the LEDs with tape and leave enough space for the wires to stretch so that the LEDs would not interfere with the painting.
In the end, I liked the results.
|
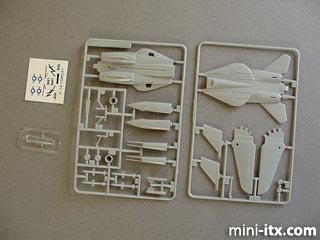
The model kit that the accessory planes would be coming from. I bought two kits, this is just one.
|
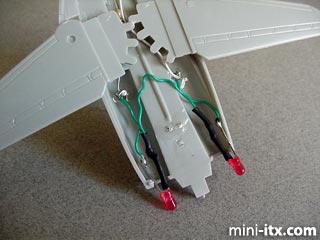
Some wire was soldered onto the LEDs in the engine bay. I had to leave room for the LEDs to move a bit. Later, they are covered with tape before the model is painted.
|
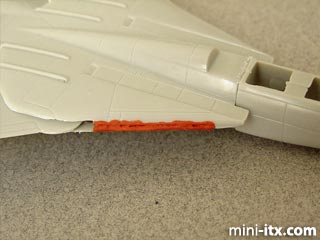
These were cheap quality models. The parts did not line up very well when glued together. I filled the seams with model putty and had to sand them smooth.
|
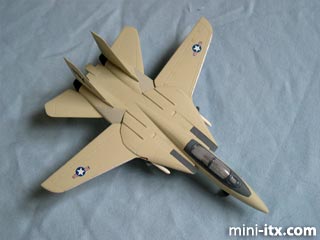
The finished lighted plane. The cockpit was also frosted by light sanding to blend the light better.
 |
 |
 |
Quick Links
Mailing Lists:
Mini-ITX Store
Projects:
Show Random
Accordion-ITX
Aircraft Carrier
Ambulator 1
AMD Case
Ammo Box
Ammo Tux
AmmoLAN
amPC
Animal SNES
Atari 800 ITX
Attache Server
Aunt Hagar's Mini-ITX
Bantam PC
BBC ITX B
Bender PC
Biscuit Tin PC
Blue Plate
BlueBox
BMW PC
Borg Appliance
Briefcase PC
Bubbacomp
C1541 Disk Drive
C64 @ 933MHz
CardboardCube
CAUV 2008
CBM ITX-64
Coelacanth-PC
Cool Cube
Deco Box
Devilcat
DOS Head Unit
Dreamcast PC
E.T.PC
Eden VAX
EdenStation IPX
Encyclomedia
Falcon-ITX
Florian
Frame
FS-RouterSwitch
G4 Cube PC
GasCan PC
Gingerbread
Gramaphone-ITX-HD
GTA-PC
Guitar PC
Guitar Workstation
Gumball PC
Hirschmann
HTPC
HTPC2
Humidor 64
Humidor CL
Humidor II
Humidor M
Humidor PC
Humidor V
I.C.E. Unit
i64XBOX
i-EPIA
iGrill
ITX Helmet
ITX TV
ITX-Laptop
Jeannie
Jukebox ITX
KiSA 444
K'nex ITX
Leela PC
Lego 0933 PC
Legobox
Log Cabin PC
Lunchbox PC
Mac-ITX
Manga Doll
Mantle Radio
Mediabox
Mega-ITX
Micro TV
Mini Falcon
Mini Mesh Box
Mini-Cluster
Mobile-BlackBox
Moo Cow Moo
Mr OMNI
NAS4Free
NESPC
OpenELEC
Osh Kosh
Pet ITX
Pictureframe PC
Playstation 2 PC
Playstation PC
Project NFF
PSU PC
Quiet Cubid
R2D2PC
Racing The Light
RadioSphere
Restomod TV
Robotica 2003
Rundfunker
SaturnPC
S-CUBE
SEGA-ITX
SpaceCase
SpacePanel
Spartan Bluebird
Spider Case
Supra-Server
Teddybear
Telefunken 2003
TERA-ITX
The Clock
ToAsTOr
Tortoise Beetle
Tux Server
Underwood No.5
Waffle Iron PC
Windows XP Box
Wraith SE/30
XBMC-ION