
Posted on March 13, 2004
|
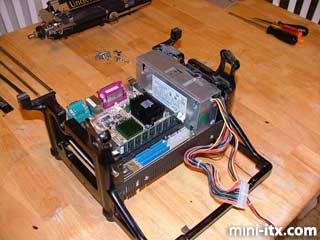
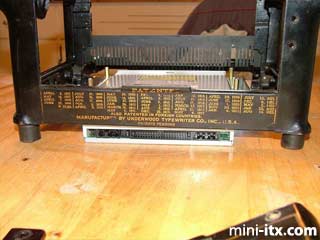
I attempted to fit the EPIA 5000 Mini-ITX motherboard and the micro power supply onto the baseplate. The computer store I work for builds small routers. We had recently purchased a number of mini small power supplies. I needed to notch part of the power supply in order to fit it into the Underwoods' interior. Both the motherboard and the power supply fit, with very little surplus space.
|
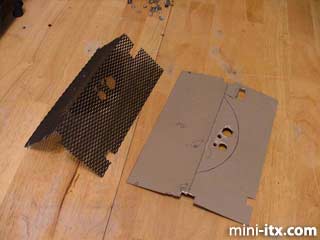
The template for the front panel was created from 1/8" cardboard. Holes were cut for the small amplifier and the ribbon colour selector switch (a, now, non-functional part on the front panel of the Underwood). The cardboard template was fitted. I was orginally going to use a piece of 1/8 plexiglass for the front panel, but wasn't able to find any. I then thought about using corrugated plastic, but found that it wasn't rigid enough. Part of my original design was to have a CD-RW drive in the front panel, however space restrictions did not allow for this to happen. My goal was to have the typewriter look as close to the original design as possible. Because the carriage of the Underwood is quite distictive, leaving it off of the frame was not an option. The CD-RW would have to be relocated. I visited the local recycling area and found a shelving unit comprised of 1/16 metal mesh screen that seemed to fit the bill. I chiseled out the appropriate spaces, for the small amplifier, and then folded the mesh. The mesh was painted with flat black acrylic paint and the areas, not covered by the front panel, were painted with high gloss acrylic.
|
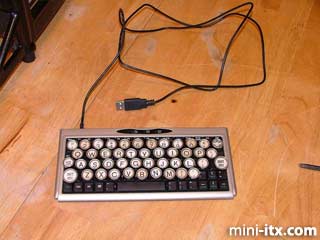
While the paint was drying, I removed the glass topped typewriter keys from the typebars. Each key needed to be hack-sawed from the typebar and then ground down. In order to test the keys, I used adhesive velcro. I wasn't sure if there would be enough space between the keys to permit the use of the old typewriter key tops. I really did not want to ruin a $70 keyboard with plastic weld. Thankfully, everything fit.
|
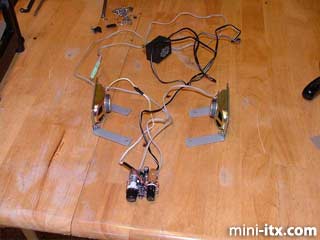
The "sound system" for the typewriter is comprised of a mini amplifier (3 watts) and two 5 watt speakers. The 9 volt power supply gives the mini amp its life.
|
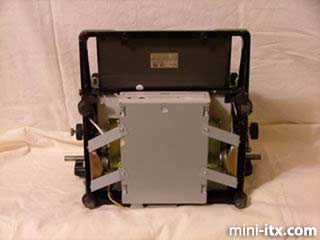
After a series of re-fittings, turnings, and another string of explitives, I found that it was somewhat possible to place the CD-RW drive on the bottom of the typewriter. Thankfully, the data and power cables would JUST fit. My plan was to suspend the CD-RW from the baseplate. Old internal slot covers were bent and then bolted to the underside of the CD-RW and then to the mounting holes of the speakers.
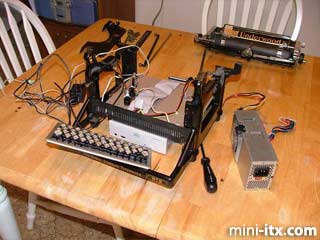
I bundled up the sound system, the CD-RW, and the power supply, and placed the frame overtop the hill of circuitry. This entire project had a very linear assembly procedure. Things had to be assembled in a very particular order. I felt as though I was playing an old Sierra adventure game (ie. King's Quest) when I was putting this computer mod together.
|
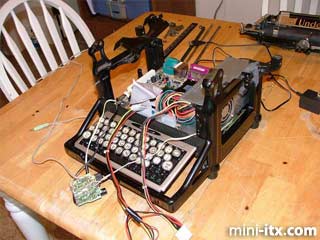
Here we can see the mess of wires. The CD-RW is suspended underneath the baseplate (underneath the keyboard, which can be tilted up to access the CD drive). The motherboard, power supply, and keyboard are in place. The mini amp, and all of its wiring, has been installed and everything is ready for the front panel.
 |
 |
 |
Quick Links
Mailing Lists:
Mini-ITX Store
Projects:
Show Random
Accordion-ITX
Aircraft Carrier
Ambulator 1
AMD Case
Ammo Box
Ammo Tux
AmmoLAN
amPC
Animal SNES
Atari 800 ITX
Attache Server
Aunt Hagar's Mini-ITX
Bantam PC
BBC ITX B
Bender PC
Biscuit Tin PC
Blue Plate
BlueBox
BMW PC
Borg Appliance
Briefcase PC
Bubbacomp
C1541 Disk Drive
C64 @ 933MHz
CardboardCube
CAUV 2008
CBM ITX-64
Coelacanth-PC
Cool Cube
Deco Box
Devilcat
DOS Head Unit
Dreamcast PC
E.T.PC
Eden VAX
EdenStation IPX
Encyclomedia
Falcon-ITX
Florian
Frame
FS-RouterSwitch
G4 Cube PC
GasCan PC
Gingerbread
Gramaphone-ITX-HD
GTA-PC
Guitar PC
Guitar Workstation
Gumball PC
Hirschmann
HTPC
HTPC2
Humidor 64
Humidor CL
Humidor II
Humidor M
Humidor PC
Humidor V
I.C.E. Unit
i64XBOX
i-EPIA
iGrill
ITX Helmet
ITX TV
ITX-Laptop
Jeannie
Jukebox ITX
KiSA 444
K'nex ITX
Leela PC
Lego 0933 PC
Legobox
Log Cabin PC
Lunchbox PC
Mac-ITX
Manga Doll
Mantle Radio
Mediabox
Mega-ITX
Micro TV
Mini Falcon
Mini Mesh Box
Mini-Cluster
Mobile-BlackBox
Moo Cow Moo
Mr OMNI
NAS4Free
NESPC
OpenELEC
Osh Kosh
Pet ITX
Pictureframe PC
Playstation 2 PC
Playstation PC
Project NFF
PSU PC
Quiet Cubid
R2D2PC
Racing The Light
RadioSphere
Restomod TV
Robotica 2003
Rundfunker
SaturnPC
S-CUBE
SEGA-ITX
SpaceCase
SpacePanel
Spartan Bluebird
Spider Case
Supra-Server
Teddybear
Telefunken 2003
TERA-ITX
The Clock
ToAsTOr
Tortoise Beetle
Tux Server
Underwood No.5
Waffle Iron PC
Windows XP Box
Wraith SE/30
XBMC-ION